
How Pro Filmmakers Gear Check Before Shooting
Let's look at how professional crew members gear check cinema cameras before shooting with them.

INTRODUCTION
If you’re new to filmmaking you may not know that prior to shooting, the technical crew always attends a gear check to carefully go through all of the equipment that will be used to shoot a film.
In this video I’ll explain why this is done, then take you through the entire process of how a cinema camera is gear checked, so that you can do it the same way as the pros on your next shoot.
WHY DO A GEAR CHECK?
While smaller corporate, documentary or solo shooter jobs may be done by cinematographers who own, rent and operate their own gear, most industry level jobs are shot with high end equipment which is rented from gear houses.
For commercials or short form content, crew is usually booked and paid for a half day to do a gear check at the rental house a day prior to shooting. While long form crew on features or series may be booked to do a few days, or even a week long, gear check that requires a greater degree of technical prep.
There are three main reasons why industry productions do gear checks.
The first and most important reason for a gear check is to ensure that all the equipment that is being rented is in proper working order and that the crew has all the necessary bits and pieces to make the gear package work. For example, you never want to just grab the gear the night before a shoot only to find out as you’re setting up to do the sunrise shot that you’re missing a cable that you need to power the focus motor. I’ve even seen, with my own eyes, an extra Alexa Mini LF, that wasn’t gear checked, brought straight onto a job only to find out that it was missing a sliding dovetail plate and couldn’t be rigged onto a car mount to do a sunrise driving shot.
The second reason to perform a gear check is to prevent accepting faulty or broken gear from the rental house. It’s much easier to immediately flag an issue with gear as you are testing it, than to report faulty gear to the rental house on set and then go through the blame game of when exactly the gear broke and who is responsible for fixing or replacing it.
The final reason is a bit of a rarity, but occasionally, in the event of an insurance claim related to faulty equipment, such as dead pixels on the sensor that spoil the footage, or problems from a film stock, the camera tests that were shot during the gear check may be reviewed by the insurance company or assessor.
GEAR CHECK
So, now that we know why it is so important to do a gear check prior to shooting, let’s go over how industry level crew perform a gear check from start to finish.
The easiest way to make sure that a cinema camera is working properly and that all the necessary accessories are there is to build the camera into the same configuration that it will be built into on set.
The focus puller will assemble the camera and attach all of the accessories, such as a lens, a mattebox, a focus motor, a monitor and a transmitter. They will build the camera into a neat form factor and make sure that all of the necessary accessories are getting power and are functioning properly.
Crew may need to get the floor workers at the gear house to get small bits and pieces of gear to make their build work, such as finding the right mattebox back or reduction ring for a unique lens, getting extra backup cables, or changing out the gear on a follow focus to a different pitch.
The VT operator will test to make sure that they are receiving a video feed to their station, and check that the focus puller is receiving a transmitted signal to the sidekick receiver that is going into their monitor.
If audio will be recorded on the job then the sound recordist will also check that their gear is working and that there is a transmitted audio feed which they can send to the director or clients. They may also rig something like a tentacle onto the camera which will keep the timecode in sync with their external recorder.
Over in another section of the gear house, the grips and electrical department will make sure their equipment is also in working order using the same idea of setting up, powering and testing the gear.
Now that the camera has been built into its shooting configuration, it’s time to start programming or marking up the lenses. The specifics of this will change depending on the kind of wireless focus handset the focus puller has, although the concept is the same - it even applies to old manual follow focus units.
Each cinema lens has markings on the barrel which indicate at what distance the lens will render sharp focus. The 1st AC will now sit and transcribe these markings from the barrel of the lens to the focus ring on their wireless unit.
Some lenses, such as the LDS Ultra Primes or the Cooke S8/i series, come with an LDS strip that sends metadata from the lens, including focus distance, to the camera. This means that when using these lenses with certain compatible focus handsets, they don’t need to be manually programmed as the focus distance will automatically display on the handset.
However, for most vintage lenses or incompatible handsets, the focus puller will need to manually program them. This is done by first calibrating the lens, so that the focus motors find an end stopping point for infinity and close focus. The focus puller will then systematically align each distance marking with the centre indicator mark. For example, it may start at infinity.
This distance can then be programmed into the handset so that the handset knows that for this lens, at this position on the focus motor, the reading is at infinity. This same method can also be done by manually marking old focus rings with a pen.
Once each lens in the set has been marked up, the 1st AC is now ready to shoot camera tests. A slate will be marked up with the name of the production, the date, the camera’s serial number, the lens’ focal distance and its serial number, as well as any other info that may be requested such as the stop, white balance or the focus distance.
The camera will be positioned in front of a focus chart. The 1st will measure the distance between the chart and the film plane of the camera and set the distance marking on the lens to that same measurement. They will check that the image is sharp - which it should be. If it’s not sharp then the lens may need to be sent off to the lens technician at the rental company for adjustment.
Before shooting the DIT will dial in the correct specs, such as resolution and codec, and any other settings specified by the cinematographer - such as a LUT or frame lines for the aspect ratio. They will then put in the slate with the relevant info and shoot a short clip for a couple of seconds to record that the lens was indeed sharp. They will repeat this process for every lens that will be used on the production. These tests are also a good way of checking that each lens will cover the full sensor and that there will be no vignetting, especially at wider focal lengths.
Sometimes, jobs that require VFX work will also ask for lens grids or distortion charts to be shot. These are especially necessary for anamorphic lenses or wider focal lengths that have a lot of curvature to how the image is captured.
Distortion charts have a straight black and white checker block pattern that can be used to measure the degree of distortion a lens has in post production, and then straighten, or unwarp, the image to make 3D tracking easier.
When shooting these tests it’s important to line up the camera to the centre of the chart and make sure that the chart is straight on all axes. Like with the focus tests, a front slate should be used to denote which lens is being shot as even the same brand and focal length lens in a different set may have minor differences in distortion.
Once all the tests have been shot, the card can be handed over to the DIT who will copy over the footage onto the prepared hard drives and examine the integrity of the tests to make sure that there aren’t any issues.
If there are specialised rigs on the job like a Steadicam, gimbal or remote head, then the camera needs to be built and tested for these setups. It’s important to ensure that the camera will be able to balance on these rigs. This might involve stripping the camera into a smaller form factor.
While all of this is going on, the 2nd AC will usually be working on labelling gear and organising it into cases. They will apply long strips of coloured gaffer tape onto the outside of the lens box and use a permanent marker to write down each focal length inside the box, its stop and its minimum focus distance. This makes it easy to identify the lenses you have and give quick information on the stop and MOD to the focus puller or cinematographer.
Long form jobs may involve a lot of labelling and organising of various other gear, such as filters, into the easiest manageable workflow. It’s a loader's job to be able to know and pull out every piece of gear that is on the job at a moment’s notice.
Finally, the camera may get packed into what’s called a coffin, or a standby box, that allows the camera to easily and safely be packed away without deconstructing the whole build.
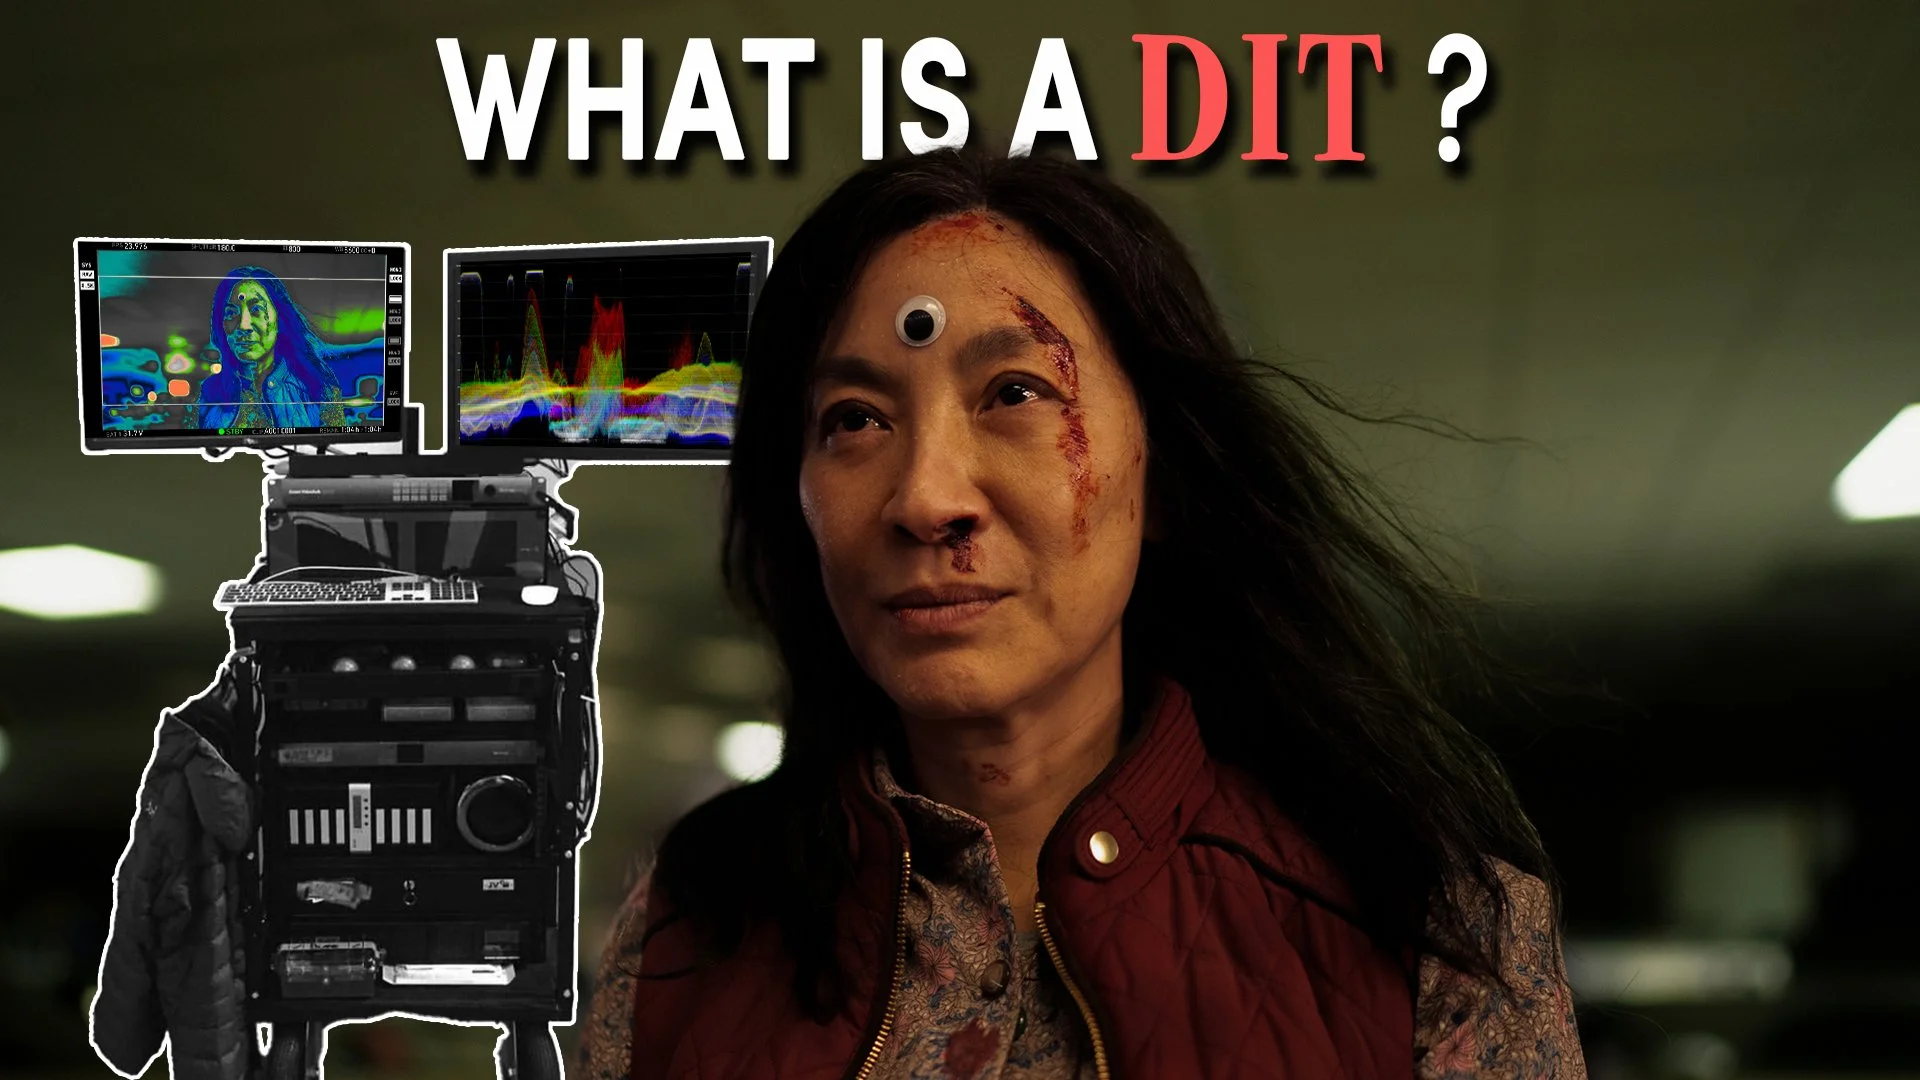
What A DIT Does On A Film Set
What exactly is a DIT? Let's find out.

INTRODUCTION
In the transition from shooting on film to working with digital cinema cameras, a new job appeared on movie sets - almost overnight. That job is the DIT or digital imaging technician.
You may not have heard of this crew member, but they are now indispensable on any industry level set. So, what exactly is a DIT and what do they do that makes their job so important? Let’s find out.
ROLE
The job of the DIT came about during the transition to shooting with digital cameras. Before then, exposed film stock would be passed on from the camera team to the film lab where it would be developed and later enter a post production workflow.
Shooting digitally suddenly meant that camera cards with footage on them needed to be transferred onto hard drives during shooting, and that digital footage needed to be prepped on set for post production.
This is because each card that a digital camera records onto contains a finite amount of recording space. For example, when shooting in open gate ARRIRAW on an Alexa 35, each 1TB card will be able to roll for 28 minutes before running out of space. If you get 3 cards in a camera kit, this means that after an hour and a half of roll time you will run out of recording space, unless DITs transfer the digital files from the cards onto hard drives.
There may be a bit of a misconception out there that this is all that a DIT does: dump footage onto hard drives and back it up. This is a better description for another crew member that may work for the DIT, a data wrangler. However, DITs on high end jobs do far more than just sit behind a computer in a van, well, at least they should.
Overall, the DIT acts as a connector between the on-set production and capture of the footage and how that footage is set up for post production.
They collaborate with the DP to correctly set up digital cameras and dial in the settings: such as the codec, resolution and frame rate. Some DPs also prefer that the DIT handles any setting changes that may happen during shooting, such as if they want to shoot at a high frame rate for a single shot, which means that the camera must drop down in resolution.
Importantly they also ensure, or oversee, the transfer of footage and metadata from camera cards onto hard drives. Once the footage has been secured they are responsible for quality control checking the integrity of it, by examining things like the sharpness of the focus, the exposure, the noise, any unusual colour tints or irregularities from filters, and to check for dead pixels, or any unwanted optical defects like lights strobing, or ghosting.
They will establish a file structure on the hard drives and come up with a workflow for that data where necessary. Depending on the needs of the project they may be tasked with preparing the files for post production so that the offline editor receives the drive with files that are ready to work with.
This may include doing transcodes or creating proxies from high resolution footage or syncing up the video with the sound clips on a timeline.
At the same time, DITs on big jobs often work on-set with the cinematographer to provide advice or manage how the images are captured, by ensuring that they are correctly exposed.
As such, DITs need to be versed both in the on-set camera side of capturing images, as well as in the post-production computer side of managing camera data and creating a workflow.
AVERAGE DAY ON SET
Before production begins, the DIT must attend the gear check. This is where the camera that will be used on the production is set up at the gear rental company and tested by the crew to make sure all is in working order.
The DIT will program the correct capture settings into the camera that they received from the cinematographer, such as resolution, RAW or ProRes, or adding the correct de-squeeze factor if using anamorphic lenses.
They will also add and overlay the frame lines for the final aspect ratio or ratios of the project, and, at the request of the DP may add a custom LUT - so that the image may be viewed with a specific look.
Once the camera is built, the focus puller will shoot a test roll of a camera chart on each lens that will be used on the job. The DIT will then transfer these tests to the drive, and carefully examine them to make sure the focus on each lens is sharp, that there are no unwanted aberrations and that the sensor is clean and free of any dead pixels.
They usually also shoot a black - where the camera rolls with the turret covering the mount - and a white - where a piece of paper is passed through the frame and recorded. This is a good way of checking the integrity of the sensor.
At the beginning of every shoot day, the first thing that they will do is to take the turret off the camera and physically check the sensor with their eyes to make sure there is no dust on it. If there is dirt on the sensor which may have been collected in between lens changes then it is the job of the DIT to very carefully dust it or clean it with a sensor swab.
A card will be loaded into the camera, they will double check that all the settings are correct and the camera is then ready for shooting.
On big jobs with multiple cameras, the DIT may be called upon by the cinematographer to help maintain a consistent exposure across all of the cameras. This usually involves getting a transmitted video image from each camera and using exposure tools such as a waveform and false colour to find an exposure that is consistent. They will then get the camera assistants to adjust the aperture or filtration on each camera until all exposures are uniform. Or they may use a remote iris control to adjust the aperture.
Once enough footage has been shot they will call on the 2nd AC to reload the camera. The AC will hand them the card with the footage on, they will head to the DIT van, and they, or their data wrangler, will immediately start transferring and backing up the footage to hard drives on a computer using software such as Silverstack - which uses checksum verification to make sure that all the files from the source get copied over to the correct destination on the drive without any missing files or duplication.
During this process they will check the clips on a monitor to make sure there are no optical or camera related issues with the files. If, for example, one shot was out of focus on every take, the DIT will quickly go to set and inform the focus puller or DP that there was an issue. They will then determine whether it is possible to re-shoot the shot.
Then, depending on what was requested from the person or company doing post production, they will prepare the drive for the edit. This usually means transcoding the footage to a lower resolution and codec that the offline editor can work with, making sure that the file names are the same and will correctly align again for the online edit.
Usually DPs will ask them to add a LUT to the proxy files. Some cinematographers will also ask the DIT to colour correct each clip that is transcoded so that they can be viewed in the edit with a look that will be as similar as possible to the final grade.
Once a card has been transferred and backed up onto at least two drives, the DIT will then return the card to the 2nd AC. Any card that they return means that the footage on it has been secured and it is safe to erase or format the card and start recording a new roll of footage over it.
TIPS
The worst fear of any DIT is that footage will get lost. It’s also probably the easiest way to get fired and never hired again.
That’s why good DITs have a system that they always stick to that ensures that no data is ever lost. This may be getting the loader to label and seal each exposed card with a roll number. The DIT can then put this sticker next to the card reader when the card is inserted and the footage is copied over, then take the label off the card and case once the footage has been copied and backed up.
That way, even if you are very busy, you’ll always know what footage needs to be copied and what footage has already been copied.
Some DITs also use software to do this, such as Parashoot. This software will detect when all the files from a card have been copied over and backed up. Once this card is handed back to the 2nd AC and loaded into the camera, a message will pop up on the screen asking if you’d like to erase the card. If this message pops up then the loader knows that the card has been backed up and is ready to format.
Another important skill for a DIT is to effectively manage the flow of cards. This may mean that they call for the camera to be reloaded early, before it is completely filled up, so that they can start copying and backing up the footage. If they let too many cards fill up without copying them over, then they may get into a situation where the production runs out of available cards to shoot on - another easy way of getting fired.
Another trick most DITs do, is to reload the camera after the first shot on day one is completed. They can then double check that there are no technical issues with the footage, before an entire card of shots gets filled up with unusable takes.
Being a DIT means that you need to always stay abreast of the newest technology. Most DITs have their own van, or cart, that they custom build into a mini post production studio with a computer, monitor, RAID and a UPS solution.
They always need to ensure that they have the necessary gear to deal with whatever camera is on the job. For example, if doing a shoot with two Alexa 65 cameras, you will need to have a lightning fast computer and hard drives to keep up with copying and processing the enormous data files.
Being able to calculate how much storage you need is another important skill for DITs to have. Hard drives are expensive, so you don’t want to overestimate your storage needs and get production to purchase lots of storage which isn’t used, but at the same time you never want to be in a position where you run out of space on the drives.
There’s a good tool on the Arri website where you can plug in the camera and settings you are using and it’ll spit out how much recording time you’ll get per card. This may be a good starting point for making this calculation.

How Cinematographers Set Their Exposure
Exposure is determined by six factors: the sensor’s sensitivity or ISO, the shutter speed, the lens’ aperture, the frame rate, ND filters and of course the overall amount of light in the scene that is being photographed. Let's take a look at how cinematographers expose.

WHAT IS EXPOSURE?
You’ve no doubt seen how some movies look darker than others. Comedies may be bright and colourful, while dramatic crime films may be dark and moody. This is, to a large part, determined by how cinematographers set their exposure: the level of brightness across a frame.
Although it may seem simple on the surface, being able to expose properly is one of the most crucial skills that every cinematographer needs.
Exposure is determined by six factors: the sensor’s sensitivity or ISO, the shutter speed, the lens’ aperture, the frame rate, ND filters and of course the overall amount of light in the scene that is being photographed. Before we talk about how to get to the correct exposure it’s important to be aware of a few terms.
The amount of light present in an image will almost never be completely even across the whole frame. Part of the job of the cinematographer is to use lighting to create different pockets of light and shadow in an image - called contrast. Sometimes that contrast might be light, other times it may be strong.
The difference between the brightest and darkest part of the image is called the contrast ratio. Traditionally in cinematography this refers to the difference in illumination between the brightness of the key light and brightness of the fill.
Similarly, a camera also has a threshold of how much of the difference between light and dark it can capture before the information turns to pure white or pure black. This is called dynamic range.
Modern digital cinema cameras usually have around 15 to 17 stops of dynamic range, while consumer video cameras may have less than 14 stops. This is one of the reasons that it may be more difficult to achieve a balanced exposure on cheaper cameras.
If the strength of the contrast ratio exceeds the dynamic range of the camera, then the image will either blow out - and turn to pure white - or it will get crushed - and turn to pure black.
Usually cinematographers like to light scenes so that the total exposure falls within the dynamic range of the camera. In other words, they like to create images in which the highlights do not blow out, and in which the shadows are not completely crushed. In a similar way to how the human eye perceives brightness in the real world.
HOW TO FIND THE RIGHT EXPOSURE?
So, we know what exposure is, but how do we find the right exposure using a camera?
Cinematographers, or sometimes the DIT, regularly use different tools to determine the best exposure - which we’ll get to a bit later. But good exposure on digital cameras can also be achieved just by referring to the image on the monitor.
The thing is, what is considered a ‘good’ exposure is a bit subjective. For example, The Batman is lit and exposed at a very low level of illumination, while a comedy like Palm Springs exposes at a much brighter level. I’d say this lower level of exposure helps to accentuate the moody, emotionally dark tone in Batman, while the brighter exposure is, literally, lighter, and brighter in tone.
It doesn’t necessarily mean an image is bad, or incorrectly exposed if a small part of the frame is blown out, or crushed to black. As long as its exposure suits the tone of the story and the environment being photographed.
Although exposure is subjective, most cinematographers still try to avoid one thing - blowing out highlights to pure white. There are always exceptions to this rule and situations where this might be impossible to avoid, but for the most part a good rule of thumb with exposure is to try to set it so that any large, bright part of the frame maintains detail.
This is called exposing for, or protecting, the highlights.
Cinematographers using this technique will first dial down the exposure to the point where the brightest highlights still preserve colour information. This may mean that other areas of the image are now too dark.
To counteract this, DPs may then add light - using artificial sources - to lift up the brightness of the shadows until there is detail present.
They may also use lighting to bring down the levels of any highlights to an acceptable level, for example using a dimmer on a practical lamp, or adding an ND gel or a net to a window.
That’s why the best way to control the contrast ratio in an image is usually by lighting.
Sometimes cinematographers may be forced to blow out bright highlights that they can’t control which take up a small portion of the image, such as windows, flames or practical fixtures.
As a side note, film stocks tend to deal with overexposure of highlights better than digital cameras do. Film gives more of a soft halation, a gradual fall off and renders highlights in a creamier colour, as opposed to the uglier, pure white of digital.
However, there are ways to counteract blown digital highlights, both in the grade, as well as by trying to introduce a softer highlight rolloff using diffusion filters.
EXPOSURE TOOLS
Although exposing by just looking at the monitor is popular, it also comes with a few downsides. The first of which is that, unless you’re working with a specially calibrated monitor, every screen produces a different level of brightness and represents colours and exposure values in different ways. This could trick you into exposing incorrectly.
Light conditions on set may also affect how you see exposure. Even if you’re working with an older monitor like a TV Logic 056, which has lovely, accurate colours, your exposure may still be off as the monitor has a very dim picture brightness in outdoor situations.
To avoid making exposure mistakes, cinematographers either use physical tools, like a light meter, or digital software tools built into the camera such as a waveform or false colour - which is the most common exposure tool on high end cinema cameras from Arri and Red.
When activated, false colour displays images on a monitor in a specific colour spectrum - ranging from a warm red, to a cool purple or dark blue - with green sitting somewhere in the middle. Each colour represents an IRE value - a measure of brightness on a scale of 0 - being complete black - to 100 being complete white.
Cinematographers can use false colour to check that their highlights aren’t red and blowing out and that their shadows aren’t purple and getting crushed to black. People often recommend that to get perfect skin tones you should expose to where the skin tones turns green or a light grey on the false colour reading.
However, as I mentioned before, some cinematographers may want to disregard this and expose darker in the dark grey to blue range to achieve a moodier feel.
Another useful exposure tool to understand is the waveform. This is made up of a vertical axis that expresses exposure in IRE values from 0 to 100 and a horizontal axis that represents the width of the frame.
For example if there is one bright highlight in the centre of the image it will be represented by a spike in IRE value in the centre of the waveform.
Like with false colour, a waveform can also be consulted to see whether areas of the image are exceeding 100 IRE and blowing out, or sitting on 0 IRE and getting crushed.
Usually when consulting a monitor for exposure it’s good to use a LUT to expose with rather than looking at the log image. Because a log image is so flat it may be easy to under or overexpose it, while still seeing detail in the log. But later in post production you may find that when you add a LUT or grade it that it is under or over exposed and doesn’t have enough detail to work with.
CONTROLLING EXPOSURE
As I mentioned before, there are six exposure variables. Each of these variables can be manipulated to arrive at an acceptable exposure, however, some of these variables also have other effects on the image.
For example frame rate changes the speed at which motion is captured, the shutter angle changes how blurry that motion is, the ISO affects how grainy or noisy the image is, and the aperture affects to what extent the background is out of focus.
For this reason, many cinematographers maintain the same or a similar frame rate, shutter, aperture and ISO throughout a project and change the other two variables - the amount of light on a set and the strength of the ND filter - to control exposure.
ND or neutral density filters are made up of glass which reduces the amount of light that hits the sensor without changing the colour characteristics of that light.
When lighting a scene it’s important to ensure that there is enough light to properly expose the image. Rather have too much light than too little light. You can always cut down the amount of light by using ND filters, but if a space is too dark you can’t get a brighter exposure without increasing the amount of grain or noise by lifting the camera’s sensitivity.
The best way to go about controlling your exposure with a cinema camera is to first ensure your ISO, shutter and frame rate are correctly dialled in. Then stop down the aperture on the lens until you arrive at an exposure which you like. This may leave the lens at a stop of, for example T/ 8.
Next, you need to determine what stop or aperture you would like to shoot at. For example maybe you’d like to shoot at T/ 2 to get a shallow depth of field.
You then need to calculate the difference in stops between T/8 and T/2 - one, two, three, four. This means you need to add four stops of ND to get to a shooting aperture of T/2.
Each stop of ND filter is measured in increments of 0.3. So four stops of ND would be ND 1.2. This means you can add an ND 1.2 either with internal ND filters or with external glass ND filters in a mattebox and set the lens to T/2.
You now have the correct exposure, while also having your desired aperture of T/2 that produces a beautiful, shallow depth of field.

Cinematography Style: Polly Morgan
Polly Morgan’s work as a cinematographer lies at the intersection between naturalism and traditionalism. Her work is fueled by capturing an expression of human experiences while at the same time often embracing a more traditionally cinematic style of working. Let's unpack her work further in this edition of Cinematography Style.

INTRODUCTION
“Stories that really excite me are the stories that are really representative of the human experience. The pain and the suffering or the joy and the love and all of these things that we all go through as people.”
Polly Morgan’s work as a cinematographer lies at the intersection between naturalism and traditionalism. Her work is fueled by capturing an expression of human experiences while at the same time often embracing a more traditionally cinematic style of working.
This video will unpack this further by going over how she got her start in the industry, looking at her philosophy on capturing images and breaking down some of the gear which she has used to do so.
BACKGROUND
“As a young girl I was always just a massive fan of movies. When I was 13 I was lucky enough to experience a film crew come onto our farm house and using it as base camp. You know, they let me look through the camera and it was really then that my love of cinematography was born.”
To turn this early dream into a reality took some time and a lot of work. After getting a Bachelor of Arts in broadcasting where she got hands-on experience with operating cameras, she spent about 10 years working in film as a crew member.
One of her early jobs in the industry was working as a production assistant for RSA, Ridley Scott’s commercial production company. After putting in time as a PA she worked as a camera trainee and then moved up to working as a loader. As an assistant she worked on some big studio films, such as Inception, and worked for many well known DPs such as Haris Zambarloukos, Wally Pfister and Dan Mindel.
This experience allowed her to study at the AFI Conservatory, after which she was able to launch into a career as a cinematographer - first shooting independent movies, before progressively shooting larger studio films.
PHILOSOPHY
When she starts a new project she’ll work closely with the director in pre-production to determine the emotional arc of the story, and then find a visual camera language that is representative of that story and the characters in it.
Her goal, along with the director she is collaborating with, is to craft a look that embodies a feeling. A look that supports the story so well that it becomes invisible to the audience, to the point that they are unaware that their emotions and impressions of the story are being manipulated by the camerawork.
“The one thing about cinematography is you don’t want the viewer to be aware of it. You don’t want someone to watch a film and say, ‘uh, the film was terrible but wow that cinematography.’ Because my job is to serve the story. My job is not to make beautiful imagery. If you’re telling a story how do you want the viewer to feel?”
This look and feeling that she creates may be different depending on what the subject matter and genre she is working on is. Suspenseful horror may involve a more creeping movement and a darkly exposed image, whereas a lighthearted comedy will have a brighter colour palette, lighter exposure and a more stable camera.
Perhaps her ability to alternate between different techniques and working styles comes from her diverse filmography.
“I think I’ve been incredibly fortunate in that I managed to shoot commercials, TV, feature films and documentaries. It means that you’re working with a variety of budgets and you’re working with a variety of crew size and a variety of time.”
Although she is capable of changing the look of the cinematography to suit the story, I feel like at the core of her look she balances naturalistic feeling techniques - such as using natural, soft light and handheld movement - with more traditional, conventional, classical techniques - like using longer focal lengths for close ups, smooth cinematic movement or using a blue-ish moonlight and haze look for night exteriors.
In this way she goes between using newer school techniques and more traditional techniques to tell stories.
So much of the role of the DP involves focusing on the technical side of creating images, but an equally important part which she focuses on is how she manages people to get the most from her crew and create the right on set environment.
“It takes a crew of people to make a film. It’s not just being an artist. You also have to be a manager and you have to be a leader. It’s just a juggle of, like, how to get the best out of people. How to be, sort of like, a collaborator and how to be a mediator. If people see the people that they are working for get stressed out or lose their cool, I think then it really creates an atmosphere which is not a conducive one to do good work.”
GEAR
Since I keep mentioning how she contrasts naturalistic techniques with more traditional ones - let me break this down a bit by defining some examples of how, and with what gear, she does this.
Let’s look at her lighting, starting with the naturalistic side. Ambient light which is not from artificially created human fixtures, tends to be quite a soft source of illumination. Natural sunlight often bounces off various objects, like walls, grass, or even the moon. Because bounced light is less direct, it is softer. Therefore she often uses softer, diffused or bounced sources of light to create a naturalistic feel.
“A more modern approach to lighting has been softer light. Now that we have more sensitive cameras and we don’t have to worry like they did 100 years ago on very slow film stocks, we don’t have to light with very strong, hard light.”
An example of her using a more sensitive camera can be found in 6 Balloons, which she shot on the Panasonic Varicam 35 - one of the earliest high end cinema cameras to feature a dual base ISO that went up to 5,000.
Having such a sensitive camera meant that she could use minimal lighting for night scenes on the street to achieve a more realistic look - which felt the real world light sources as they passed. For car driving scenes, which were shot on a process trailer, she accentuated the natural light by rigging RGB Arri Skypanels on the trailer outside the car to create the look of stop lights.
For other films she’s also leaned heavily into a soft, diffused, more neutral, natural, pretty ambient light look - especially for day exteriors. She’s flipped this convention in other stories, by lighting scenes using a more traditional, old school convention - blue backlit moonlight with haze.
On A Quiet Place II, she shot on a far less sensitive Kodak 500T film stock, which she rated at 400 ISO. Shooting at 400 ISO, compared to 5,000 meant that she needed much more light to expose the image properly. She used a combination of large HMI units and the high output LED Skypanel 360 - which she brought to a colour temperature of 4,400K. When shot with the 3,200K film stock it produced a cool, blue look.
In a traditional, old Hollywood style, she backlit the actors with these hard sources, so that the lights were facing towards the camera. This subtly lifts the background and leaves characters in silhouette, illuminated by an edgy highlight. She then added haze, which accentuates the light source and raises the exposure of the midtones in the background - when the smoke is hit by light.
This technique of creating a cool moonlight is quite a conventional way of lighting night exteriors. Even on other movies which she’s shot digitally, such as The Woman King, she’s repeated this technique.
So her lighting of night scenes is one way that she has contrasted more naturalistic photography with a more conventional approach. Another technique is how she uses camera movement. The films that she shoots often have a rougher, on the shoulder, handheld movement which track the character with a more documentary-esque feeling of naturalism.
She contrasts this with smooth, fluid, camera moves done on dollies, Steadicam or a Technocrane which are more conventionally cinematic.
When it comes to choosing a camera, she’s opted for both film and digital acquisition before. She’s used film cameras, such Panavision’s Millennium XL2, with Kodak 250D and 500T stocks. However, she mainly uses digital cameras. Some examples include Panavision’s DXL2, the Alexa 65, Mini and Mini LF and Panasonic’s Varicam 35.
Likewise she’s used both anamorphic lenses, like the T-Series and Cooke Xtal Express, and spherical lenses, like the Panavision Primo 70s and the Zeiss Super Speeds.
She’s often drawn to Panavision glass and even shot Where The Crawdads Sing on unreleased prototype large format spherical lenses made by Panavision which had imperfections, focus falloff and a softness to them which are reminiscent of anamorphic glass - again, evoking a more textured, organic, naturalistic feeling.
While, at the same time, she often uses longer focal length lenses for close ups, another more traditional technique.

Netflix Approved Cinema Cameras
If you want to shoot original content for Netflix then you have to do it with one of their approved cinema cameras. Why exactly is this and what cameras are approved?

INTRODUCTION
The age of digital streaming has brought about many changes and has for the most part shifted the movie experience from the cinema to the couch. Perhaps the largest and most influential player in this space is Netflix. If you want to shoot original content for them you have to do it with one of their approved cinema cameras. Why exactly is this and what cameras are approved? Well, let’s find out.
WHY NETFLIX APPROVES CAMERAS
If you go to Netflix’s website, the official reason that they give for mandating their list of approved cameras is “to help creatives produce their best work and create compelling visual experiences for our audience.”
Although this is a pretty general statement, they do go on to say that some of the image capture benchmarks that they take into account when approving a camera include: a high dynamic range, colour accuracy, detail rendition, low grain and high resolution.
For Netflix authorised fiction, 90% of the footage must have been captured on one of their approved cameras. That leaves a 10% gap for footage that may be needed from specialty cameras, such as smartphones, high frame rate cameras, drones, or action cameras.
For non-fiction content they are a little bit more flexible with this ratio and may allow, for example, more than 10% of the footage to be shot with non-approved cameras, such as when using old stock footage in documentaries.
An interesting question however is whether things like higher resolution truly do provide, in their words, “a compelling visual experience” or a visual experience which best suits the story.
Some of the shows on Netflix with the highest numbers of streams, were in fact not original content, and were therefore quite often captured on cameras which don’t come close to Netflix’s image capture benchmarks of today.
For example, if The Office, the highest streamed TV show on the platform in 2020, was pitched to Netflix today it would have to be captured with a far cleaner, higher resolution, larger sensor, low noise look, which would go against the intended fly-on-the-wall, TV broadcast, 1080p video look of the show.
It should be noted that Netflix’s regulations about approved cameras only apply to newly filmed, Netflix original content. Acquisition of older content is not bound to their image capture benchmarks.
CAMERA SPEC REQUIREMENTS
Let’s dive further into the specific minimum capture requirements that all Netflix approved cameras need to adhere to.
The first, and probably most important minimum requirement that Netflix sets is resolution. Netflix originals need to be captured by a camera in a resolution of at least 3840 horizontal photosites - also called 4K UHD.
One of the reasons I imagine they created this resolution requirement was so that they could offer a dedicated Premium price tier, different from their Standard Full HD tier, which allows users to stream in 4K UHD.
When this resolution requirement was first introduced a number of years ago, it controversially cut out most Arri cameras from approval, including the most popular cinema camera of the time, the Alexa Mini - which has 3424 horizontal photosites - just short of the 3840 that are required.
Since then, Arri has released a few cameras capable of recording at Netflix’s required resolution - which we’ll get into later.
Netflix approved cameras need to be able to capture using either a lightly compressed or uncompressed RAW codec, or an Intra Frame 4:2:2 codec, capable of 10-bit or greater recording with a data rate at or above 240 Mbps in a wide or log scene-referred colour space.
These requirements ensure that cameras capture a good level of colour and information which can be worked with intensively in post-production. Most high-end cinema cameras stand up to these image standards - but it does eliminate some smaller mirrorless cameras - such as the Sony A7 III - which only does 8-bit 4:2:0 internal recording.
Finally, Netflix requires that approved cameras are capable of jamming timecode to an external source and recording that timecode as metadata. This is mainly used for synchronising sound in post-production which is captured on location with an external recorder.
Again, this eliminates many smaller body cameras, such as the Sony A7s III, which can’t jam or write timecode as metadata.
It’s also possible to shoot on film - which will involve some technical coordination with Netflix - and usually means scanning the film negative at a 4K resolution to comply with their UHD standards.
NETFLIX APPROVED CAMERAS
Since there is quite a long list of Netflix approved cameras to choose from I’ll just be highlighting some of the most popular ones, breaking them into two camps: documentary and lower end cinema cameras and high end cinema cameras. If you’d like to review all the approved cameras you can do so on Netflix’s website.
Starting at the lower end is Panasonic’s S1H, the only camera on the list with an SLR style body that takes both stills and video. This sits at a similar level as Canon’s C70 and Sony’s FX3, which both make the list, occupying the positions of being affordable Netflix approved options that come in a small form factor.
These cameras are great as B or C cams where they may accompany a higher end A camera. Their smaller size and light weight also means they can be rigged into tight or less accessible spaces.
When it comes to observational documentaries, the choice of camera often boils down to a decision between Canon or Sony. Sony’s cheaper FX6 and more expensive FX9 are both approved and take up Sony’s prime spots for single operator documentary cameras. Older Sony models like the FS7, F55 and some broadcast cameras also make the list.
The main Canon single shooter documentary competitor is the C300 - with both the mark two and mark three making an appearance. While the C500 and C700 come in at a higher price point.
Alternatives in this single operator, midrange budget level include Blackmagic’s Ursa Mini and Ursa Mini Pro, as well as Panasonic’s lower budget EVA1 and their higher budget Varicam LT.
Finally, we get into the high end cinema camera range. These cameras are used to shoot the majority of Netflix’s series, movies and high end documentaries. This category is dominated by Red, Panavision - which is basically a repackaged Red sensor, Sony and Arri.
Earlier I mentioned that when these approval guidelines were first released, most Arri cameras were excluded due to their inability, or rather lack of interest, in recording at high resolutions. It was only their 6K, 65mm format Alexa 65 which made the cut - albeit at a very high budget point.
To address this, they have since added three other 4K capable, Netflix approved cameras to their lineup: the large format Alexa LF, the smaller body version the Mini LF and their recent Super35 camera, the Alexa 35. All of which can be used for both regular spherical and anamorphic capture.
Arri’s early exclusion meant that Red, with their focus on high resolution, dominated the early days of the streaming service. Although much of that early dominance has been eroded in recent years, Reds are still popular cameras of choice for original Netflix productions.
They have loads of camera and sensor variations that are approved - most of which are capable of anamorphic capture. Some of the most popular are the full frame, 8K Monstro, their Super35 Dragon and Helium cameras, the newer body Red Ranger, and their little, low price point Red Komodo.
Panavision also offers the DXL2 which takes the Red Monstro sensor and places it in a more traditional studio style cinema camera body with great ergonomics.
The final high end competitor is Sony, with their Venice and Venice 2 which are approved for spherical and anamorphic capture. This has been a great product for Sony which has won them a lot of market share in this high end cinema camera category.
ASPECT RATIO REQUIREMENTS
So we know that Netflix original content requires using a camera capable of capturing at least 4K UHD. But, what happens after filming is completed and the final files need to be delivered to Netflix?
The first thing to be aware of is aspect ratio. This is displayed as the value of a file’s width in relation to its height. The easiest way to get to this ratio is to divide the number of pixels that make up the width by the number of pixels that make up the height.
So if we take video captured in Netflix’s desired 3840x2160 resolution, we divide 3840 by 2160. This equals 1.78. Therefore it has an aspect ratio of 1.78:1.
All original Netflix content needs to be delivered in 4K UHD in a container aspect ratio of 1.78:1 otherwise called 16:9 - so 3840 pixels by 2160 pixels. This doesn’t however mean that aspect ratios besides 16:9 can’t be used.
Netflix supports a host of different established active picture aspect ratios, such as 1.33, 1.78, 1.85 and 2.39:1. These ratios are a creative choice made by filmmakers.
When productions choose an active picture aspect ratio different from the container aspect ratio of 1.78:1, there will be black matte bars on either the sides, called pillar boxes, or on the top and bottom, called letter boxes.
So, the total video file including the black bars are called the container ratio - which is 1.78:1 and 3840x2160.
While the part of the file that isn’t black and displays only the filmed content is called the active picture aspect ratio - which could be for example 1.33:1 and 2880x2160 or 2.39:1 and 3840x1610.
Some content, like that which was not filmed on 4K UHD capable cameras, must still be delivered to Netflix in a 1.78:1 container ratio, but at a lower 1920x1080 resolution.

How To Build A Career As A Cinematographer
On a film set with tens or even hundreds of crew members, there is only one head of department role of director of photography. In this competitive environment what are some of the ways that you can increase your chances of landing this job and sustaining a career as a DP?

IT’S NOT AS EASY AS IT SEEMS
Every job is impacted by the nature of supply and demand. Each year film schools pump out a ton of graduates who leave with expectations that they’ll go straight into getting a job as a cinematographer on movies. However, what isn’t always mentioned is that these jobs are in very high demand, with an oversupply of people vying for them.
On a film set with tens or even hundreds of crew members, there is only one head of department role of director of photography. So, in this competitive environment, what are some of the ways that you can increase your chances of landing this job, and sustaining a career as a DP?
STARTED FROM THE BOTTOM
The reason it’s difficult to give generic advice on this topic is that there is no single, straightforward path that will lead you to guaranteed success in the film industry.
When you talk to different DPs you’ll quickly find out that each of them kickstarted their careers in different ways. I know some who began working as a still photographer and then transitioned to shooting moving images, others went to film school and built a network of collaborators there, while some did it the old fashioned way and worked their way up through different crew positions over years or even decades.
That isn’t to say that there aren’t some commonly identifiable paths that are regularly taken by many to build a career as a cinematographer. The most traditional path, that usually also takes the longest, is to build up on set experience by working in different crew roles.
Although there is only one job of director of photography on a set, there are far more other roles available in the production, camera, electrical and grip department. Playing the numbers game by trying to land any crew role that you can is a good way of getting on to a set.
“I always wanted to light and to shoot. I started out working at rental houses, fixing up equipment for various shoots. I was a trainee and then I was out loading, yeah. I launched myself into my career at that end. You know I was a clapper loader for four or five years. I did a period as a focus puller. It was a slow progression but a very rewarding one.” - Ben Davis, Cinematographer
Very rarely do people in the film industry become DPs overnight. More often than not it takes years to build a career.
This trajectory is kind of like a standard career where you work for a company and then progressively get promoted up the ranks over time until you land an executive job.
However, as you'll be a freelance worker, the onus is on you to gather up skills, and then, when you are able to, push to move to a higher up crew position and cease taking on jobs in your previous position. By being on set you’re not only being exposed to the more obvious things like gear, how to build and operate a camera, how to light and how a dolly works.
You’re also learning the nuances of how a film set operates: how people interact, the slang and words for certain things, what crew you want to work with, the structure and conventions of how shots are set up and executed and how to adapt your mind and body to a sometimes stressful work environment.
In this way, starting from the bottom and working up provides a valid platform to kick start a career.
FILM SCHOOL
Although getting a job as a DP often takes a long time to happen, there are always a few cases where people are able to work as a cinematographer at a fairly young age. More often than not this is achieved by film school graduates.
“It’s so much about who you meet and the work that you put out there right up front. And I think I was fortunate enough to go to AFI and there be an amazing group of students that we continued to stay friends and, you know, my classmates would recommend me and I was able to meet some really influential people. You know I’d do a small project, maybe like a fashion film. Stuff like that. And then you start to build my reel.” - Autumn Durald Arkapaw, Cinematographer
A key component of working in the film industry is building up a network of contacts and collaborators who you can work with. For DPs this means forging bonds with directors and producers who will hire them.
Probably the easiest way to quickly build up a network of collaborators is through attending a film school where you’ll all be put in the same class and forced to work together on different projects.
Graduates leave film school with a network of like minded collaborators who may employ them in the future.
The second part to early success in this equation is building a body of work. Shooting something which gains traction online, or which gets accolades at a film festival is the best way of promoting yourself and will encourage new directors to reach out to you.
SHOOTING YOUR WAY UP
“I ended up being a news cameraman through desperation. I was broke, living in England and I did know how to use a camera. In fact the first job that I got was as a news sound man and I pleaded with them and said, ‘You know, I can shoot.’ The Falklands War occurred and they were desperate for cameramen so they gave me a camera and I was given 10 years as a news cameraman to make every possible mistake you can make.” - Sean Bobbitt, Cinematographer
Another way of building up your skillset as a camera person - outside of attending film school or working on an industry set - is to find jobs where you shoot in whatever scenario you can. This may be shooting weddings, no budget music videos, your own documentaries or landing a job in TV.
As much as you can build up theoretical knowledge by studying or watching videos online, the real training ground is actually shooting. There’s a big gap between knowing how to expose and operate a camera and being a director of photography. One of the reasons that it’s rare to find super young DPs shooting high end work is purely because you need lots of time behind the camera to sharpen your skills and build experience.
Although I think those three paths of working as crew on a set, attending film school and shooting smaller films are probably the three most common ways of building a career as a DP, they are of course not mutually exclusive. Most cinematographers will do some if not all of these things in the early stages of their careers.
PATH TO SUCCESS
With those jumping off points out of the way, let’s go over six tips, or areas of advice that I’ve focused on and found useful when building my career - which is still a bit of a work in progress by the way.
One, it’s important to know the kind of lifestyle that working in film comes with and you should prepare to set yourself up for that. Working in the film industry means that you will be employed on a freelance basis. You must be happy with the risk of not having a guaranteed salary. This means that in the beginning you may get called up for a job the night before it happens.
Therefore creating a life for yourself that ensures as much flexibility in your schedule as possible, so that you can take any opportunities that arise, is necessary.
In the beginning this may also mean finding another freelance or flexible source of employment income that will cover your expenses when there is a lull in film work.
Two, it’s important to have a clear goal and sense of direction. Being a cinematographer means being a specialist, not a generalist. Do you mainly want to shoot narrative films, documentaries, or commercial work? Or a step further, do you want to shoot car commercials, beauty commercials or food commercials? Even though you may need to take any job you can get in the beginning, try and focus on identifying and working towards your niche as soon as you can.
Three, time. Perhaps it’s because it’s not in a film school’s interest to sink dreams, but you need to prepare yourself for the fact that to become an industry level DP will take time. This may take less time for some than for others, but nonetheless you should be aware that you are setting a long term career goal, which likely won’t happen in a couple months or even a couple years.
Four, be proactive. Since you’ll be self employed, it’s on you to be proactive about seeking opportunities, reaching out to collaborators or mentors, being open to doing free work, shooting passion projects or finding an agent. You need to put yourself in the right environment for opportunities to present themselves.
Five, you will get hired based on your reputation. It’s pretty obvious, but important, to remember that however you act on set, and whatever work you produce will be what gets you hired on the next job. Film industry circles are usually pretty small, where many people know each other and rely on word of mouth references for crew. If you have a reputation for being good to work with and a reel to back that up, you’ll get more jobs in the future.
Finally, six, always get better. As you build a career you are building three things: your skills and experience, your network of contacts, and your reel. I personally have found documentaries to be a great training ground for improving my speed, awareness of light, framing and a host of other skills. You should constantly be building all three so that when an opportunity does present itself you are in the best possible position to take it.

Shutter Angle In Cinematography Explained
Let's unpack what shutter angle is, explain the differences between shutter angle and shutter speed and then look at some examples from movies that have used the shutter to create interesting visual effects.

INTRODUCTION
One of the key things that makes cinematography different from photography, painting or illustration is, of course, that cinematographic images create an illusion of movement.
How smooth, or jerky this motion appears when captured is dependent on the important camera setting of shutter angle or shutter speed. Let’s use this video to unpack what shutter angle is, explain the differences between shutter angle and shutter speed and then look at some examples from movies that have used the shutter to create interesting visual effects.
WHAT IS SHUTTER ANGLE?
A useful exercise is to think of a filmed clip not as one glob of video, but rather as a series of individual photographs, or frames, that are played back fast enough to create an illusion of motion.
Shutter angle controls how much motion blur there is in a single frame. An angle of 360 degrees will create more of a streaky blur when a character moves, while an angle of 45 degrees will create a sharper, crisper, stuttering image. But what exactly is a shutter angle and how do we arrive at those numbers?
Inside old film cameras, an image is created when light passes through a lens and hits a frame of film. In between the lens and the film there is a rotating circular disk which is called a shutter that determines how much light is let through.
Usually these old film camera shutters could be mechanically opened up to different angles from around 11 degrees to a maximum of 180 degrees. Modern digital cinema cameras however are capable of digitally dialling in specific shutter angles all the way up to 360 degrees.
The amount that this circular shutter is solid and blocks light versus open and lets light in is called the shutter angle.
For example, if the shutter is set to 45 degrees it means that it is open for 45 degrees of the 360 degree circle and closed for 315 degrees. Light will hit and expose each piece of film only when it passes through the small open portion of the 45 degree shutter. This small exposure time means that a miniscule moment is frozen in every frame, which means the image will have less motion blur. Therefore, when multiple frames captured with a 45 degree shutter that all look sharp and crisp are played back it gives a stuttering effect and renders small moving details sharply.
For an opposing, theoretical example let’s imagine we could open the shutter up all the way to 360 degrees. This would mean each frame is exposed for much longer and therefore this shutter angle would let through more light. Because the exposure time is much longer, there is a greater period to capture movement, which means each frame will have more motion blur. Therefore when multiple frames captured with a 360 degree shutter are played back it gives a burred, lagging feeling to movement and renders small moving details with a hazy smoothness.
Both of these shutter angles are generally considered to give an exaggerated appearance of motion that is unnatural - one that is overly choppy and one that is overly blurry.
The middleground is a 180 degree shutter. This is widely considered to be the default shutter angle setting on a camera as it produces motion which looks most natural to the human eye. The vast majority of movies that you watch will use a 180 degree shutter for most scenes.
Many digital video cameras come with the ability to adjust their shutter, however this isn’t done by changing a physical mechanical shutter like on older film cameras. This adjustment is instead done by changing the amount of time that the digital sensor collects light for each frame which is captured.
So to sum this up, a smaller shutter angle means less light will hit the film plane, and that images will be sharper and appear more choppy and stuttering when played back. While a larger shutter angle means more light will be let through, images will be more blurred and will have a smoother motion when played back.
SHUTTER SPEED VS SHUTTER ANGLE
If you use a broadcast or consumer video camera rather than a cinema camera, the measurement of the shutter will likely be displayed as a shutter speed rather than a shutter angle. Shutter speed is rooted in the same fundamental concepts as shutter angle but with a few small differences.
Instead of being displayed as the angle of the shutter that blocks the light, it is displayed as the amount of time that each individual frame is exposed to light for.
A good rule of thumb to get to an equivalent 180 degree shutter angle is to take the frame rate that you are shooting at, for example 25 frames per second, and double it - so a shutter speed of 1/50th of a second.
This is the reason that tutorial videos talking about camera settings will advise you to use a 50th of a second shutter speed on DSLR or mirrorless cameras.
The issue with using shutter speed, and why it isn’t used on high end cinema cameras, is because it requires you to do slightly clunky calculations about shutter speed every time you want to change the frame rate on the camera.
Many cinematographers want to maintain the same feeling of normal motion blur by using a 180 degree shutter angle across the whole project. On cinema cameras you can set it to 180 degrees and leave it there, so that whether you are shooting at 24, 33, or 200 frames per second, you will always have the same shutter angle that produces the same feeling of motion blur. However if you’re using shutter speed and you want to maintain the same 180 degree shutter angle then you need to perform a calculation and change the shutter speed setting every time that you want to shoot at a different frame rate.
If you’re shooting at 24 frames per second and want a 180 degree shutter angle, the shutter speed must be doubled, or set to 1/48. If you change to shoot 60 frames per second then you need to change the shutter speed to 1/120. At 200 frames per second your shutter needs to be 1/400th of a second.
Using shutter angle eliminates the need to change the shutter speed when you alter the frame rate on the camera. It does it automatically so to speak.
Another reason that cinematographers may want to use angle rather than speed is that it gives you the ability to dial in a very specific shutter. For example, sometimes DPs shooting at 24 frames per second like to shoot with a shutter angle of 172.8 degrees. This is because when shooting in countries that use 50HZ electricity to power lights, they will not have an undesirable flickering or strobing effect when the camera shoots at 172.8 degrees.
CREATIVE USES
Let’s take a look at some different examples of how shutter angle can be used to subtly further storytelling in movies.
The first shows how a narrow shutter angle can be used to introduce a jittery feeling of urgency and panic that recreates the emotional reality of on the ground warfare.
“Saving Private Ryan was never meant to be thrilling. It was never meant to be an adventure. It was meant to be a recreation, a kind of a documentation, of the closest I could get to the experiences of those who fought there. All the research that we did really brought that scene to life because it was ugly. Because it was honest. And it had to be ugly because that’s the way it was.” - Steven Spielberg, Director
Cinematographer Janusz Kamiński decided to shoot most of the famous opening scene in Saving Private Ryan using either a 45 degree or a 90 degree shutter. This, along with the use of a handheld camera gave the footage a crisper shake and imparted an added sense of reality and urgency to the scene.
Using a narrow shutter angle also had a pronounced effect on the explosions that were happening around the characters. If we pause on a frame with an explosion you can see individual chunks of sand flying through the air. Because of the shorter exposure time there is less motion blur so every individual grain of sand stands out as crisp - giving the scene a literal grittiness.
Digital cinema cameras came onto the scene with an added ability that film cameras didn’t have. Being able to shoot with a wide shutter angle past 180 degrees. One of the earliest examples of a filmmaker using this technology reportedly occurred in the shooting of Michael Mann’s Collateral.
Shooting with a wide open shutter angle served two purposes. First and foremost it let more light into the camera. This allowed them to shoot night exterior shots in very low light conditions - which they otherwise wouldn’t have had enough light for.
Visually it also gave the city a more blurry, hazy, glowing feel which made the city itself almost feel like one of the movie’s characters. It’s an interesting example of letting the camera shape the feeling of the environment on screen.
“It was night time and I just cranked the shutter open and went down to 6 frames. If you can’t afford to do something it’s good to find a solution that gives the feeling of something. You have the impression of a battle and a fight rather than saying, ‘Oh, he was there and he went that way and the horse went this way.’ It was the feeling of it. It was the emotion of being in a battle rather than the historical outlay of who and where and when they crossed the line.” - John Mathieson, Cinematographer
John Mathieson pulled from two different techniques - shutter speed and frame rate - when shooting the battle scenes in Gladiator to effect the feeling of motion in the image. On the one hand, he used a choppy 45 degree shutter angle to reveal the sword’s movement as it swung around wildly, which increased the feeling of intensity and made the combat feel more aggressive and sharper.
On the other hand he employed a different technique, separate from shutter angle, to increase motion blur and slow time down. He did this by shooting with a slow frame rate of 6FPS that allowed the film to be exposed for much longer and therefore blurred any movement. These 6 frames were then printed four times using step printing to arrive at a frame rate of 24 frames.
Combining these two different approaches to movement meant that action scenes were shot in a more experimental way that emphasised the emotions and feeling of being in a battle rather than just trying to portray it accurately.

How Movies Are Shot On Digital Cinema Cameras
Let’s break down the workflow of how most movies these days are shot on digital cinema cameras: all the way from choosing and setting up a camera to exporting the final, finished product.
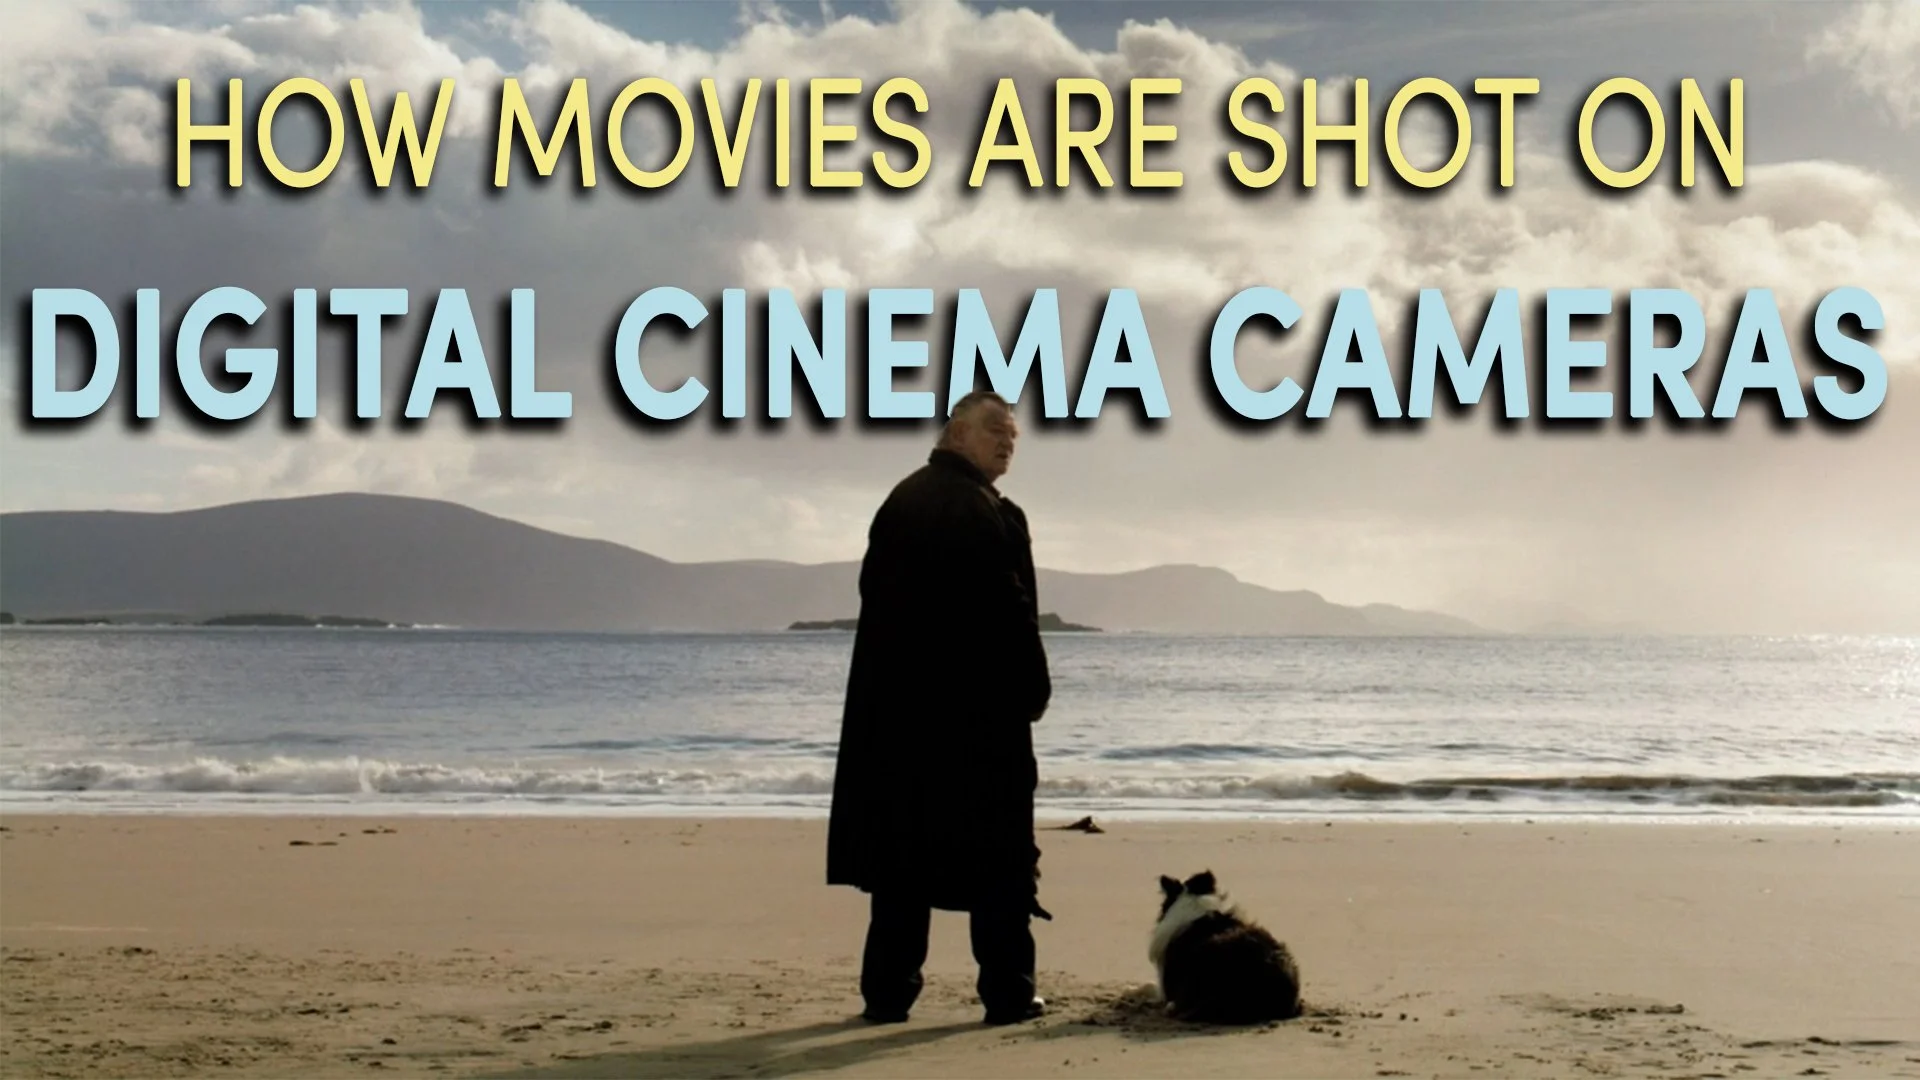
INTRODUCTION
In a prior video I gave an overview of how movies today are shot using film. While it’s good to know, it probably won’t be applicable to the vast majority of movies which are mostly captured, edited and presented using digital technology.
So, let’s break down the workflow of how most movies these days are shot on digital cinema cameras: all the way from choosing and setting up a camera to exporting the final, finished product.
CAMERA SETUP
The digital cinema camera that cinematographers choose to shoot a movie on will likely be influenced by three decisive factors. One, the camera’s ergonomics. Two, the camera’s internal specs. And three, the cost of using the camera - because as much as you may want to shoot on an Alexa 65 with Arri DNAs it may be beyond what the budget allows.
Once you have an idea of what budget range the camera you select must fall into, it's time to think about the remaining two factors.
Ergonomic considerations are important. You need to think about the kind of camera movement you may need and what camera can be built into the necessary form factor to achieve that. If it’s mostly handheld work you may want something that is easy to operate on the shoulder. If you need to do a lot of gimbal or drone shots then a lighter body will be needed.
Also think about what accessories it’ll be paired with. What lens mount does it have? What are the power options? Do you need a compatible follow focus? What video out ports does it have? Does it have internal ND filters? If so, how many stops and in what increments?
These are all questions that will be determined by the kind of project you are shooting.
The second consideration is the internal recording specs that the camera has. What size is the sensor? Do you need to shoot in RAW or ProRes? Does it have a dual ISO? Do you need to shoot at high frame rates? What kind of codec, dynamic range and colour depth does it record? How big are the file sizes?
Once you’ve chosen a camera that best fits the needs of the project it’s time to set it up properly before the shooting begins.
On high end productions this will be done by the DIT or digital imaging technician, under the direction of the DP. At the beginning of every shoot day or at regular intervals the DIT will continue to check that the specs are correctly dialled into the camera.
They will start by setting the codec that the camera records in: such as Arriraw or ProRes. Next, they’ll make sure that the correct sensor coverage is chosen. For example if using anamorphic lenses a fuller, squarer coverage of the sensor may be desired and a de-squeeze factor applied.
They’ll then dial in the resolution required, such as 4K, 4K UHD or 2K. Sometimes this might change during shooting if cinematographers want to capture clips at higher frame rates than their base resolution allows.
Next, they’ll set the base frame rate for the project. Even if the cinematographer decides to change the frame rate during shooting, such as to capture slow motion, the base frame rate will never change. This is the same frame rate that the editor will use when they create their project file.
With the basic settings dialled in, the DP may now either be happy to shoot with a regular Rec709 LUT or they may ask the DIT to upload a custom LUT that they’ve downloaded or created.
Cinema cameras are set to record a flat colour profile in order to maximise how the images can be manipulated in post. However it can be difficult to get an idea of how the final image will look when working with a flat log reference. So, a LUT is added on top of the image - which isn’t recorded onto the footage. This applies a look, like a colour grade, to the image so that cinematographers can better judge their exposure and what the final image will look like.
Finally, frame lines will be added and overlaid over each monitor so that operators can see the frame with the correct aspect ratio that has been chosen for the project.
Now, the camera is ready to go.
SHOOTING
While shooting the DP will usually manipulate the camera's basic settings themself and set exposure. These settings include the EI, white balance, shutter speed, frame rate, internal ND filters and the aperture of the lens.
There are different ways of judging exposure on digital cinema cameras. Most commonly this is done by referring to how the image itself looks on a monitor and occasionally also referring to the cameras built in exposure tools. On high end cameras the most used exposure tool is false colour which assigns a colour reading to different parts of the image based on how bright or dimly exposed they are.
If you see red it means an area is bright and overexposed. Green refers to an evenly exposed 18% middle grey - a good reference for skin tones. While a dark blue or purple indicates underexposure.
There are also other exposure tools, often found on broadcast cameras, such as histograms, waveforms or zebras which cinematographers may also use to assess their exposure. Alternatively, exposure can also be measured by DPs with a light metre, however this is becoming increasingly rare when working with digital cameras.
On bigger jobs with multiple cameras, the DP may also request that the DIT help set the exposure of each camera. For example, I’ve worked on jobs where there are say four to six cameras shooting simultaneously. The loader or assistant for each camera will be hooked up to a radio with a dedicated camera channel.
The DIT will have a station set up in a video village where they get a transmitted feed from all of the cameras to a calibrated monitor with exposure assist tools. While setting up for each shot they will advise each camera over the radio channel whether the assistants need to stop up or down on the lens and by how much so that all the cameras are set to the same exposure level and are evenly balanced.
For example they may say, ‘B-Cam open up by half a stop’. The assistant will then change the aperture from T4 to T2.8 and a half. On other shoots they may even be given a wireless iris control which is synced up to an iris motor on each camera - such as an Arri SXU unit. They can then remotely adjust the stop on each camera while judging exposure on a calibrated monitor.
The DIT, under the direction of the DP, may also change to different LUTs for different scenarios. For example, if they are shooting day for night, a specific LUT needs to be applied to get the correct effect.
DATA MANAGEMENT
Once the big red button has been pushed and some takes have been recorded digitally onto a card inside the camera, it’s time to transfer that footage from the card or capture device to a hard drive. This secures the footage and organises it so that editors can work with it in post production.
This is done either by the DIT or by a data wrangler using transfer software. The industry standard is Silverstack which allows you to offload the contents of a card onto hard drives, backup, manage and structure how the files are organised - usually by shoot day and the card name.
The standard rule is to always keep three copies of the footage - one master copy and two backups. This is to ensure that even if one of the drives fails or is somehow lost or stolen that there are still copies of the precious footage in other locations. Even though data storage can be expensive, it's almost always cheaper than having to reshoot any lost footage.
Once this footage has been secured on the hard drives the card can be handed back to the loader who can format it in camera. The footage is carefully viewed by the DIT to make sure that the focus is sharp and there aren’t any unwanted artefacts, aberrations, pulsing light effects or dead pixels - which may require the camera to be switched out.
The next job of the DIT or data wrangler is to prepare the drive for the editor. Because footage from high end digital cinema cameras comes in huge file sizes and is very intensive for computers to work with, smaller file size versions of each clip need to be created for the editor to work with so that there is no playback lag when they are editing. These files are called proxies or transcodes.
This is usually done in software like Da Vinci Resolve. The DIT will take the raw footage, such as the log 4K ProRes 4444 files, apply whatever LUT was used during shooting on top of that log footage, then process and output a far smaller video file, such as a 1080p 8-bit ProRes clip. Importantly these proxies should be created with the same clip name as the larger original files. This will be important later.
Data wranglers may also be tasked with doing things like creating a project file and syncing up sound to video clips to help speed up the edit.
POST PRODUCTION
Once shooting wraps the precious hard drive which includes the raw footage as well as the proxies will be sent over to the editor. There are two stages to the post production process: the offline edit and the online edit.
The first stage, offline, refers to the process of cutting the film together using the smaller, low res transcoded proxy files with video editing software, such as Avid or Adobe Premiere Pro. This will be done by the editor and director.
They will usually go through multiple cuts of the movie, getting feedback and adjusting things along the way, until they arrive at a final cut of the film. This is called a locked cut or a picture lock - meaning that all the footage on the timeline is locked in place and will no longer be subject to any further changes.
Having a locked final cut indicates the end of the offline edit and the start of online. Online is the process of re-linking up the original, high res, raw footage that came from the camera.
To do this the offline editor will export a sort of digital ledger of every cut that has been made on the timeline - in the form of a translation file such as an EDL or XML.
This file is used to swap out the low res proxies in the final cut timeline with the high res log or RAW footage that was originally on the camera card. This is why it is important that the proxies and the original files have the same file names so that they can easily be swapped out at this stage without any hiccups.
The original files can now go through a colour grade and any VFX work needed can be performed on them. The colourist will use any visual references, the shooting LUT, or perform a colour space transform to do basic colour correction to balance out the footage. They’ll then apply the desired grade or look to the original footage, all the while getting feedback from the director and cinematographer.
The main industry standard software for colour grading is Baselight and Da Vinci Resolve. Once the grade is complete, the final, fully graded clips are exported. They can then be re-linked back to the timeline in the original video editing software. A similar process will happen with the final sound mix where it is dropped in to replace the raw sound clips on the editing timeline, so that there is now a final video file and a final audio file on the time ready for export.
The deliverables can then be created. This may be in the form of a digital video file or a DCP that can be distributed and played back on a cinema projector.

Cinematography Style: Wally Pfister
In this edition of cinematography style lets unpack Wally Pfister’s career as a director of photography.

INTRODUCTION
How is it that Wally Pfister went from shooting quote unquote ‘erotic thrillers’ to being the cinematographer responsible for bringing some of the biggest, most iconic blockbusters of the 2000s to the big screen for director Christopher Nolan?
In this edition of cinematography style let’s unpack Wally Pfister’s career by going over some of his philosophy, thoughts and ideas about filmmaking and then looking at some examples of the film gear he used to execute those ideas.
BACKGROUND
After graduating from high school, with a keen interest in filmmaking, Pfister started at the bottom as a production assistant at a television station. He was allowed to borrow their CP-16 16mm film news cameras on weekends to shoot visual essays. After showing them to the production manager he was brought on to shoot low budget PSAs. This later developed into a full time career as a news cameraman who also shot TV documentaries for PBS.
After an encounter with Robert Altman on a series he directed, he made the decision to move to LA and enrol at the AFI to study cinematography. Some of his AFI classmates included Janusz Kamiński and Phedon Papamichael who he sometimes worked with as a grip or electrician.
“When you come out to Hollywood, I came out here to be a cinematographer, to shoot movies. You end up shooting a lot of different things. MTV shows. And I did Animal Instinct. I did all of these erotic thrillers that were not pornography but kind of R-rated. You know, they called them erotic thrillers. Honestly that’s where I cut my teeth and learned how to light. And learned how to light fast. We shot movies in 15 days. You know, if you had a big budget one you shot it in 18 days.”
After working on a string of B-movies, he started to gain traction shooting films such as The Hi-Line which went to Sundance and received festival acclaim. At a festival he met a director called Christopher Nolan who was looking to shoot his second feature Memento.
This began the start of a collaborative relationship which would last many years.
PHILOSOPHY
A core tenet of his philosophy comes from the idea that the job of the cinematographer is at the intersection between being a technician and being an artist.
“What you have to understand is that cinematography is one part artistry and one part craftsmanship.”
Much of the early development of his skills as a craftsman happened through working on R-rated movies, where being able to light very quickly and well became an important skill to have. These practical skills are then intermingled with creative thinking about how to best visually represent each story on screen.
This process of thinking about the story begins during the planning phase in pre-production all the way when he’s first presented with a screenplay.
“My first read of the script is really just as a viewer and reacting to it as an audience member. And then the subsequent passes are just breaking it down, coming up with questions really. My process with Chris is that I just make pages and pages and pages of questions and I walk into his office and say, you know, ‘What was your thought about doing this? What do you think about doing this?’ And then really it’s easier for me to start thinking creatively after all of those sort of those logistical…and once I’m in Chris’ head and I understand how he sees it on the screen.”
This process of collaborating with the director carries over to all heads of departments from the production designer to the editor. Pfister makes an analogy of cinematographers being kind of like a general that reports to the first in command.
Good directors will surround themselves with high calibre collaborators whose job it is to present ideas, suggestions, questions and occasional pushback to directors - who then decide whether to accept, reject or use those suggestions to inspire a new creative idea.
A cinematographic concept that he has carried into various films, especially movies such as Inception with its various, simultaneous plot threads, is the idea of providing a unique visual look for each scene.
“One of the sort of challenges creatively was to break this into different looks. And particularly later on when the film is intercutting between the ski slopes of Calgary and, you know, a tumbling hallway and a van on a rainy street in Los Angeles it’s important to distinguish looks between those three elements.”
Not only do these different looks and locations provide a sort of global scale and greater depth to the world of the movie, but they also serve as a way of distinctly differentiating between different plot lines, dream layers or characters which more clearly solidifies the story in the minds of the audience and minimises any potential visual confusion between the different plots.
A final concept that both he and Christopher Nolan are drawn to is to try and shoot action scenes as much in camera as possible. This comes from pushing to find practical solutions to difficult shots rather than constructing those shots purely with visual effects work.
Of course certain lines in a script such as a Parisian street folding in on itself require an integration of visual effects and live action photography. For these sequences, again, communication with collaborators, such as the visual effects supervisor, are crucial.
“There are not that many sequences that are pure CG like that. I just remember shooting the action bits and then shooting the emotional bits and then of course the main action set pieces have almost no visual effects in them. All the way back to Batman Begins I’ve been involved in the visual effects stuff in that they send me still photographs and comps and I help guide them in terms of the lighting and the colour to match our original photography.”
GEAR
“The important thing is that we’re not treated like technicians, we’re not treated as anything else but the visual storytellers of the film. And in that people should not be dictating what kind of equipment we use to capture our films. We should be the ones, with our expertise, that are able to choose the tools that we want to choose.”
When looking at his films, particularly his large budget work with Christopher Nolan, they maintain quite a similar overall look, while the visual nuances in the storytelling, like framing, lighting, lens selection and camera movement change based on each story's requirements.
I’d describe his look on Nolan films as being bound by three things. One, being shot largely on 35mm film. Two, utilising a combination of the anamorphic film format and the taller, higher resolution, large, Imax format. And, three, lighting and exposing the negative with a rich level of contrast, colour and saturation.
Pfister shot all of his high end work exclusively on film, even his later movies which were shot after Arri had released their digital Alexa camera. This choice was primarily down to the look of film, but also took into account the way in which film is worked with on set.
“Chris and I are real film guys. The fact that 35 is closer to 8K and there’s no digital 8K camera but it’s also the physical depth of the layers on film that give it the contrast that give it the colour saturation. And, it’s the simplicity of it for Chris and I. All we really have to plug into that film camera is a battery and we have to load a magazine of film on there.”
Most of his high end work was done in the anamorphic format with Panavision anamorphics, such as the Primos, E- and C-Series, and with 35mm Panaflex cameras like the Millenium XL and the Platinum.
In his early work with Nolan on Memento and Insomnia they almost exclusively used the longer 75mm anamorphic focal length lenses. However, for his later films that included more blockbuster action that needed to be captured in wider shots he preferred to shoot on wider 35, 40 and 50mm anamorphic focal lengths with the camera physically closer to the characters and action.
Even if they’re shooting with a single camera at a time, Pfister often likes to have multiple cameras on standby built in different configurations - which saves on the time of building cameras. For example, on Batman Begins they carried one Panaflex Platinum in a studio build and two Panaflex Millennium XLs - one for Steadicam and one for handheld.
He’s also used specialist cameras like a Arriflex 435 or a Photo-Sonics 4C to shoot slow motion film at higher frame rates.
From The Dark Knight onwards this 35mm anamorphic look was mixed with Imax for certain set pieces. This granted them a higher resolution and a larger than life format.
“I take credit for making it happen but it was actually the brainchild of Chris Nolan to shoot on Imax. I put a lot of effort early on in pre-production on The Dark Knight to figuring out what it was all about and what it meant to shoot with Imax cameras.”
This included finding technical ways to move the huge camera, such as with an enormous Steadicam Imax rig. More creatively it also meant thinking about framing. Unusually, they made the decision to cut between footage shot with the different native aspect ratios of the anamorphic and the much taller Imax format.
Pfister found that as long as he kept the focus of the framing in the Imax shots more towards the centre, giving more headroom to characters, it transitioned smoother when a cut was made between the two formats as the eyes of the audience were in the same place.
The third part of Pfister and Nolan’s look comes from a rich looking negative. One part of this is down to how Pfister likes to expose the film. He regularly rated his films at a lower ISO and then did what was called ‘printing down or timing down’.
For example, he would take a 500T film stock from Kodak that was recommended to be shot at 500 ISO and instead rate it on his light metre and shoot it at 400 ISO. The film would then be developed regularly at 500 ISO. This meant that he overexposed the film slightly and then in the DI or colour grade brought the exposure down by the same amount to produce a rich, deeper looking negative with nice contrast and saturation.
Another reason for the contrast in his images of course comes from his lighting. He often positions his lights so that his key light on his character comes from the side. Side lighting a character produces shadow on one side of the face, while the other side is exposed brighter.
He also often hits characters with strong sources of backlight so that a highlight around the back of their hair forms that separates them from a darker background. He regularly combines these techniques of side light and back light to produce a negative with strong contrast.
CONCLUSION
Pfister’s career developed slowly, learning the ropes and how to light quickly on B-movies to eventually shooting some of the biggest films in the world. His style is informed by him prioritising collaboration, maintaining a core, Hollywood look that was flexible depending on the story and shooting visceral, in camera action sequences.
All of this, while operating at the intersection between technology and creativity.

The 1959 Black & White Film That Hollywood Still Shoots Movies With: Eastman Double-X
Let's take a deeper look at Eastman Kodak’s Double-X black and white negative motion picture film.

INTRODUCTION
Usually in the world of film gear things tend to move pretty quickly. Every year there’s a new camera, lens set or piece of lighting kit which is released that DPs flock to try out. Movie technology always advances forward.
That’s why it’s strange that there’s one piece of filmmaking tech which has remained completely unchanged since the late 1950s and still continues to be used on productions to this day. That technology is Kodak, formerly Eastman Kodak’s Double-X 5222 black and white negative film stock.
Let’s take a deeper look at this film stock by unpacking what black and white film does, looking at two different types of black and white film, identifying Double-X’s characteristics and in doing so look at some examples of modern movies shot on the stock.
HOW IS BLACK & WHITE DIFFERENT FROM COLOUR NEGATIVE
“Black and white negative just looks different than colour negative too. It just has its own physical presence. It’s chunks of silver, you know, embedded in an emulsion.” - Jarin Blaschke, Cinematographer
Film is created by taking a cellulose triacetate base - basically plastic - and adding layers of chemicals to it so that when it is exposed to light and then developed it produces an image.
Colour negative film is coated in at least three different layers of colour sensitive dyes, mainly: red, green and blue. These three layers when combined represent a full spectrum of colour. When this film is developed and processed it creates a negative - where the inverse of each colour is reflected. This can later be scanned and turned back to a positive.
Black and white film on the other hand usually contains one layer of silver halide crystals. Rather than being sensitive to a particular colour spectrum of light, black and white film is affected by luminance only. So negative film renders dark shadows as white and bright highlights as black. Like colour negative film, this is then scanned and inverted to produce an image in black, white and shades of grey for exposure values in between.
This means that cinematographer’s don’t need to worry about the colour temperatures of lights when shooting black and white film and can instead focus purely on contrast or how bright or dark each area of the image is.
Black and white film also requires a different development process to colour negative or colour reversal film.
PANCHROMATIC VS ORTHOCHROMATIC FILM
When black and white film was initially developed it was only sensitive to blue and green light rays on the colour spectrum. This is called orthochromatic film.
Because orthochromatic film wasn’t sensitive to red tones in an image, and there tends to be a lot of red in skin tones, this meant that skin tones captured on this film appeared darker and that blemishes, shadows and lines on faces were accentuated.
On the other hand, orthochromatic film is much more sensitive to areas in the image with lots of blue, such as skies - which is why they would read very bright and overexposed.
A great example of orthochromatic film can be seen in the photographic portraits taken by Yusuf Karsh. His subjects often would be photographed with orthochromatic film that made their skin appear darkened, textured and more weathered.
Eastman Double-X is different. It was created in 1959 as a panchromatic film. This means that instead of capturing blue and green tones it responded to all colours depending on their level of brightness. This allowed redder skin tones to be captured and meant that faces were less harshly represented.
Since the introduction of panchromatic film, black and white orthochromatic stocks ceased to be widely manufactured.
Interestingly, on The Lighthouse, cinematographer Jarin Blaschke wanted to recreate the weathered, old look of orthochromatic film, even though panchromatic film was the only choice available, by shooting with a custom filter.
“We came up with a filter also to emphasise texture. It’s a cyan filter that Schneider made for us. It replicates very early emulsions that were insensitive to red. It tends to heighten local contrast too, especially on skin tones which are mostly red of course. So any little variation of red is further amplified. So any blemishes, pores, you know, if you’re hungover and your cheeks are red, you know it all gets amplified.” - Jarin Blaschke, Cinematographer
EASTMAN DOUBLE-X CHARACTERISTICS
“I think this stock was created in the end of 50s early 60s so this is the same stock they shot those movies on. If we’re paying kind of an homage to a certain 60s Hollywood style. So using this exact stock was a good decision I guess.” - Marcell Rév, Cinematographer
Eastman Double-X comes in two different gauges: 16mm and 35mm. The 16mm version is called 7222 and can be purchased in 100 or 400 foot rolls. The 35mm variant, 5222, comes in 400 or 1000 foot rolls.
The stock has a very specific look. It contains large amounts of thick, dancing grain which is especially noticeable in the grey mid tones and makes footage look unapologetically old fashioned.
5222 produces different pockets of contrast. So skin tones, which may be rendered in a similar contrast range by other stocks or cameras, contain more difference between shadows and highlights on Double-X. This emphasises textures and makes images feel slightly more dimensional and less flat.
Because it’s so old, 5222 doesn’t have a big dynamic range. It has a steep gamma curve which means it reacts a bit more like slide film even though it's a negative film. This limited latitude means that cinematographers need to be careful when exposing it. Overexposure will quickly blow out the highlights to white, while underexposure will muddy up the blacks so that they aren’t pure and crisp.
It also has relatively low sharpness compared to more modern stocks at 100 lines per mm in perfect conditions. However, that slight softness can actually be nice for capturing people and skin tones as it provides a more gentle roll off that subtly smooths out how skin is rendered.
Kodak presents two different exposure indexes for different lighting conditions, like an iso on a digital camera.
If you’re shooting the film under tungsten light sources then it is recommended to expose at 200 EI. If instead the shot is lit by a source with a daylight colour temperature then it can be shot at 250 EI.
The reason for this difference can be found in the film’s spectral sensitivity data curve. Basically this shows how the film is more sensitive to light at cooler colour temperatures - such as HMIs or daylight - and less sensitive to light at warm colour temperatures such as tungsten sources. Hence the reason for their different sensitivity rating.
Back when this stock was first released it was considered a highly sensitive stock for lower lighting conditions - since it was around in an era when shooting on 50ASA stocks was the norm.
However, in the modern era, where shooting with an EI of at least 800 on digital cinema cameras has become the norm, this is no longer the case.
“We were shooting on film. The Double-X black and white stock so we were around 250. I underexposed it a little bit just to protect the highlights because they can blow out pretty easily. I would lie if I’d say I wasn’t scared of the low sensitivity. And it goes to Fotokem to develop and then you won’t see it for two days.” - Marcell Rév, Cinematographer
One disadvantage of shooting on such a niche film stock is that there are relatively few film laboratories that can process this film in motion picture quantities. It is still possible but shooting in North America requires shipping the stock to a lab like Fotokem where it will be processed, scanned and then delivered as rushes, usually in a digital file, a few days later.
Another disadvantage is that shooting night scenes with a film that is rated at 200 means that large light sources are required to reach exposure, which also means that these scenes will tend to have a more old world feeling to the lighting with actors illuminated by strong, hard sources, rather than the soft, dark, ambient lighting style that can be more easily achieved by using digital cameras.
“This is more limited. You have a certain kind of contrast built into the stock that you have to embrace. I think if that clicks with the project then it can really benefit from it.” - Marcell Rév, Cinematographer
So, while it may be easier to shoot digitally and try to arrive at a vintage looking black and white image in post, for some productions who have the right budget and access, shooting on a 60 plus year old film stock which still holds a textured, grainy, contrast laden, classically Hollywood look that is very difficult to accurately create otherwise is the best way to go.

A Cinematographer's Guide To Pre-Production
Going over the nine different steps that cinematographers may take when they prepare to shoot a film.

INTRODUCTION
Early on, when I first started working on film sets, I used to think that the job of the cinematographer was the cushiest job around. After all, they have a huge technical team that carries all the heavy gear into remote locations, a gaffer and electrical crew who set up all the lights, someone who’ll bring them a cup of coffee in the blink of an eye, all while they sit on a dolly and play with the camera while a grip pushes it.
The reality is that there is an important reason why some DPs, to the untrained eye, do seemingly little work during production. It’s probably because they’ve done a large amount of the groundwork prior to stepping on to set.
For many cinematographers and HODs on high end jobs their workload is kind of like an iceberg, the little bit at the top that you see is the work done on set, while the massive chunk below the surface happens during prep.
In this video I’ll try to create a basic guide for pre-production by listing all the respective tasks that are usually performed by cinematographers prior to shooting.
Of course, since filmmaking can vary all the way from massive multi-month shoots to single day, single crew member corporate documentaries, this process will never be fixed.
Prep will always be flexible depending on the nature of the project, the working style of others, the budget and many other factors. Nonetheless here’s a basic template for prepping for a film.
1 - PROJECT INTRODUCTION
Getting a job in the first place won’t happen without having some contacts in the industry. Cinematographers usually receive an introduction to each project through directors or producers.
This may involve a meeting where the project is pitched and they have a conversation about it. Or it may start by being sent a copy of a treatment or script. During this early phase when ideas for the project may still be in their infancy, probably the best thing you can do is to focus on building a relationship with the director themself.
The more time you spend together chatting the better you’ll be able to understand their perspective, how they work, references they may like and start to develop an idea of the visual picture that they have in their head.
These early conversations lead into another task.
2- RESEARCH
Researching the topic of the film is a nice way of familiarising yourself with the subject matter.
What you’re doing throughout this process is slowly building up a better understanding of the story and world that it takes place in that will inform a perspective on how the visual language will be crafted in your head and, later, how it will be shot.
This may include noting questions about characters in the screenplay, looking at the architecture of the locations in the story world, familiarising yourself with a historical context for a documentary topic, or researching vintage lighting technology for a period film. What this research covers will be entirely dependent on the context of the film.
3 - VISUAL PLAN
Now that you know what the project is and are better informed on the subject matter, it’s time to put together any ideas in the form of a visual plan. There are a few different ways to do this. One idea is to draw from films as references that hit the kind of tone that the director is after, or address a similar subject matter.
If you want to hit a polished, dark, satirical comedic tone then watch some films by Ruben Ostlund. If your story’s world is parched, dry, barren and bleak then you might find something in the language of There Will Be Blood that works.
Other forms of reference such as music, photographs or paintings may also be used. What you're trying to do when coming up with visual ideas is not to directly copy a reference but rather to use them to inspire the kind of tone that is suitable for your project, when thinking about things like shot sizes, framing, camera movement and lighting.
I find it useful to compile a moodboard of images - which can also be used to establish the kind of colour palette that you’re after.
4 - LOCATION RECCE
Having a visual plan will inform the next step of prep which is location scouting. Sometimes the director and production team would have already locked down shooting locations, but other times cinematographer's may be able to provide their thoughts and input on which location best suits the production’s needs.
This can be done by visiting locations in person, by browsing location stills or even by looking on Google maps.
The crew will then do a recce of the chosen shooting locations. Usually the HODs, like the producer, 1st AD, the director, the cinematographer, the gaffer, the grip, the unit manager and the production designer will attend this scout so that they can make the necessary preparations for the shoot day.
For example, the grip may have to make measurements at the location so that they have the right sized rigging tools, or have enough space to fit large equipment through tight spaces. The unit manager will determine the logistical access to the space and how many vehicles will be able to park nearby. The production designer will have a look at what decor is already inside a location and then determine what art elements they’ll need to bring in.
As well as being practical in nature, a recce also provides a creative opportunity for the cinematographer and director to run through how they imagine the scene in the space and start shaping shots and lighting ideas.
It’s always a good idea to keep records of this process. Whether that’s in the form of written notes, photographs, or by finding frames in the space using a viewfinder app such as Artemis.
5 - SHOT LIST
Using the ideas for shots that were discussed during the recce, the director and cinematographer may now sit down and start compiling a shot list. Usually this is done with a spreadsheet and can include a written description of the shots, drawings, or use location photos or viewfinder images that were taken during the recce.
For higher budget projects and commercials an artist may also be employed to create storyboards for the shoot or specific scenes. On even higher budget shoots which involve lots of visual effects work they may also create a previs, which is a rough, animated cut that displays all the shots that are required.
6 - LIGHTING PLAN
This step isn’t a must, but I find that creating a lighting plan - especially for more complicated setups - is a great way to determine what lighting gear needs to be rented, the access to power, how long this setup will take to achieve and to more thoughtfully think about the light that you want.
Sometimes a ‘light study’ may be necessary - where you visit the shooting location at different times during the day to see what the ambient light is doing and whether or not you’ll need to control it.
A lighting diagram can of course be hand drawn or more precisely done using software like Photoshop. It’s also great to have this document to send to the gaffer to give them a clearer idea of your vision and so that they can potentially use it as a guide to pre-light locations before you arrive.
7 - GEAR LIST
By now, you should have enough technical information from the scout, shot list and lighting diagram to determine what gear will need to be rented. Some cinematographers also like to do a day of camera tests for long form projects to determine a lens, camera or sometimes film stock combination that they are happy with.
Usually I break my gear lists down into the separate department sections of camera, grips and lighting. Unless you’re working at a higher budget level, there may be a bit of a negotiation that will take place between the gear rental company and the production team.
Usually I like to first send through a complete gear list which includes everything I’d like to make the shoot happen. Then, if we get a quote from the rental house that is over the allocated gear budget, I will start to provide alternative, cheaper gear options - such as a less expensive zoom lens instead of a set of cinema primes - or start losing gear on the list until we reach a point where the production’s budget and the rental house quote meet.
When you create a gear list it’s also important to consider the post production workflow. Shooting in a higher resolution or RAW versus log versus a baked in Rec709 look - will affect whether a DIT, colourist, transcoding, or more expensive hard drives will be required - which all affects the budget.
8 - CREW LIST
Now that you have the gear you’ll need crew to run it. Cinematographers will usually either pass on crew names to production who they have worked with before, have interview sessions where they talk to crew HODs, or go with the crew recommendations of a crew agent or the production team.
Like with gear, how many crew you are able to hire will be determined largely by the production’s budget but also by the working style that you are after and, of course, the technical needs of the project.
For example, even if you have a large budget for an intimate documentary shoot, you may still only want one director, one cinematographer and one sound person to be on set.
9 - TECHNICAL COORDINATION
The final step involves coordinating all the technical details so that the shoot goes as smoothly as possible. This includes creating a schedule using the shot list.
Usually this is done by the 1st assistant director, however cinematographers may need to provide guidance or feedback to their schedule regarding shooting times, pre-lighting, rigging and what crew will be required where.
For example, some exterior dusk scenes may need to be scheduled so that the wide is shot during the best after sunset light and any close up insert shots are saved for last where they can be lit with artificial light sources once the ambient light has died.
CONCLUSION
Generally, prep for a film starts by being situated in a more creative, thoughtful space - where you can dream up the vision you would like. Throughout the planning process it’ll evolve into being more technical, practical and more about how the shoot will be executed.
By the time you arrive on set, you should already have a good understanding of the world of the story, have formulated a broad visual approach, have all the gear that you need, the crew to run it, and have scheduled things to run as smoothly as possible.
So if you’re on a shoot that is all going according to plan and the DP is watching his crew work, giving bits of feedback all while casually drinking a cup of coffee - it might be because most of the iceberg of prep has already been done.

How Ryan Coogler Shoots A Film At 3 Budget Levels
Ryan Coogler’s career has seen a progression all the way from making a low budget indie movie that became a festival smash, Fruitvale Station, to directing one of the biggest blockbuster Marvel films in the world - Black Panther. Let's take a deeper look at his career as a filmmaker.

INTRODUCTION
“Making a film is something that involves a lot of technicalities, you know. And it is hard work. And it is something that’s systematic to me that I’ve learned. Going up against time and money you know you never have enough of either one when making a film and I hear it’s still like that on films of higher budgets.” - Ryan Coogler
Ryan Coogler’s career has seen a progression all the way from shooting a low budget indie movie that became a festival smash, to directing one of the biggest blockbuster Marvel films in the world.
As you may have seen in this series, directing films at different budget levels has an inevitable impact on how movies are made. Despite this, Coogler’s work is all bound by characters and stories told through an empathetic lens, made by a close knit team of collaborators, which are thoroughly researched and to a large extent shaped by how he writes his screenplays.
So, let’s take a look at the low budget Fruitvale Station, the mid budget Creed and the high budget Black Panther to see how his approach to making movies has evolved over time and identify some commonalities that are present throughout his career.
FRUITVALE STATION - $900,000
“The biggest thing that I walked away with from film school is just a lot of my colleagues. You know, like, I met the composer that’s done all of my films at film school. One of my editors has worked with me the whole time. The community was the most valuable thing that it gave.” - Ryan Coogler
Coogler first became interested in screenwriting during a college creative writing course, where his teacher recognised his talent for his visual writing style and proposed he try writing screenplays.
After undergrad he got into film school at USC where he made a number of short films that did well at festivals with some collaborators who he would continue to work with through his career.
During his studies he mentioned to a friend who was studying law about potentially making a film about the Oscar Grant case. Later, when his friend began working on the case, he introduced Coogler to the Grant family who gave the rights to tell the story.
After the festival success of his shorts, and getting the script for Fruitvale Station into the Sundance Screenwriters lab in 2012, Forest Whitaker came on board to produce through his production company Significant Productions. A production budget of $900,000 was secured to make the film.
“Being in the Bay area at the time and being the same age as the guys who were involved and seeing myself and a lot of my friends in them. Then shortly after seeing it become politicised. Seeing his humanity get split in two different directions. And the fact that he was a human being whose life was lost kinda got glossed over. You know, ,my outlet, my artistic outlet is filmmaking, so, oftentimes, when I see things or think about things I think of them in that format.” - Ryan Coogler
He compiled as much research as he could from a combination of legal documents as well as talking to the friends and family of Oscar Grant. His goal was to treat the story with a sensitivity by humanising the characters on screen through portraying an intimate, personal portrait of their relationships.
Letting the story play out in a world which was as true to life as he could make it. To create this visual world encompassed in realism he turned to a close collaborator, cinematographer Rachel Morrison.
“Fruitvale’s a really interesting scenario for a cinematographer because you have tons of films that are based on true stories but very few that are based on true stories that happened three years ago in locations that still exist exactly as they were. So it’s not this interpretation of something. It was really important to be really, really authentic.” - Rachel Morrison, Cinematographer
She pushed this idea of authenticity visually by shooting on a grainier, more organic Super 16mm film, using a handheld, exploratory single camera and by keeping the lighting as naturalistic, motivated and as true to life as possible.
The smaller gauge film size meant that they shot on wider lenses and therefore had a deeper depth of field than a 35mm film plane.
Morrison shot the film on an Arriflex 416 with Zeiss Ultra 16 lenses which were donated to the production by Arri. The Ultra 16s are probably the sharpest Super 16 primes on the market and since there were going to be a lot of low light scenes, Morrison wanted lenses that would be as sharp as possible when shot wide open at T/1.3 on the lower fidelity 16mm Kodak 500T film.
An idea that the cinematographer discussed with Coogler was finding a middle ground between a deconstructed documentary realism and a fictional, elevated cinematic gravitas - where visual tweaks were made to elevate the story.
An example of this was how they used the colour grade in post production as a low budget way of changing the colour balance of the lights in the real shooting location.
“In the BART station the fluorescent lights up above, actually they’re warm light - which is sort of a yellow, warm feeling to them. And it’s this terrible, terrible event and for me I always, the second I saw them I’m like, ‘Well we’re going to time it cool right?’ And then we got into this dialogue about will it still feel like the BART station if we time it to feel a little cooler instead of being warm. That was the dialogue which was so interesting. Most films I think are much less beat for beat interpretations of things.” - Rachel Morrison, Cinematographer
By shooting with no large production design builds, being quick, flexible, handheld and using a lot of the ambient light that was naturally present on the real locations Coogler pulled off the shoot with his tight knit crew on a budget of $900,000.
CREED - $35 Million
“I’m a big Rocky fan. You know, I kinda inherited my love for those movies through the love for my father. So I knew the movies really well. I knew the world really well. I kinda came up with this idea where a young guy interacts with basically my dad’s hero at a time in his life where he’s ageing and dealing with his own mortality in a way that we’ve never seen him deal with it before. It’s really about me and my dad. As much as I could bring of my own, you know, partial inexperience. Really, my dad, my relationship with him, as a heartbeat for the creative tensions there.” - Ryan Coogler
Contrary to what some may think, the idea for Creed was not one that was conceived by a studio. Instead, Coogler had been toying with the concept for a Rocky spin off with his USC friend Aaron Covington, just as a fun spec script while he was working on Fruitvale Station.
At the Sundance Screenwriting lab for his first film he was able to secure an agent who asked him whether he had any ideas for projects beyond Fruitvale. After explaining his concept for Creed his agent set up a meeting where Coogler pitched the idea to Stallone - the original writer, and of course, lead actor in the Rocky franchise.
After securing Stallone’s buy-in to get a script written, MGM paid for him and Convington to write the screenplay. Appreciating the fresh perspective on the story and his character, Stallone gradually agreed to come on board until MGM greenlit the project with a production budget of approximately $35 million.
In Stallone, Coogler found a new collaborator to work with.
“He’s also a producer on the film. He was comfortable taking a backseat here which is a big thing. He had written all the scripts, every single last one, for these types of films. What really made him excited was seeing this from the millennial perspective. You know, we’re talking about a 68 year old dude who is showing up in the cold everyday. And shows up for a day where we’re shooting four pages and he’s got 10 pages of character work that he did the night before. It was amazing and it was energising.” - Ryan Coogler
One example of Coogler’s openness to collaborations from his cast and crew happened when instead of Stallone throwing water in Michael B Jordan’s character’s face to wake him up as it was written in the screenplay, Stallone proposed that his character play old records instead, as it’s what he felt his character would do. They went with this suggestion and it made the cut.
To create a visual language for the film which was a little bit ‘slicker’ than Fruitvale Station, but which was still grounded by a similar photographic feeling of realism he turned to cinematographer Maryse Alberti - whose naturalistic work on The Wrestler he admired.
Rather than something more stylised like Raging Bull, they decided on a camera language which was more realistic and which at the same time paid subtle homage to the original Rocky film with its famous early use of the Steadicam - but didn’t copy the look.
“We looked back more at what not to do. Do you like this colour? Do you like this? No? Well, me neither. And taking the good things like the iconic thing of the steps and things like that. But, yeah, he was reinventing.” - Maryse Alberti, Cinematographer
One way that they reinvented the film visually was by making the final boxing match look more like it would be presented realistically on a modern TV broadcast by shooting at a deeper stop of T/5.6 and using a higher key lighting style.
They did this by building the ring on a soundstage and surrounding it with a 600 foot greenscreen wall which they could then replace with a composited crowd using visual effects. Her team lit the ring by rigging up square truss above the space from which they suspended 120 tungsten par can lights with different lights focused at different distances, to provide an even overhead lighting.
Because it’s tiring for actors to repeat these choreographed boxing scenes many times in a row and maintain the same level of energy, they shot with multiple cameras to get better coverage - in a slightly similar visual style to how big fights might be shot for TV.
This scene was covered with one camera on a technocrane, getting telescoping movement and wider shots, one camera on a steadicam which could roam around the ring, and two handheld cameras getting on the ground reactions.
They made the decision to shoot digitally on the Arri Alexa XT in 2.8K Arriraw with spherical Cooke S4 primes and some wide angle Angenieux Optimo zooms. She also used the Alexa Mini on a Movi for some scenes which need nimble camera moves through tight spaces such as when the camera tracked from outside the ring, through the ropes into the ring - which they did by passing the Movi off in the hand to a new operator.
Alberti chose the S4s as they flattered skin tones and rendered them nice and softly, which counteracted the digital grain they planned to add in post which roughened up skin a little bit.
Creed was therefore pulled off on a much larger production budget of around $35 million that leaned on established franchise characters, while also invigorating the series with a new perspective that used a larger crew to run more gear, involved building sets, shooting more time-consuming action sequences and incorporating more visual effects work in post.
BLACK PANTHER - $200 Million
“The biggest difference actually wasn’t in the restrictions. It was actually, like, in the lack of restrictions. When I was making my first film, dealing with not a lot of money you have a lot of limitations and it helps you actually move faster because you can’t do just anything. Maybe sometimes there’s only one place you can put the camera. You can only be in this location for two hours and then you have to go. It makes it easier. When you can do anything and that’s kinda what happens with a film like this. That’s what I found made it a lot harder.” - Ryan Coogler
A lack of limitations means that more preparation time can be put into the project during pre-production. As with all his movies, Coogler’s role as a director began with him being involved in writing the script.
An extensive period of prep time was necessary for this Marvel blockbuster undertaking which involved far more scope, intricate scenes and visual effects than any of his prior work had.
This required input from multiple heads of departments. For this he brought together many of his prior collaborators who’d worked with him since Fruitvale Station, and some even since his student short films days. This included editor Michael P. Shawver, production designer Hannah Beachler, composer Ludwig Göransson and cinematographer Rachel Morrison.
The director and cinematographer had many discussions with Marvel’s VP of physical production and with Geoffrey Baumann, who oversaw a team of 16 different visual effects vendors that were working on the film.
Practically, this prep work involved doing things like creating a previs - a rough animated version of the entire cut of the film - and mapping out how they would cover a scene using a 3D printed scale model of a set for a casino scene they would be constructing.
One of the moves that they came up with for this fight scene was a shot where the camera transitioned between different characters on the set’s two floors by flying through the air. They rigged a Movi gimbal onto a cable rig, which lifted the camera to the second floor. From there, another operator could grab the camera off the line and begin operating it.
While they were working on building this set, Morrison drew up a detailed lighting plan which involved rigging multiple overhead 8x8 and 4x4 blanket lights from SourceMaker, using higher output LRX Scorpion tungsten units to backlight and then using Varilite VL1000s which could be remotely swivelled to hit specific spots with targeted light. All of these fixtures were effectively ‘built into’ the set and rigged to a DMX board so that the levels could be adjusted quickly on the day of shooting.
Coogler turned his attention to detail for each character by focusing on things such as their costumes, which in the Casino scene were designed to take on the Pan African flag colours of green, red and black.
Since seeing all the costumes, even in the backgrounds of shots, was a priority to the director, Morrison needed to shoot at a deeper stop. This meant that rather than shooting on a large format Alexa 65 camera, Morrison chose to shoot open gate on a smaller sensor Alexa XT - which would yield a slightly deeper focus than a large format camera, with the Panavision Primo spherical lenses set to a stop between T/2.8 and T/4.
Coogler shot Black Panther with its larger scope story that involved more actors, preparation, visual effects, action sequences, stunts, bigger set builds, and even larger technical camera, lighting and grips setups.
However, he maintained his fingerprints on the project by co-writing the screenplay, using real world research to provide a level of depth to each character, working with his same close knit pool of collaborators, creating a deliberate visual style which was true to the tone he wanted and carefully telling the story through a lens which is empathetic and does justice to his characters.

What A VT Operator Does On Set: Crew Breakdown
In this Crew Breakdown video, let’s take a look at the VT Operator and go over what their role is, what their average day on set looks like, and a couple tips that they use to be the best in their field.
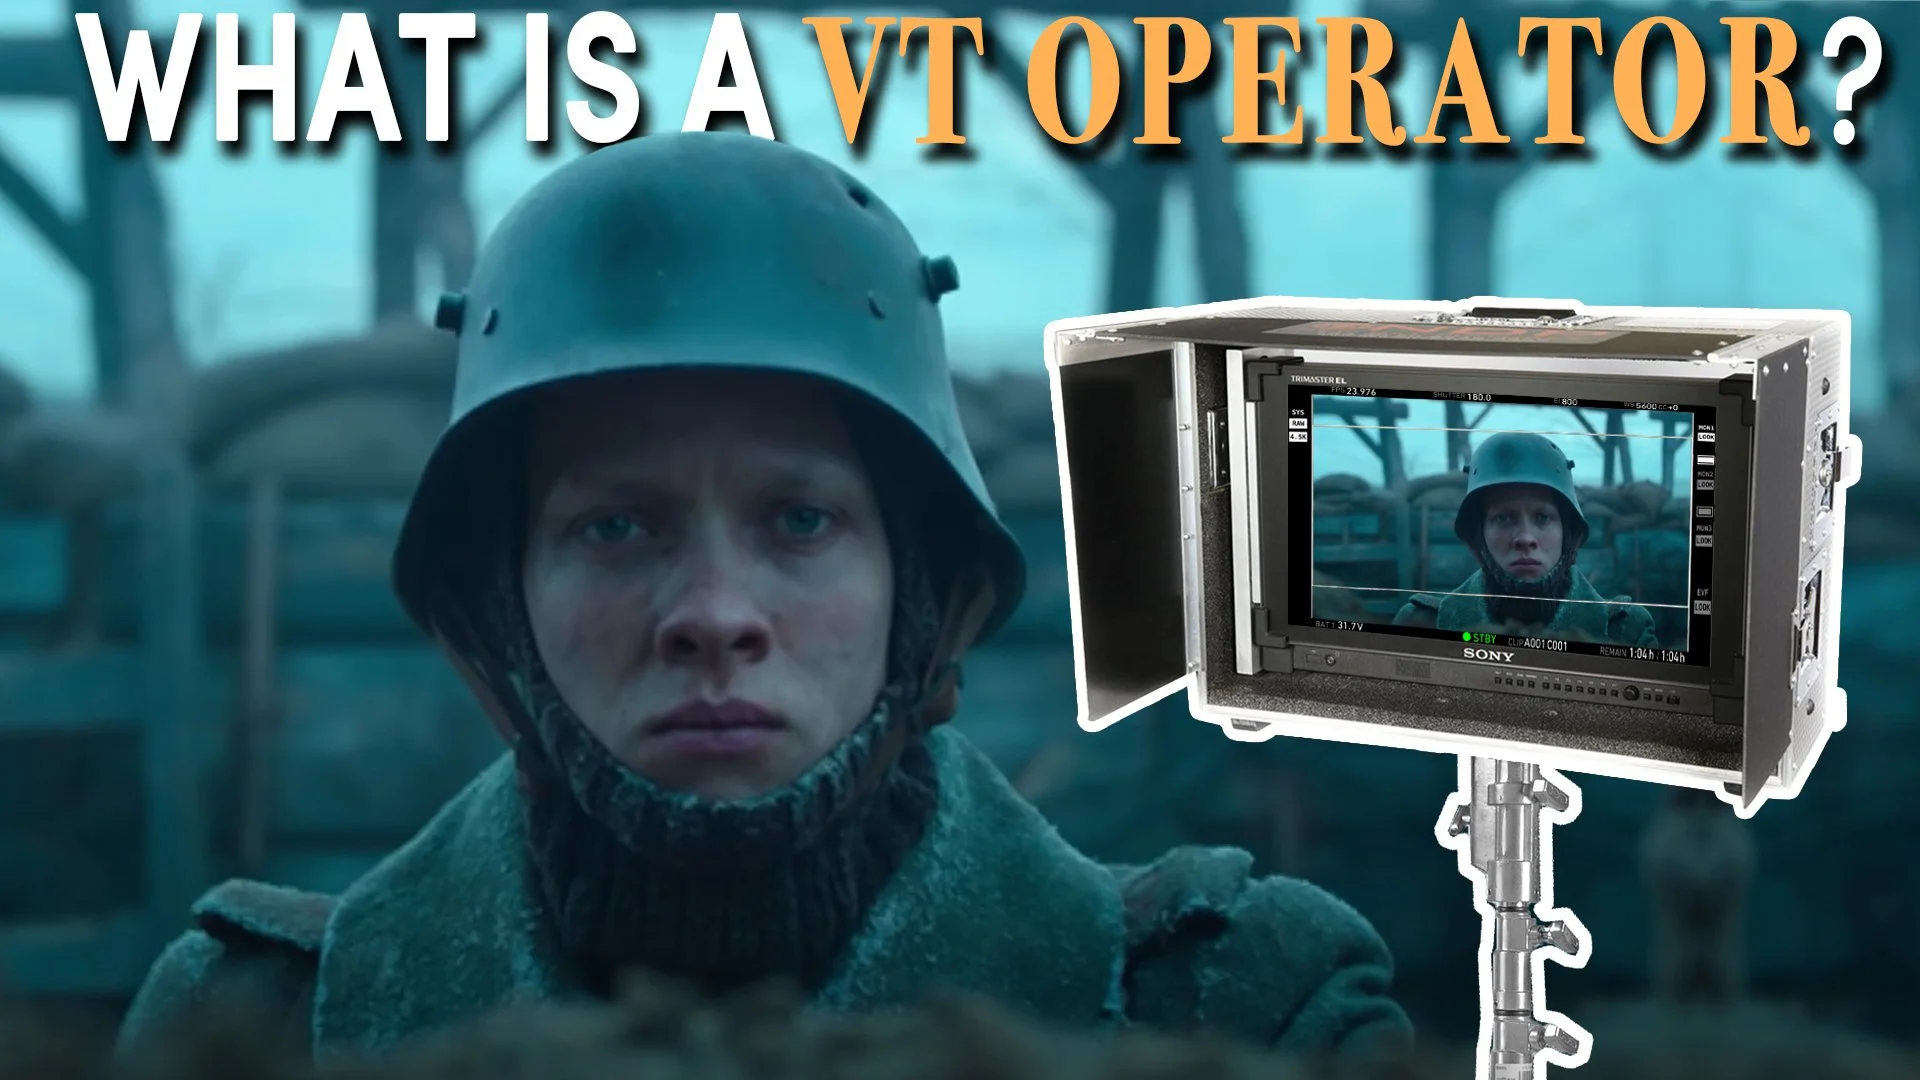
INTRODUCTION
The VT operator is one of the least talked about crew positions in film production, whether that’s on YouTube or the internet in general. They are responsible for orchestrating the live transmission and playback of video and sound via production monitors. It’s a role which is a necessity for any industry level commercial or feature film shoot and one that every technical film crew member should understand.
So I’ll use this video to try and fill in this information gap based on my observations from working as a crew member in the camera department by first unpacking the role of the VT operator, going over what an average day on set for them might look like and finally giving a couple tips which I picked up from watching experienced VT ops work.
ROLE
The process of shooting a movie involves capturing multiple takes of shots until the director is happy that they have a shot which will work in the edit. This means they need to be sure of both the technical aspects of the shot, such as the framing, camera movement and focus as well as the content of the shot such as the performances of the actors and the blocking.
Since getting the perfect shot can be a bit of an intricate dance, filmmakers need a tool which they can use to monitor these live takes and evaluate them. This is where VT comes in.
The video tape operator, also called video assist, playback operator, or VT, is responsible for setting up video monitors that have a live feed from the production camera or multiple cameras and then recording any takes that are done as a video file so that they can be played back after each take for the client, director or creative heads of departments to evaluate.
VT came about before digital cameras, when productions were shot on film. Since film needs to be developed at a laboratory before it can be viewed - which of course takes quite a while - film cameras couldn’t playback footage that had been shot on set.
Therefore, the solution was to record each take from a tiny, low res ‘video camera’ inside the film camera called a video tap. This signal from the video tap was recorded onto tape with a device such as a clamshell. This tape could then be fast forwarded or rewound and playback a low res video version of each take that the film camera recorded.
Since digital technology took over and footage is now recorded to cards rather than film, the role of the VT operator has evolved but is still based on the same principle of providing a live image on a monitor and being able to quickly playback video of takes.
There will usually be a few different monitors, reserved for different people on a film set.
This can be done by sending a video signal either through a wired connection to different monitors, or by using a wireless transmitter that can send a signal out to multiple receivers which are plugged into monitors.
The focus puller will usually get a feed directly from the camera with a sidekick receiver. The VT operator will then transmit or wire a feed to their station and run it through software on a computer such as QTake - which is the industry standard. They’ll then distribute this feed from the software to other monitors which may include what we call a video village - a tent with production monitors that display feeds from all the working cameras that are usually reserved for the creative agency, clients, the director and sometimes the producers.
Nowadays they’ll usually also be a wireless, portable director’s monitor on the set which is either put on a stand or can be handheld by the director as they move around and give direction to various departments and actors.
The cinematographer usually operates and exposes using a 5 or 7 inch monitor which is mounted directly onto the camera, but sometimes will request a feed to a specific colour calibrated monitor such as a Flanders Scientific screen that can be used to more accurately judge the exposure and colour of an image. Kind of like a modern light meter.
Although there’s a bit of an overlap between the 1st AC and the VT op when it comes to who is responsible for monitoring, usually the on camera monitor and the focus monitor feed is set up by the 1st AC, while the director’s feed and any other external monitoring lies with VT.
AVERAGE DAY ON SET
The kind of gear that VT needs to run will be determined beforehand depending on the kind of setups that are needed. For example, the gear for tracking vehicle scenes will be different to the kind of gear that is needed for a standard interior scene.
Therefore the first step is to plan for the kind of video transmission required, taking into account things like transmission range and how many monitors will be needed.
There are two, or actually now three, ways to send a video signal from a camera to an external monitor.
The first is what we call hardwiring. This is where a cable, usually an SDI cable, is plugged from a video out port on one side to a video in port on the monitor. The upside to this method is that the quality of the feed will usually be very solid. The only way to interrupt a hardwired feed is if the cable gets damaged.
The downside however is that if the camera needs to move then the cable will often get in the way and need to be wrangled by someone to avoid getting tangled up or becoming a tripping hazard.
The second method, wireless transmission, doesn’t require tethering the camera with the cable and is therefore the most popular. It involves attaching a transmitter, such as a Teradek, to the camera and plugging it into the camera’s SDI out port. This sends a live video signal of what the camera is recording through a wireless radio frequency to a receiver.
VT ops usually build their own custom mobile video trollies that they’ll mount the receiver to. This receiver will then get fed into some kind of a distribution converter or switcher that will get fed into a laptop or computer that runs macOS. This feed goes into the QTake software, where it can be controlled. This signal is then sent out of the video trolley through a hardwire, wifi or through transmission to a monitor.
The third, fairly new, way that video can now be transmitted is through a live stream using the internet. This was mainly done during Covid shoots and is now used for tracking vehicle work where the car will drive out of the range of the wireless transmitters.
With this technique, a video feed is sent to a modem with a SIM card and antennas which uploads the live video signal to the cloud and creates a streaming link. This live feed can then be viewed by anyone with access to the internet anywhere in the world - which is why it was used for remote shoots.
So, depending on the needs of the shoot the video assist will evaluate and provide a technical solution that aligns with the production’s budget.
Once they have a live video signal up and running to the required monitors they will wait until shooting begins. They will trigger video to record for both rehearsals and any takes that the camera rolls on. After the camera cuts, they will call out ‘playback’ and then loop the video footage of the last take that was shot on the monitors.
Using QTake software they will also label each take that is done. Giving it the same name as the scene, shot and take that is on the clapperboard. This is a way of archiving what has been shot and makes it easier to relocate previously shot takes - which is especially necessary when directors need to quickly track down a specific take from a scene that may have been shot weeks ago.
VT will also collaborate with the sound department to provide audio that is synced up with the video footage. If you’ve ever seen a photo of a director on set wearing headphones, they are for listening to a transmitted audio signal that is being captured by the sound recordist that is synced up to the video feed on the monitor.
TIPS
Earlier I mentioned that it’s commonplace for video assistants to label and archive each take. They may also take this one step further by marking specific takes. As they’ll usually sit near the director’s monitor if they hear the director make remarks about a take being good they’ll be sure to mark that specific take. The director may also directly ask VT to mark a take.
This often happens during the shooting of commercials, which involve a back and forth discussion between the director, the agency and the client - who need to approve each shot before the production moves on. So, if, say, the director thinks they got it on take four, they may ask VT to mark that take. If they have time they’ll then do a couple extra takes for safety. Then once they’ve got those extra takes in the bag the director will ask VT to loop the marked take on the client’s monitor and then go over to them to confirm that they are happy, approve that take and then the production can move on.
On some shoots, the video assist may be asked to perform a mix and overlay. This can be done using QTake software and involves overlaying video or images on top of a take. For example, some commercials may need to incorporate specific text or a company’s logo on a shot. VT can overlay and then position this logo so that the cinematographer and director can find a frame that compliments and accounts for this.
Or, there may be a series of planned match cuts that the director wants to do. VT can then find the shot that they want to match cut with, overlay it on top of the live feed and mix down the opacity of the other take. They can then position the frame for an optimal match cut.
Most software these days is able to auto trigger video to record. So when the cinema camera starts recording it will trigger the video device to record at the same moment and likewise it’ll cut when the cinema camera cuts. However, occasionally when working with some setups - such as some film cameras - the video may not auto trigger and it’ll be up to VT to manually start recording video once they hear the call of ‘roll camera’.

How Casey Neistat Changed Vlogging Forever
One reason that I, along with the rest of the online world, am drawn to Casey Neistat is because of the filmmaking in his videos. Although they may appear rough and handmade, if you look a bit closer you’ll quickly see that his films are backed up by an array of innovative filmmaking techniques that he uses to present stories as a creative, experienced documentary filmmaker.

INTRODUCTION
It may come as a bit of a surprise from a part time YouTuber, but I actually don’t watch many YouTube videos - well not now anyway. But there was a time when I was living in Japan around 2015 or 2016 where I’d watch every single release from one particular YouTuber every single day. Those videos were Casey Neistat’s daily vlogs.
There were a few reasons that I, along with the rest of the online world, were drawn to Casey Neistat. For one, he’s a super charismatic and entertaining person on camera with strong opinions. For another, the non-stop freneticism that is his life, and the amazing situations that he puts himself in, was incredible to see documented. This combined with an honest, pretty intimate view of his life and daily uploads created a super close ‘relationship’ with millions of online followers.
But there was something else that immediately drew me to his videos: the filmmaking. Although they may appear rough and handmade, if you look at his videos a bit closer you’ll quickly see that they are backed up by an array of innovative filmmaking techniques that he uses to present stories as a creative, experienced documentary filmmaker.
So let’s break down his approach, vlogging gear, some of the cinematic techniques that he uses and explain why they are the very backbone of what made Casey Neistat’s vlogs so groundbreaking.
STORY STORY STORY
You can have all the tricks in the book, but they mean nothing if they aren’t used to create some kind of narrative arc. So before we look at his specific filmmaking techniques let’s unpack how he constructs story in his films. Even his more freeform personal docs that document his day, still have a story arc to them.
He’ll sometimes start with a cold open, cut to a hint at what will happen, the setup, they’ll have him doing something, the content, and then he’ll wrap it up, the wrap up.
Within the broader story of a video they’ll also be these little mini arcs that follow the same formula.
This is the same introduction, body and conclusion structure that academic writers use, the same setup, action and climax formula that screenwriters use and the same way that oral storytellers present fables. It’s a formulae that for whatever reason resonates with humans.
Of course, as an experienced filmmaker he also mixes things up chronologically. But the way that he structures each day, video essay, or even long take interview using this kind of formula is foundational to creating structure out of the chaos that is life that acts as a hook that the audience can relate to.
He also uses titles, physical chapter markers, visual gimmicks (tape measure plane) and handmade stop motion animation to introduce locations, context or explain concepts that enforce the structure of the story - in the same way that documentary filmmakers do.
FILMMAKING TECHNIQUES
Although what Casey mainly does in his videos has been called vlogging, what his videos really are are personal documentaries. And, as with most personal documentaries, the content is prioritised over getting technically perfect shots. This means that some moments may be out of focus, over exposed, lit using the screen of a phone or include moments of him picking up a tripod.
Part of the appeal of his style is that he uses real filmmaking techniques but then deconstructs them a bit and leaves them rough around the edges, including moments of imperfection.
So, what are some of the practical cinematography and editing techniques that he uses to enhance his storytelling visually. One technique he uses a lot is the whip or swish pan.
For most of his techniques he shoots with the edit in mind. He quickly pans the camera off to the side to end a shot. Then in a later clip he’ll repeat this same movement as before and cut between these to get a seamless transition between locations.
If you break it down frame by frame you can see that he cuts the two shots so that the one ends and the next begins on a blurred movement. Because this happens so fast the eye isn’t quick enough to see exactly where the cut happens and two shots can be stitched together without it being noticeable.
This technique has been used quite often in cinema. Usually when filmmakers want a way to join two long shots together which need to be filmed in separate takes. For the smoothest transition possible it helps to make this cut during the most minimal frame possible such as a dark, blank wall - rather than a complex shot with actors.
Another editing technique he and a ton of other YouTubers use is the jump cut. This is where a cut is made that joins two shots which have the same, or similar, framing. Usually this means doing one take using a single clip and chopping out sections in the middle of it to exclude mistakes, fumbled lines of speech, or to just include the best bits of a take.
In more formal filmmaking this is usually avoided by shooting multiple angles and shot sizes of scenes and cutting between these different angles to smooth over any mistakes. However some movies, such as the French New Wave film Breathless, have also used this technique to deliberately break down the established forms of filmmaking. It renders a more ‘breaking the fourth wall’, ‘hand made’ feeling which fits the tone of Casey’s vlogs.
He also uses jump cuts to playfully push the story forward in time. By shooting a single take shot from a locked off, still perspective, he can move himself around into different parts of the frame and then in the edit, remove all of that excess footage and quickly cut between him in different positions. This makes him whimsically bounce around the frame and gives the feeling that time is passing.
Or he’ll sometimes combine this with a match cut where he uses an edit to transition between two frames that have similar compositional or subject traits - another technique found in cinema.
While he uses jump cuts to shorten and speed up his videos, he’s also done the exact opposite for certain videos to achieve a different effect. In some videos he has used long takes - where he lets an extended portion of a clip play without cutting. These tend to really suck the viewer into the moment and work well for heartfelt monologues - as long as those monologues don’t have any distractions or lapses in performance.
Like all of these techniques the long take has also been used in many films, often for moments where the filmmaker is trying to pull the audience into the world of the film and the performances on screen as much as possible without breaking the illusion with excessive cutting.
Another well worn technique he uses are timelapses. This is where footage is captured at a lower frame rate and then played back at a higher frame rate in editing software. This ramps up the motion of the footage, speeding it up.
This technique is often used by filmmakers as a visual mechanism to illustrate the passing of time. It’s particularly useful in vlogs because they often display a lot of action over a short period of time such as a day or even a few hours. Timelapses can be placed in between two shots to visually show the passing of time and that these two moments are not continuous.
Casey shoots his vlogs with a variety of different shots from a variety of perspectives. He shoots wide establishing shots, usually in the form of overhead aerial footage to establish the space that he is in. He shoots POV or point of view shots where he’ll point the camera in front of him to capture an image that mimics his perspective on what he is seeing.
Like in most documentaries he’ll grab observational footage of people, who sometimes engage with him behind the camera, or who sometimes appear natural and unaware of its presence.
He’ll also sometimes set up a frame on a tripod, record a bit of the environment and then enter the frame and start talking in an interview style. And of course he shoots the classic vlogging shot - a self portrait with a wide angle lens capturing himself as he talks directly to the audience through the camera - which he’ll handhold.
A large part of what photographically makes his vlogs so dynamic comes from the camera movement and framing. Casey is great at finding interesting angles and frames on the fly. He’ll mix the perspective between high and low angles or use framing devices such as this shot, where he places the camera inside a phone booth, to create a natural frame for himself while at the same time showcasing the dynamic environment of the background.
The camera moves largely come from him physically moving his body in different ways. Whether that be on his famous boosted board, a bicycle, surfboard, or just him walking.
Part of what makes the way in which he moves the camera so effective is because of the variety. Contrasting shots with fast motion, locked off shots, high angles, low angles, create a feeling that the story, through the cinematography and editing, is constantly getting propelled forward.
VLOGGING GEAR
So, how does he do this? Well, the answer is with quite a few different tools and cinematic toys. The cameras and gear that he’s used has changed quite a bit over the years but let’s go over the current setup he uses.
Most of his gear is, I guess, what you’d call consumer or prosumer because its relatively reasonable price points make it accessible to the general public. As I mentioned before, getting the shot is more important in his vlogs than ‘perfect cinematography’. Function rules.
He shoots aerials with a Mavic 2 Pro drone, that comes in a tiny form factor that fits in a backpack but which also resolves great images and puts it at the top of the consumer drone market.
He’s recently taken to shooting super fisheye POV and vlogging shots with the Insta360 X3 that he attaches to a pretty ridiculous selfie stick. And for most action or water sequences he uses a GoPro. At the moment the Hero 9.
So those are some of the more niche cameras that he uses. Now let’s take a look at his main vlogging camera setup.
For years he stayed in the Canon ecosystem, using the 6D as his main camera with either a 16-35mm or a 10-18mm wide angle zoom lens. However, he’s now moved to Sony and shoots his videos with a 4K workflow.
His main camera is the A7S III. It’s light, shoots in 4K, has slow mo capabilities, can shoot in super low light conditions, and importantly has a swivel screen so that he can see what he’s recording when he shoots in selfie mode. This is paired with his go to lens - the Sony 12-24mm f/2.8. A large part of his look comes from using super wide angle lenses up close, that distorts the edges of the frame a bit and maximises how much background we see in a shot.
Shooting at a wider focal length also minimises the amount of visible camera shake there will be when shooting handheld.
He attaches this setup to a GorillaPod, a lightweight, mold-able tripod which can act as a selfie stick and can also be quickly positioned in tight, small spaces as a tripod. He also carries a lightweight Manfrotto Element Traveller tripod, which is small, portable and can be used for higher elevation tripod shots.
Finally, he’ll mount a lightweight Rode VideoMic Pro+ shotgun mic on top of the camera to capture ambient sound or when he talks directly to-camera.
CONCLUSION
I guess the answer to the question ‘What makes Casey Neistat’s videos so groundbreaking?’ is that he effectively took a bunch of established filmmaking techniques and his own experience in documentary filmmaking and applied it to tell stories in a more deconstructed YouTube vlog format.
Although his videos appear super improvised, rough and chaotic - and to an extent they probably are - they are also carefully and thoughtfully shot, crafted and assembled with a high degree of filmmaking know-how - which wasn’t really the norm before Casey.
While a vlogger’s personality and the situations they put themselves in are of course a large part of the appeal, Casey’s vlogs changed the game by also applying a level of filmmaking that elevated the vlog genre as a whole.

Cinematography Style: Charlotte Bruus Christensen
Let’s look into Charlotte Bruus Christensen's philosophical approach to shooting movies and then take a look at some examples of the gear she uses to execute her cinematography.

INTRODUCTION
The visual language of cinema is to a large extent determined by the context of the story. Some moments need to be slow and creeping, some moments need to feel hot and pressured, while at other times it should feel organic and natural. Charlotte Bruus Christensen’s work can be characterised by an overall classically Hollywood, cinematic, filmic, widescreen look, mixed with naturalism, which then uses the context of the story as the basis for applying the correct psychological perspective.
In this video I’ll take a closer look at the Danish cinematographer’s work, by unpacking some of her philosophical thoughts on the medium and then go over some of the gear that she uses to physically bring stories to the big screen.
PHILOSOPHY
“It’s interesting how you hit those different genres. It adds to the way that you think about, you know, lighting a scene or moving the camera. I think it just gives you, a sort of, another way in technically and also style wise to how you approach a story. It gives you sort of a framework and then you think there are those rules but then you break them.”
From horror films like A Quiet Place to period dramas like The Banker and psychological mystery films like Girl On The Train, her photography has covered a range of different genres.When coming up with a look for a film she’ll use the visual associations with each genre as a kind of general jumping off point, but will then narrow down the look and sometimes go against expectations as things progress.
The process for preparing for each film shifts. For example when working on Fences, originally written as a play, with director Denzel Washington, a lot of the early focus went to working with the actors, and nailing down the feeling of how each scene would be performed using rehearsals. Whereas when working with a different director slash actor John Krasinski they would go over older films as references in the build up and then be much more flexible and reactive with how each scene was filmed once they arrived on set.
“For A Quiet Place, John Krasinski, the director and actor, both of us were like there’s something about Jaws. I know it’s not a sort of direct, like you may not spot that in there, but the ways they were sort of lining up a three shot and this while thing of in Jaws you don’t see the shark until very late. There’s things that inspired us. I think also it’s a very educational process that we all sort of constantly do. When you make a movie you educate yourself further and further and further.”
She uses these films and shots as references in a way that takes into account their tone, feeling and type of storytelling - rather than directly borrowing from their look. For example, using a classically slow, steady, reactive, quietly moving camera to build a feeling of tension in scenes. And then letting the horror come from how the performances are captured and how the actors react to the off screen threat.
This feeds into another cinematic technique that she uses, where a psychological approach to story is taken through the imagery. She tends to shoot scenes grounded in a similar widescreen, classical, filmic base look but then tweaks things like framing, camera movement and lighting depending on the idea or effect she’s after.
For example, the buildings and places in The Banker were almost as important to the story as the characters were. So to better present the spaces she shot many scenes from a lower angle with a steady frame that more fully displayed the height of the architecture in the background.
While a film like The Hunt, pulled more subtly from the Dogme 95 stylistic guidelines by shooting naturalistically on location and using a lot of handheld camera movement to present intimate, personal close ups of authentic performances.
So, although both these examples were bound by a similar warm, film-esque look with shallow depth, real locations and natural lighting - the subtle variations in her cinematic techniques differentiates how audiences may psychologically interpret these two films - while also maintaining her own perspective. She uses these little variations in different contexts to enhance the psychological feeling that she wants the audience to have.
“And then also a whole sort of psychological thing of how you make people nervous, you know. If they’re in court this thing of sort of shining light into their face and over expose them to make them feel so small and in the spotlight and sweaty and heat and all these sort of things you would do to make people break.”
These effects come from discussions with the director, combined with her own point of view on how they want the images to feel. To get the most out of collaborations with the director and to serve their vision, usually means helping get the best performances out of actors.
“The most important thing I think I really value and try very hard to create freedom for a director and the cast while also producing a cinematic image.”
This is a balance that most cinematographers have to tread between getting the best image that they can, while at the same time being flexible enough to compromise with the actors and people in front of the lens.
Sometimes this may mean changing a pre-planned lighting setup and adapting that on the fly when actors and directors come up with new ideas for blocking on the day. Or it may mean quickly having to re-frame to capture an actor that isn’t tied down to hitting a specific mark on the set.
More often than not this process takes the form of an organic back and forth discussion with the creative heads of departments. This is why it’s so important to be able to collaborate and compromise on a film set to best tie the ideas that are brought to the party into the best iteration of the story that’s possible.
GEAR
I mentioned earlier that most of Christensen’s cinematography has quite a consistent, warm, classical, filmic look to it. I’d pin this down to two gear selections which she regularly makes.
The first is her use of anamorphic lenses. Although she has shot in the Super 35 format with vintage spherical lenses like the Cooke Speed Panchros, the majority of her feature film work has used anamorphic lenses. Particularly the C-Series set of anamorphics from Panavision, which is sometimes supplemented by other more modern Panavision anamorphics like the T or G-Series.
These lenses create a native widescreen aspect ratio and render images with a natural smoothness and warmth to them that has long been seen as a trademark of traditional Hollywood cinematography.
The second fairly consistent gear selection she makes is to shoot on film. Of course this isn’t always possible from a production standpoint or necessarily the right creative choice for all films, but she has shot a large portion of her work photochemically on all the variations of Kodak Vision 3 colour negative film.
When she does shoot digitally she tends towards the more filmic sensor in Arri cameras, like the old Alexa Plus or the Mini. The choice to shoot photochemically is in part an aesthetic one, but it’s also one that is determined by the style of working that she’s after.
“The way you light the film, the way you work with film. You know, you’re on set. You look towards the scene. You don’t disappear into a video village and try things out. You look, you light, you use your light metre and you shoot. I think that for us there was a nice feel to that. And then, you know, obviously the very soft, cinematic look where we could really use the anamorphic lenses, you know, with the emulsion.”
Depending on the needs of each project or scene she’ll select different speed stocks. For the interior scenes on Fences she used the more sensitive 500T which allowed her to expose the darker skin tones of the actors at T/5.6 in the dim spaces while still having enough latitude to preserve the brighter information outside the windows without it blowing out. Whereas this interior scene from The Banker was shot on the less sensitive 50D stock. This finer grain film stock, along with her lighting, evoked the 1950s, Hitchcockian period look that she was after.
To enhance this look, she lit the actor with a hard light - an 18K HMI. The light beam was positioned and cut so that it hit the forehead and created a rim light highlight ping on the skin, which is reminiscent of older films from the period which used hard light sources in a similar way.
I think Chirstensen’s overall approach to lighting was influenced early on by her work on films by Dogme 95 directors like Thomas Vinterberg. This filmmaking movement came with various rules that included limiting the excessive use of artificial lighting.
Her lighting tends towards a naturalistic look, where the sources of the light, even when they are artificial, are motivated by real sources of ambient light. Therefore, coming back to those interior scenes from Fences, she spots the quality of the sunlight that is coming through the windows and supplements its direction and quality by using daylight balanced HMI units.
Then to balance out the look so that the actors do not appear too much in a shadowy silhouette she adds fill light using Arri Skypanels - which imitates and lifts the natural sunlight that comes from outside and bounces back, more softly, off the walls.
Most of her lighting uses this similar approach of supplementing the existing sources of light that are naturally present at the location, whether that’s in the form of sunlight, street lights at night, or artificial light from practical lamps inside a home. Just as she subtly tweaks her lighting in different ways that play to story, time period or some kind of motivated idea, the way in which she moves the camera is also an important feature of her work.
“If you’ve been busy with the camera, if it’s been handheld, or you’ve been running with the camera and you cut then to a still image then it’s like, ‘Oh my God. Something is going to happen.’ It was very minimalistic in a way. You move the camera a little bit or you cut from a running shot to still. These kind of very simple, minimalistic tools were very powerful.”
How the camera moves is often talked about, but what is discussed less often by cinematographers is the kind of movement that is present in two different shots which are cut next to each other. Something Christensen likes to think about is how to contrast two forms of camera movement - like a rapid dolly move to a slow creeping push on a dolly - for a more abrasive emotional effect. This contrast is especially effective when it’s set against the rest of the movie that is shot with subtle, slow, barely noticeable camera moves.
She uses a lot of these slow, steady, traditionally cinematic moves in her work which is done with a dolly and a track. Sometimes to get to lower angles she’ll ‘break the neck of the dolly’ and shoot from low mode.
Another consistent feature in her work is the use of a handheld camera. This is especially present in her early work with Dogme 95 directors, as shooting with a handheld camera was another of their aesthetic rules, but she’s also continued to use this technique, particularly for more intimate close ups, throughout various other movies shot in the US.
CONCLUSION
“I love going in and seeing the whole team and everything is going off. What you planned to do. And I come on set in the morning and go , ‘Really? Can I enter this and go in and say something?’ I always get excited about just the physics of the staff and the people and some mechanic that I love about this.”

The Pros And Cons Of Shallow Depth Of Field
Let's dive into what depth of field is, the factors and settings that can change it and then go over some of the pros for shooting with a shallow depth of field, as well as go over some of the reasons why shallow focus may actually be undesirable.
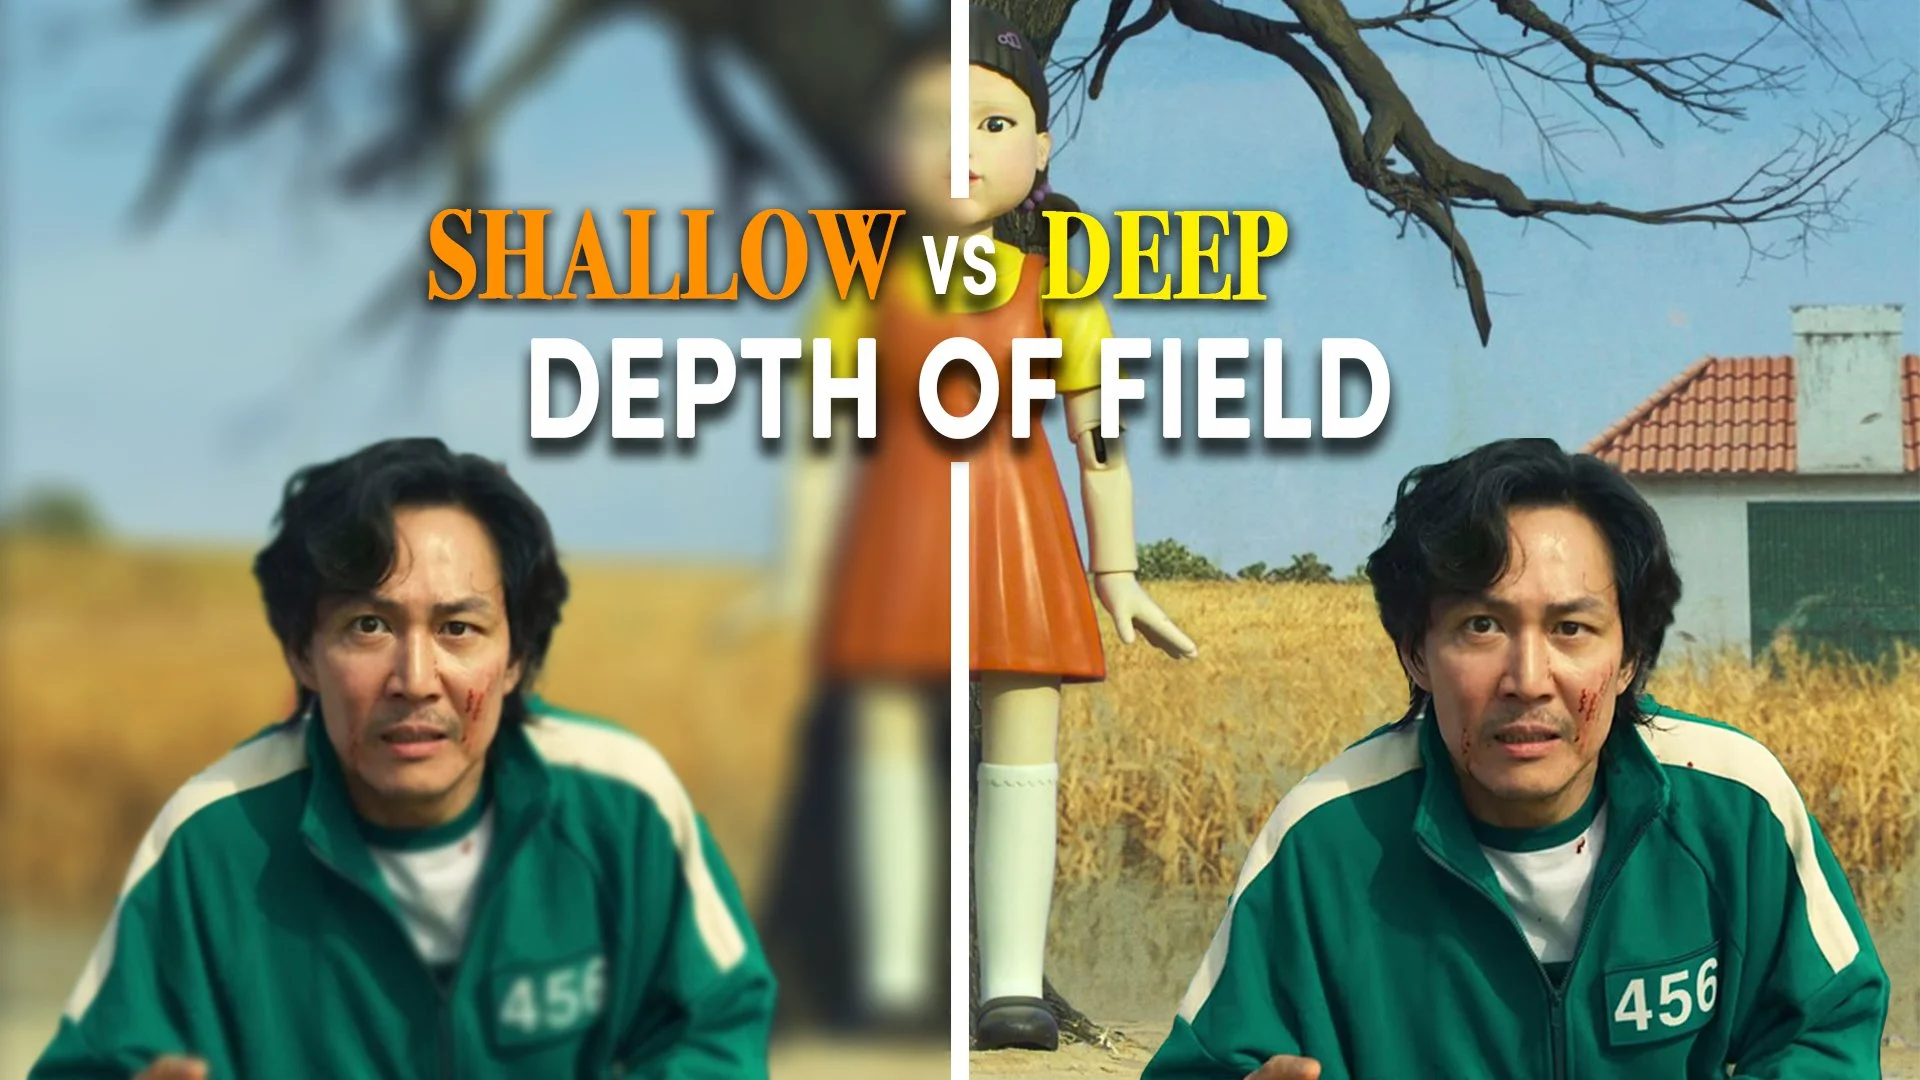
INTRODUCTION
Ever noticed how some shots in movies have a blurry background, while in others everything is pin sharp across the entire frame? This is due to the depth of field of an image and is more often than not a conscious choice that is made by filmmakers.
Shots with a super soft, out of focus background have what we call a shallow depth of field. While those that have large areas of the image in focus have a deep depth of field.
Let’s break this down a bit more as we dive into what depth of field actually is, the factors and settings that can change it, and then go over some of the pros for shooting with a shallow depth of field, as well as go over some of the reasons why shallow focus may actually be undesirable.
WHAT IS DEPTH OF FIELD?
Depth of field is a measurement of the distance between the nearest point that a lens renders in sharp focus and the furthest object that is sharp.
For example, one could shoot a close up shot of a character on a telephoto lens where the nearest point of focus are their eyes and the furthest point of focus are their ears. In this example, the distance between these two points, the depth of field, is a measly 3 inches. This is what we’d call shallow focus.
In another example, a camera may shoot a long shot on a wide angle lens where everything from the foreground to the horizon is in sharp focus. In this example the distance between those points is so far that we just call it infinity. This is what we call deep focus.
Based on those examples, we can establish that there are a few different variables that change how much depth of field an image has. In fact there are three variables: the focal length, the distance to the in-focus subject and the aperture of the lens.
Shots captured with a telephoto lens that has a long focal length - such as a 290mm zoom have a much shallower depth of field than shots that use a wide angle lens - such as an 18mm lens - which will create a deeper depth of field. So one way to create a background with more blur is to choose a longer focal length.
The second variable for depth of field is determined by where the focus distance is set. The nearer to the camera that the subject is and the tighter the shot, the shallower the depth of field will become. This explains why when you shoot an extreme wide shot that focuses on the horizon most of the frame will be sharp.
Finally, the third variable that filmmakers can use to change the depth of field is the aperture or stop of the lens. The wider open the iris on the back of a lens is, the lower its T-stop will be and the shallower the depth of field it will produce.
One reason why fast lenses such as T/1.3 cinema lenses are desirable are because cinematographers can shoot them wide open to create a background full of soft bokeh.
When a long focal length lens, a subject close to the camera and a fast aperture are all combined - much to the horror and disgust of the focus puller - the depth of field that a camera captures will be very shallow.
Inversely a wide focal length lens, a subject far away and a closed down stop will mean that the depth of field will be very deep and the focus puller can relax.
There’s also a fourth variable, the sensor size, which doesn’t directly affect the image's depth of field but does affect it indirectly. Shooting on cameras with a larger sensor size produces images that have a wider field of view. To compensate for this extra width, cinematographers will either shoot on longer focal length lenses to produce a comparable field of view, or are forced to physically move the camera closer to maintain a similar frame.
As we now know, those two actions, using a longer focal length and focusing on a subject closer to the camera will both make the depth of field shallower.
PROS OF SHALLOW DEPTH OF FIELD
The biggest cliche about images with a blurry background is that they look ‘cinematic’. The idea of a ‘cinematic’ shot can’t only be tied down to a specific image characteristic. I mean, obviously there have been plenty of gorgeously shot pieces of cinema that don’t use a shallow depth of field.
However, sometimes cliches have an inkling of truth to them. To understand the link between images with a shallow depth of field and cinema, we need to go back to the days before digital cinema cameras.
In the early days of video, most cameras had little sensors, wider lenses and slower apertures. While movies captured on 35mm film used a larger film plane, longer, faster lenses.
So the ability to capture images using a shallow depth of field was technologically limited to filmmakers that shot for the big screen, while deeper focus had associations with the less highly regarded video format.
Although this has now changed, with advances in digital technology making it easy for even entry level cameras or smartphones to simulate a shallow depth of field, I’d argue that there’s still an unconscious mental association that persists between a shallow depth of field and ‘cinematic’ movies in the mind of the audience.
With that out of the way, I’d say that the single greatest practical use of shooting with a shallow depth of field is because it allows filmmakers to control what they want the audience to see and ‘focus’ their attention to.
The smaller the depth of field, the less information in a frame will be in focus and the more power the focus puller has to show where the audience should direct their gaze.
It makes it possible to more easily isolate a certain character or detail in a frame. The more you isolate a character from the background, the more they stand out and become the central point of the story. A shallow depth of field therefore empowers filmmakers to visually tell stories from a more subjective viewpoint.
Depending on the context, a shallow depth of field can also be used for other, more creative, applications. Because a super shallow, drifting focus makes images feel dreamy, it can be used as a tool to chronologically differentiate certain scenes from others - such as using it as part of a different visual language for flashback scenes.
Shots that drift in and out of focus may also be used as a deliberate technique to emulate a less controlled environment and make certain sequences like action feel faster, more panicked and more dynamic.
From a purely technical point of view, shooting a lens wide open also lets in more light and makes it easier to achieve exposure in darker shooting environments. This also means that smaller lighting setups will be needed for scenes in darker spaces, like night exteriors - where shooting at a deep stop is rarely practically possible.
Another technical point is that cinematographers choose certain lenses over others because of their visual characteristics and how they render an image. The wider the aperture and the shallower the focus, the more pronounced these characteristics, such as their bokeh and focus falloff, become.
It’s almost seen as a bit of a waste to shoot a beautiful, vintage set of lenses at a deep stop. As you close down to around T/8 or T/11 most lenses will become increasingly sharp across the frame and will be more difficult to differentiate from each other. So for those who want to create a level of soft texture to the images, shooting at a faster stop is prefered.
CONS OF SHALLOW DEPTH OF FIELD
While shooting with a shallow depth of field is wildly popular in the film industry, there are also some reasons and situations where it may not be desirable.
I mentioned before that shallow focus can be used to tell stories by guiding the audience’s gaze towards a specific part of the frame, but inversely a deeper focus can also be used to tell a story in a different way.
Shooting a film with a deep stop, where more of the frame is in sharp focus, allows the audience to peruse the environment and pick out information from it themselves - rather than having those details spoon fed to them with shallow focus by a filmmaker. In this way a deeper focus presents stories in a way that is subtly more objective.
Another persuasive case for a deeper depth of field is that it allows you to see more of the set and environment that the character is in. I remember a focus puller that I used to work with who would voice his surprise, especially at younger DPs, who would always shoot every shot with the aperture wide open and make the background as blurry as possible.
Why travel all the way to a beautiful location, or spend loads of money constructing an incredible set, only for the audience to not see any of it because the background is so out of focus?
Deeper focus shots that see the location are a useful tool for the audience to place where exactly the character is in their minds.
Moving on to the practical side, and being fully transparent, that focus puller may have advocated for a deeper depth of field because it makes their job of keeping the subject sharp much easier. The shallower the depth of field is, the less margin for error focus pullers have to accurately pull focus and maintain a higher ratio of shots that are usable.
This is why if there is a particularly challenging focus pull, the DP may chat to the 1st and stop down the lens a couple of stops to help achieve more accurate focus. If you’re short on shooting time, sometimes it’s better to sacrifice a smidge of buttery smooth bokeh in order to maximise the number of takes that will have usable focus. Rather have four usable takes for the director to work with in the edit than one take that is in focus that has a shallower depth of field.
Another case where a deeper depth of field may be preferred is when shooting a two shot. As the name suggests this is a single shot with two people in the frame. Sometimes these two characters may be placed at different distances apart from the camera. When shooting with a shallow depth of field, this may mean that only one of the people can be rendered in sharp focus, because the depth of field doesn’t extend far enough to the second character.
A solution to this is to shoot with a deeper depth of field and get the focus puller to do what is called splitting the focus. This is where the lens is stopped down and focused to a distance in between the two characters - so that the depth of field extends nearer to get the first person in focus, and further to get the back person in focus at the same time.
Before I mentioned that shooting wide open accentuates the interesting optical qualities of the lenses, however, for certain films the look may be more suited to shaper images. The more that a lens is stopped down, the deeper the depth of field becomes and the crisper and more accurately resolved the image will be.
This is particularly useful when shooting with certain old, wide angle anamorphic lenses such as the Cooke Xtal Express set. The wide focal lengths in this set have a huge amount of focus falloff when shot wide open with the ‘sweet spot’ of the lens only rendering sharp focus in the very centre of the frame.
So to minimise actors looking soft on the edges of a shot and to sharpen up the lens to an acceptable level, some DPs prefer to shoot these lenses with a deeper focus at a stop such as T/5.6 or T/8.

How Virtual Studio Sets Are Changing The Way Movies Are Made
A recent advance in filmmaking technology is taking place in the field of film sets. This is being altered by improvements in LED wall technology combined with gaming engines. Let's take a look at how we’re quickly heading towards a point where the idea of shooting big budget shows and movies in real world locations is becoming less and less popular.

INTRODUCTION
Filmmaking is a creative discipline which is constantly changing and being driven forward by changes in technology.
Whether that’s the change from black and white film to colour, the introduction of anamorphic lenses that led to a widescreen aspect ratio, or the creation of digital cinema cameras and the advances in CGI and post production software which allowed filmmakers to artificially create shots that wouldn’t have been possible before.
Advances in technology have an undeniable influence on filmmaking.
One of those recent advances which I’ll look at in this video is the way in which the film set, the space in which a movie is physically shot, is being altered by improvements in LED wall technology combined with gaming engines. And how we’re quickly heading towards a point where the idea of shooting big budget shows and movies in real world locations is becoming less and less popular.
WHY NOT SHOOT IN REAL LOCATIONS?
If you’ve never been on a film set and don’t know much about how movies are made it may surprise you to find out that on many productions the environments that the characters are filmed in are not actually locations in the real world.
There are two types of filming environments that can be set up, real world places - which is called shooting on location - and fake environments that are artificially created to mimic a space - which is called shooting in a studio.
You may wonder what the point of shooting in a studio is when the real world has no end of beautiful, easily accessible locations. It boils down to a few reasons.
The first considerations are time and money. Even though it’s costly to rent studio space and build a set from scratch, sometimes this is still a cheaper option than shooting on a real location.
For example, some scripts may require multiple scenes shot in a diverse range of interiors. It may be cheaper and easier to build one tent set, one interrogation room set, one office set and one prison cell set next to each other in a studio which the crew can quickly bounce around between, rather than doing multiple hour location moves, or even inter-country moves, between each real world location.
Another more obvious reason to shoot on artificial sets is because it may be impossible, or at least very difficult, to access certain locations in real life. Trying to gain access to shoot in the Oval Office probably isn’t going to go very well.
Thirdly, shooting in a studio gives filmmakers a far higher degree of creative and practical control. When you set lights in a studio they will provide a consistent level of illumination for as long as necessary. When you’re in a real world location the sun will move throughout the day and the quality of the ambient light will constantly change.
When shooting outside in real locations it might rain, there may be clouds or there may be full sun. You’ll constantly have to adapt your plans and scheduling depending on weather forecasts and what kind of look you’re after. This isn’t isn’t an issue when shooting inside a soundstage where you can create your own permanent artificial sun.
Finally, shooting in a studio is sometimes necessary to achieve certain shots with specific gear. For example, doing a telescoping movement through an interior on a Technocrane, or getting a high bird’s eye view perspective, may only be possible in a studio where that gear can practically be brought into the space and where set walls can be moved around, or the set ceiling removed, to accommodate the gigantic rig.
HISTORY OF ‘VIRTUAL’ SET TECHNOLOGY
“Every step that we take in the film business is incremental. Digital didn’t just appear on the scene. It had been precursured with Genesis’ and DVs. It didn’t appear all of a sudden. It feels like it sometimes that the adoption of digital happened overnight. But it actually didn’t.” - Greig Fraser ACS, ASC, Cinematographer
When you compare movies from the 30s and 40s with contemporary films it’s much easier to see which sets are not real in the older films. This background is clearly not real, but what about this one? It may look like a real interior location but this background is actually created by a giant LED screen.
To better understand this cutting edge soundstage of the future it’s best to start at the beginning and go through a brief historical overview of quote unquote ‘virtual set backgrounds’.
One of the earliest ways of creating fake backgrounds in movies was with matte paintings or painted backdrops. This is where an artist was employed to physically paint a landscape or set background onto a sheet of glass. The painting would try to incorporate as much of an illusion of depth as they could using a 2-D surface.
Actors, foreground set design and props were then filmed and placed in front of these painted backdrops to trick the audience into thinking they were at a real location.
To save on the inflexibility, lack of photorealism and lack of camera movement, the next technological step forward used the same idea but replaced it with film projection.
Rear projection, as it was called, used a large screen surface with a film projector mounted behind it that could project photorealistic backgrounds that had been pre-filmed at a real location. This also meant that moving backgrounds could now be projected to give the illusion of motion.
Although this was later improved upon with front projection, it still didn’t always sell these backgrounds as 100% reality.
Moving forward in time to digital effects, the next technological breakthrough came from chroma key compositing. Again, this used a similar principle as before, but instead of painting or projecting a background image that could be captured in camera, this time a consistently coloured blue, or green screen backdrop was used.
Green and blue are the most commonly used background colours for chroma keying as they are uniform, distinct and differ significantly from the hues that are present in human skin and most other human environments.
Using software, this specific green or blue channel of colour can be keyed out and removed from the shot. A secondary shot can then be layered behind this foreground layer in post production, replacing the background with whatever footage they’d like and creating the illusion of depth.
Although this technique has been widely used to create artificial set backgrounds for years, it’s still not perfect. One of the main challenges of shooting with a chroma key is that it does not provide realistic lighting, like a real life ‘background’ in a shot would.
“Cause there’s always the problem.You know, you’re flying above a planet like Earth. If you do a barrel roll how do you suitably light that all around? You’re not going to do a real barrel roll. So trying to solve that problem led us to creative volume.” - Greig Fraser ACS, ASC, Cinematographer
LED VOLUME WALL
Creative volume, or volume lighting, is a way of describing the latest innovation in virtual background technology.
“The stage of the future is a series of lights on the walls. It’s walls that are made of light emitting devices.” - Greig Fraser ACS, ASC, Cinematographer
This is a gigantic LED wall, and sometimes also a ceiling, which can display and playback photo-realistic video or stills using Epic Games’ Unreal gaming engine - kind of like a massive TV. This system can also use camera positional data to change how the background moves. So when the camera moves, the background can move accordingly, creating parallax and an almost perfect visual illusion.
“There’s another shot on that same ice pathway on the ice planet where the camera was booming up. And in camera it’s perfect. There’s one long walkway disappearing. Obviously there was a practical walkway and then the digital wall. And so the digital walkway, as the camera’s booming up, had to change its relationship so that the perspective from the camera was the same.” - Barry Idoine, Cinematographer
This enables most shots to be done completely in camera without much post production tweaking necessary. This wall also solves the lack of interactive lighting problem that’s encountered when using a green or blue screen.
Greig Fraser used this system, which they called The Volume, to shoot large portions of The Mandalorian in studio. Having no green screen meant that there were no green light tinges to the set, or green reflections on the actors metallic suit.
The Volume is a 20 foot high, 270 degree wall with a circumference of 180 feet, complete with a ceiling. This newest iteration of the technology featured LED pixels which were only 2.84mm apart from each other - close enough for it to produce photorealistic backgrounds.
This allows crews to use the gaming engine to map 3D virtual sets as a background using the same technique as early matte paintings or rear projection but with the added bonus of creating realistic parallax movement that mimicked that of the camera movement, and interactive lighting that provided naturalistic shadows, illumination and reflections.
These backgrounds are created by using a series of digital photographs taken on a camera like a Canon 5D which can then be stitched together to create one stretched out background that covers the 270 degree wall.
To change between locations in different cities, or even different planets, the production design crew just needs to swap out the foreground art elements, like the floor and any props near the characters.
The correct background will then be set on the LED wall, any lighting tweaks will be adjusted, the actors called in, and then they’re good to go. This allowed them to be able to change between an average of two different locations in a shooting day.
“Instead of blue, green screen, we can now see the environments and actually see them as live comps. For all intensive purposes. We’ll actually be able to go inside a car on stage and for the actors and the photography to look like you’re actually driving.” - Lawrence Sher, ASC, Cinematographer
One of the big advantages of working like this is that cinematographers can use this LED screen to control the ‘weather’ however they want. If they want to shoot the same sunset for 12 hours at a time they can do so. If it needs to be cloudy, or sunny that can be accomplished by switching out the background and adjusting the light.
One limitation that shooting in this way still has is that the actors need to be about 15 to 20 feet away from the LED wall in order to create enough separation between the actors and background for the image to look realistic.
Apart from this one downside, this new technology of creative volume is a massive step forward in virtual set technology, which allows filmmakers a new degree of studio control and an ability for cinematographers to capture the images that they want in camera without leaving it up to post production.
Also remember this technology is still in its infancy. As it continues to get used on more shows in the future, such as the upcoming Netflix period production 1899, it will continue to improve, costs will slowly reduce and it will become more user friendly and faster for crews to work with.
We’re rapidly approaching the stage where filmmakers will be able to shoot scenes relatively easily in whatever photorealistic environments they imagine - without even needing a ton of post production manipulation.
As always technology pushes filmmaking forward, and will hopefully bring the industry back to the sweet spot of capturing films as much in camera as is possible.

Getting Kodak To Bring A Film Back From The Dead: Kodak Ektachrome
Now that the much beloved Kodak Ektachrome is back on the market after bring discontinued, let’s take a closer look at how exactly the film was resurrected, break down what makes Ektachrome different to other existing Kodak films, and look at how 35mm motion picture Ektachrome was brought back by special request to shoot the second season of Euphoria.

INTRODUCTION
It’s 2013. The digital camera has been introduced and you can now capture images with the click of a button. It soars in popularity while film sales plummet.
In a move to cut costs Kodak begins discontinuing its more niche films. Finally, all the variants of the legendary Kodak Ektachrome for both stills and motion picture got the chop. Cut to 2017.
“Kodak is proud to announce the return of announce the return of one of the most iconic film stocks of all time: Kodak Ektachrome.”
Now that the much beloved Kodak Ektachrome is back on the market, let’s take a closer look at how exactly the film was resurrected, break down what makes Ektachrome different to other existing Kodak films, and look at a film industry use case by going over why Ektachrome was used to shoot the second season of one of the most popular contemporary TV shows.
HOW EKTACHROME WAS RESURRECTED
Kodak started ceasing manufacturing Ektachrome 64T and Ektachrome 100 Plus in 2009. This was quickly followed by the rest of the line up until 2013 when all Ektachrome products were scrapped.
After seeing a bit of an uptick in the sales of film - especially in photography - Kodak made the move to bring the emulsion back. However it was no easy task. Manufacturing film on an industrial scale requires significant investment.
You can think of making a filmstock as being kind of like baking a cake. First you need to assemble all of the ingredients.
This is where Kodak hit the first snag. Because it had been discontinued from the market, it was difficult to find suppliers that would supply them with the necessary ingredients - or chemicals - to make it.
Ektachrome is a complex film that requires about 80 different chemical components. Eventually they managed to source or manufacture all the necessary ingredients and could begin producing and testing the new film.
This starts with using a cellulose triacetate base - a plasticy substance - which is then coated with multiple different layers of chemicals. These chemicals are mixed in different containers in the dark and applied to the support roll until it is coated. It is then cooled, dried and is ready for shooting where it will be exposed to light for the first time.
Initially Kodak rolled out the film so that it could be shot in 35mm by still photographers, in Super 8mm cartridges and in 16mm. However, 35mm motion picture Ektachrome wasn’t made available. Well, not yet anyway. But we’ll come to that later.
Once the Ektachrome film has been shot it can then be developed in an E-6 chemical process where the image emerges and is set so that it can be viewed and worked with under light.
This development process starts by passing the film through a chemical bath in the same way as colour negative film is in C-41 processing. But, because it is a reversal or slide film, it also has an extra step with a reversal developer that turns it into a positive.
But, you may wonder, what exactly is reversal film?
WHAT IS EKTACHROME
In a previous video I went over Kodak’s Vision 3 colour negative film, the most popular stock for motion pictures. When this film is shot and then developed it produces a negative where the colours and areas of highlights and shadows are inverted. This negative is scanned and then digitally converted to a positive image so that the image is flipped back to normal.
Kodak Ektachrome works differently. It’s a reversal film which is different to a negative film.
This means that when it is shot and developed in the E-6 process that I mentioned before it produces a positive image on the film. So the image can immediately be viewed by just projecting light through it and when it is scanned you get a positive image without needing to do any conversions.
If this is the case then why is negative film more commonly used than reversal film?
One reason is because reversal films have a much tinier dynamic range than negative stocks do. A modern colour negative stock like Kodak’s Vision 3 range is capable of capturing detail in an image with up to around 14 stops of dynamic range between the deepest shadow and the brightest highlight.
So it can see details in extremely dark shadowy areas metered at f/ 1.4 without going to pure black, while also maintaining details in super bright areas of the image up to f/ 180 without blowing out to pure white.
Ektachrome on the other hand has a far smaller dynamic range of about 4 or 5 stops. So if it is set to capture details in shadows at f/1.4, the highlights will start to blow out at only f/ 5.6.
This means that cinematographers need to be far more careful with exposure and that scenes need to be lit much flatter, with a small difference between the bright and dark parts of an image.
If you compare the sensitometric curves of Kodak 500T, a colour negative film, and Ektachrome, it shows that detail can be captured in far more stops of light for colour negative than for the reversal film.
Ok, enough technical talk. What kind of look does Ektachrome produce?
Firstly it is a high grain stock, so it has more texture and therefore less perceived resolution than Vision 3 stocks. I’d describe Ektachrome colour as ‘hyper real’. It basically captures colour with far greater vibrance, richness, contrast and saturation than real life. The shadows have a lot of blue in them and the blacks are very dense.
The highlights are quick to blow out to white but have a filmic roll off to them which is pleasing to the eye.
In a nutshell, reversal films are much more grainy, punchy, contrasty, vibrant and saturated than negative films - which makes the look more extreme and elevated.
These, along with its limited exposure range and slow speed of 100 ISO, make it more of a niche film, hence it’s prior discontinuation, however if you want that punchy, exaggerated colour then Ektachrome is hard to beat.
USE CASE
“In the second season we use Ektachrome, which I’m pretty excited about. We asked Kodak to manufacture 35mm Ektachrome which was I think discontinued in 2003 or something. And now they’re doing it again and it’s exciting. Sometimes we’re shooting, like, night exteriors on this stock which is a 100 ISO stock. It’s a little bit of a nightmare but when you get it back it’s rewarding.” - Marcell Rév, Cinematographer
Because of its niche usage, Ektachrome was only being manufactured for the smaller gauge Super 8mm and 16mm formats, as well as in 35mm for small still photography rolls.
The Euphoria creative team pushed to use the stock to capture large portions of season two of the show. After talking to Kodak and putting in a large order they were able to get them to manufacture Ektachrome 100D in 400 foot 35mm motion picture rolls.
There were two main reasons that they pushed to shoot on film. One, they originally wanted to shoot the entire show on film. And two, the switch from digital to film creatively reflected the visual evolution of the characters and the show through a desire to break out of realism and a move into presenting it in a larger than life way that echoed how the characters saw themselves as the star of their own movie.
The elevated colour, contrast and grain of Ektachrome was the perfect choice for this emotional expression of a more sensory experience.
“To be honest we always wanted to shoot it on film - the first season too. We were just not really allowed to. We’re changing a little bit of visual direction and I think film was a choice for season two.” - Marcell Rév, Cinematographer
After the success of the first season, HBO relented to their creative demands and allowed them to capture the second season photochemically.
Instead of processing the film with the recommended E-6 process that would render the film as a positive, Marcell Rév instead got the lab to cross process the reversal film so that it came back as a negative instead of a positive.
Deliberately messing with its intended processing meant that the colours were even more saturated and contrasty and that the negative came back with a green tint to it once it was scanned.
He then got his colourist Tom Poole at Company 3 to do very specific colour correction that removed the green tint, but maintained the strange, over saturated colour.
For some darker night scenes where he needed a more sensitive stock he also used Vision 3 500T negative film. He underexposed it and pushed it a stop to try and increase the grain and then got his colourist to grade it to closer match the Ektachrome footage. The reversal and negative footage didn’t exactly match, but they at least occupied a similar visual world.
The biggest challenge that he had to face by using two different film stocks was that they required two vastly different approaches to lighting. Due to the different dynamic ranges of the two films, that I mentioned earlier, the negative film could be lit with far more contrasty lighting conditions, while any scenes shot with Ektachrome had to be shot with lighting that was much flatter, with lots more fill light, in order to create a similar look.
They also required vastly different amounts of light. Getting exposure at 500 ISO needs far less light than getting exposure at 100 ISO.
So any night or interior scenes shot on Ektachrome meant that increased power generation and higher output light sources were required.
All of this work resulted in images which had strange colour casts, were grainy, amped up, saturated and pretty magical.
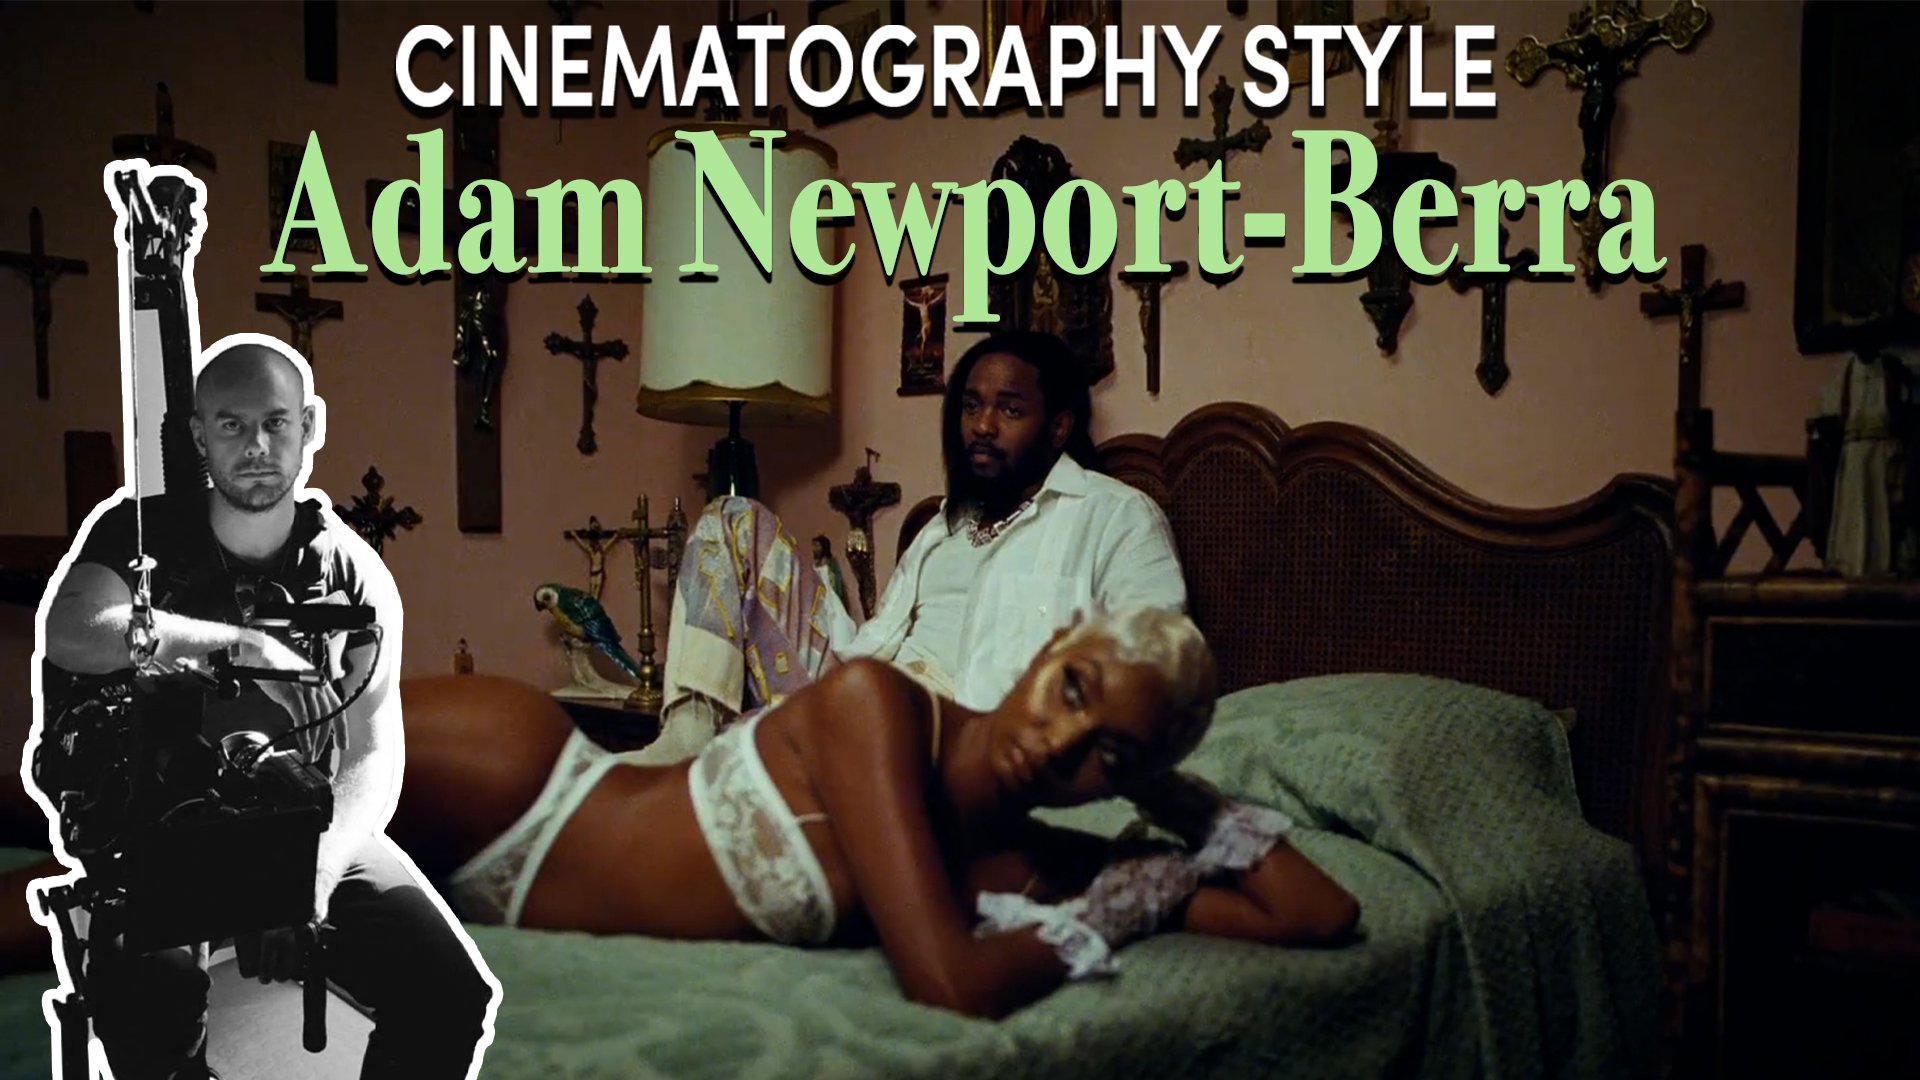
Cinematography Style: Adam Newport-Berra
In this episode I’ll dive into Adam Newport-Berra's philosophical approach to shooting movies and then take a look at some examples of the gear he uses to execute his photography.

INTRODUCTION
Adam Newport-Berra’s work as a cinematographer has been spread across every category of filmmaking: music videos, documentaries, narrative features, shorts, TV and commercials.
Although he changes his approach to photography depending on the tone that the director wants, there are some common threads across projects that he’s shot.
He leans heavily on prep work before he gets to set, he focuses on selecting crew with the right energy and he surrounds himself with like minded collaborators.
I’ll use this video to further unpack Adam Newport-Berra’s cinematography by going over some of his thoughts and philosophies behind creating images and then dive into some more practical examples and look at some of the gear setups he has used to pull them off.
PHILOSOPHY
“I think the most inspiring person, as far as people I look up to, is Robby Müller: Dutch cinematographer. How he was able to carry his sort of touch and his vision but make it fresh every time with every director. I want to be hired for my working style, the way I collaborate with the director, how I’m able to bring out their vision. And I think Robby was always able to do that.”
Adam Newport-Berrra’s cinematic journey began when he studied film at NYU. It was there that he started building relationships with his peers and shooting shorts. When it came to crewing up he often ended up behind the camera due to his prior experience and familiarity with cameras: which was informed by him shooting skating films with his friends when he was young.
As his career evolved and he moved into the HOD position of cinematographer on bigger budget projects, choosing crew and getting the most out of them became a priority. When employing someone, whether on a crew or in any business, the skills that they have are of course important.
However, when you get to hiring a certain level of personnel, you can begin to assume that all the applicants with enough experience will be competent at their job. But, something that he sees as equally, if not more, important is the energy and kind of personalities that they bring onto set.
“I had to spend a lot of time interviewing people and, you know, making calls and reference calls to figure out my crew. Because the energy of the crew is very important for me. Creating the right environment is just crucial. I expect everyone in my crew to have ideas. Down to the loader, the grip. Everybody. Like, everyone’s going to bring something to it. The more you arm them with ideas and your vision the more you set them up for success the more you’re going to get out of them.”
One way that he gets everyone on the same page is due to the prep work that he does before shooting begins. Early in the process, once he gets the script and is beginning discussions with the director he’ll compile a mood board or look book based on any ideas he comes up with.
This includes a compilation of visual references, such as frame grabs from films, or pictures from still photographers.
He uses this in the initial exploration phase to see what ideas resonate with the director.
“I try to take my first impressions from the script and just put together sort of a collage of images that come to mind. I’m pretty transparent with the director that this isn’t how I think they should shoot thir film, but rather the sort of things that bubble to the surface as I was reading. And it’s a great way to sort of take the temperature of a working relationship to see what they respond to.”
After feedback and discussions with the director they’ll start to get a better picture about the tone and look of the film that they’re after. They can then dive a bit deeper and go over specifics, such as what kind of lighting is nice, what framing works and which colour wardrobe is best for each scene.
As this gets more and more refined he’ll compile these ideas into a sort of ‘shooting bible’ complete with more specific notes, the sides and location stills or references. This ascribes a PDF page with each scene that they need to shoot. So if they’re shooting scene four, his crew can look at page four of the cinematography bible and see the ideas, technical notes and tone that he has in mind for the scene.
He uses this as a tool to catalogue specific ideas about scenes so that they don’t get lost, which can happen on a shoot that is weeks or even months long which constantly bounces around with a new scene from a different part of the script each day.
Although of course light can be artificially added and shaped with filmmaking tools, another important way that light can be controlled is by scheduling scenes that take place on location for specific times during the day when the natural light is best.
This is another part of his pre-production workflow and takes place before shooting begins.
On The Last Black Man In San Francisco he managed to get a key to the house they would be shooting in and did much of his pre-production work at a desk inside the space. As the sun moved outside the building he could observe the time of day where it cast the most interesting shadows and gave the most shape to the space.
He could then note the time and try to schedule the interiors so that they were shot within a specific time window.
In this way the preparation that he puts into discussions with directors, the formation of visual ideas and the more practical scheduling, before even having a camera in his hand, is a large, unseen part of his cinematography.
GEAR
As I mentioned, beautiful natural light can be achieved through careful scheduling, but a bigger part of his job is how he works with artificial, film light sources.
He often uses a lot of coloured lighting in his work which is tinted to colour temperatures other than just the standard 5,500K daylight and 3,200K tungsten light.
To get different hues he places gels in front of large fixtures, such as warm sodium vapour gels, and uses RGB LED lighting fixtures which allow a specific colour temperature and tint to be dialled in.
“I’m not technically that proficient with gels. I kind of just look at stuff and figure out what I like and then tell the gaffer that’s what I like and they remember it. I’m totally game for using LED RGB colour. It’s just difficult because I love the quality of fresnel lighting that comes from tungsten lights and I feel like LED lights aren’t quite to that quality level yet.”
A technique he has used is to create different colour pockets of light in different parts of the set. For example using some fixtures that are warmer and then keying through windows with something cooler. Having different areas with different colours creates more separation in the frame and a greater sense of dimensionality between different planes of the image.
He often uses practical lights that we see in the shot, like warm, tungsten lamps, or overhead off-green fluorescents.
An advantage of using RGB lights over gelling is that it allows you to change the colour of a light during a shot. For example if you watch We Cry Together you can clearly see the Skypanel LEDs that he bounces through the windows change their colour temperature from a cool blue at the beginning, to more of a warmer purple, into pink and finally into a warm orange.
I’d hazard a guess that he rigged all of these Skypanels to a DMX board that his gaffer could control remotely during the long take shot. I’d also hazard a guess that the motivation for shifting the colour of the lights during the shot is meant to mimic the shifting of emotions that happens between the characters during their argument.
Another show that he worked on that featured a combination of coloured lighting and cueing lighting effects was during the last two episodes on the first season of Euphoria.
“I was a bit intimidated and daunted by taking on such a huge production so late in the game. You know, by the time I came in they’d been shooting for like eight months. I wanted to bring my own vision and my own style and my own inspiration to it but I also had to honour what had already been done. I was worried that that was going to be difficult.”
This balance between bringing in new ideas and staying true to the established look is a challenge for DPs that are employed to shoot later episodes in a series.
Usually the cinematographer that is hired to shoot the pilot episode of a series, in collaboration with the director and showrunner, crafts the basis of the look for the season and the show. This cinematographer will establish how certain locations are lit, and once lit, they tend to stick to this lighting for the remainder of the series.
For example, Adam Newport-Berra shot the first episode of The Bear and established the camera zoom language, the use of practicals, different pockets of coloured lighting and the saturated, contrasty look that he’s known for. This remained in later episodes.
Coming back to Euphoria, he stuck to the lighting plans that had already been established in earlier episodes by Marcell Rev, but was allowed to light some newly introduced locations and advocated for using a mixed medium approach for certain scenes that were shot with 16mm film.
He’s shot on both 16mm and 35mm film and in different digital formats. He largely sticks to Arri cameras for digital capture, such as the Alexa Mini, the Alexa 65 and the Amira.
A lot of his work is done with spherical prime lenses that have a fairly clean look to them, such as the Master Primes. His selection of focal lengths is varied, but he has been known to use wide angle lenses for close ups of characters.
Going through his work, a consistent visual feature that I found that spanned a few different projects is his use of slow push ins with zoom lenses. This BTS photo shows him working with what looks to be an old Angenieux 10:1 25-250mm that is strapped up to a Microforce.
A Preston Micro Force is a zoom control device which is linked up to a motor - and works in a similar way as a wireless follow focus. It’s powered by a cable which is plugged into a battery port and another zoom cable links up to a motor that slots into the zoom gear on the lens. The Micro Force is rigged onto an arm on the head of a tripod with a bracket called an Oppenheimer.
This allows the operator to use the Micro Force as a handle to pan and tilt the camera, while also allowing them to trigger a zoom in or out button with their finger. How hard the button is pressed determines the speed at which the motor will zoom. The motor torque can also be adjusted to make the zoom faster or slower.
He uses this device often to smoothly push into or pull out of shots, particularly establishing shots or to pick out a detail in a wide frame by pushing in to it.
Another type of shot which he’s used in quite a few different projects is the long take, where the camera floats around either on a Steadicam, like in We Cry Together, handheld on the shoulder for the short film Run/On or presumably with some kind of tracking vehicle like a Russian Arm with the camera mounted on a stabilised remote head on Baby Keem’s music video.
CONCLUSION
“My advice to everyone I think is to just keep making things and not be too precious. That’s something that we all struggle with is this idea that, like, whatever we make has to be the perfect calling card for who we are and what we believe in and what we want to be making. I’m always unsatisfied with where I’m at. I always want to be at the next level. And you’ll find that any DP is going to feel that way. You just need to keep creating things and surround yourself with people that have similar values and beliefs as you and will push you to create things.”

Choosing The Right Aspect Ratio For Your Film
There are a host of different standardised aspect ratios out there that filmmakers have used. From the almost square 1.19:1 to the extreme widescreen 2.76:1. In this video I'll go over a few of the most popular aspect ratios used in cinema and unpack some of the rationals for shooting in different ratios.

INTRODUCTION
Although we’ve become accustomed to watching online video content, like this video, in a 16:9 format, films can actually be shot and presented in all kinds of different shapes and sizes: or aspect ratios.
These rectangular form factors usually have a horizontal width to them that better mimics the point of view of the human eye.
With all of these different aspect ratios to choose from you may wonder which of them is the best to shoot your next film in. So, in this video I’ll try to aid that decision by first going over some popular aspect ratios that are used in cinema and then explain why using different aspect ratios makes footage feel different by using a few creative examples from some popular films.
CINEMA ASPECT RATIOS
The dimensions of a 2-D video frame are measured in pixels, which can be simplified and factored down into a fraction. For example this video clip is made up of 1920 horizontal pixels and 800 vertical pixels. When we divide 1920 by 800. We get 2.4. Therefore we say that this widescreen frame has an aspect ratio of 2.40:1.
Throughout the history and development of cinema, certain aspect ratios emerged which became standardised choices for capturing and projecting an image. Cinema started before the age of digital editing software: where it’s easy to crop video to any ratio desired.
Back then, the aspect ratio was determined by how cameras captured images onto film. For example, early silent films used the full horizontal length between the perforations of a 35mm film negative, and used the horizontal space of 4 perforations. So each frame represents a picture that is 4 perforations long, also called a 4-perf pulldown. This gave a 4:3 or 1.33:1 aspect ratio.
Over the years, changes in camera technology created new aspect ratios. When sound was first introduced in cinema it had to be added as a thin strip on the negative and therefore cut into the horizontal space of the 1.33 frame, creating a squarer 1.19:1 aspect ratio.
This was later deemed by the public to be too square, so it was replaced by a wider, standardised 1.375:1 or what was called an Academy aspect ratio. This became the dominant aspect ratio for Hollywood films from the 40s and was popular until the introduction of widescreen.
Partly to address dwindling audience numbers and to differentiate the cinema experience from the 4:3 TV format, a more expansive 1.85:1 aspect ratio was introduced.
This was shot in the same way using 35mm film and spherical lenses, but this time the top and bottom of the image was effectively cropped until they arrived at a surface area that was closer to three perforations tall, rather than four.
To get an even more expansive, grander looking feel, required the creation of a new format that used a different kind of lens: anamorphic.
This format still covered the full width of the 35mm frame and used four perforations of height - but it captured this space on the negative using anamorphic lenses which stretched and distorted the image to cover the full frame.
This squeezed image could later be de-squeeezed until it got back to an image without distortion. De-squeezing it created more horizontal length and produced an aspect ratio of 2.39:1 which is commonly rounded up and called 2.40.
There are some slightly more niche aspect ratios like: 1.43:1 Imax, 1.66:1 , 2:1, and even the ultra wide 2.76:1 Ultra Panavision 70 ratio.
But far and above the two most common cinema aspect ratios today are 1.85:1 and 2.40:1. Most cinema releases that are digitally projected are done so using a DCP, which is basically a hard drive with the digital file on it. The two most common aspect ratios for a DCP are either scope - which has a 2:40 aspect ratio - or flat - at 1.85:1. So, getting to any niche aspect ratios requires cropping the video file within one of those two formats.
THE EFFECT OF DIFFERENT ASPECT RATIOS
Now that we know some of the available aspect ratios that can be used, it’s time to talk about what makes these formats different from each other. Like picking a lens and lighting a scene, the aspect ratios that filmmakers choose for their project is also a creative choice.
The reasons for this choice range from more concrete, practical reasons, to more difficult to define, emotional impulses. And, although there are nuances to choosing certain niche ratios over others, the decision of what aspect ratio to shoot in basically just boils down to a choice of how wide or how narrow you want the frame to be.
“My intent was to have the entire movie play in the gigantic 1:43 aspect ratio on a giant Imax screen. Compositionally I really started falling in love with that concept because Superheros as figures tend to be less horizontal. A lot of the work we’re doing is trying to restore the full frame.” - Zack Snyder, Director
One component to this choice are the historical ties that come with certain formats. In the same way that shooting with a handheld camera has ties to the documentary genre and therefore has ties to realism.
Generally, the narrower the aspect ratio is the more old world it feels and the wider it is the more modern it feels. This tie to period is a product of the history we discussed earlier where Hollywood silent films were shot in narrower ratios like 1.33:1.
So a movie like The Artist, uses 4:3 as a pretty obvious visual cue to mimic the aspect ratio of the time period of the silent movie format that the story tells.
“He was talking like this to say, what about doing a silent movie. I thought he was like maybe doing a silent movie in the modern way but he said, ‘I want to do a movie in the 20s: black and white and silent and square format.’” - Guillaume Schiffman, Cinematographer
Particular aspect ratios can also be chosen to represent footage taken with a particular recording device, whether in a mockumentary style with timecode and frameline overlays like in District 9 or to emulate the point of view of whoever is recording from a smartphone like in Searching.
Some filmmakers have used different aspect ratios within the same movie. For example The Grand Budapest Hotel delineated the three different time periods in the film by shooting them in different aspect ratios. The 1930s scenes were shot in the Academy aspect ratio, the 1960s scenes were shot in an anamorphic ratio and the 1980s scenes used a widescreen ratio.
Other directors, like Christopher Nolan, have used different aspect ratios in their films because they like to use the native aspect ratios of whatever format they are using without cropping it to conform to a common ratio. Dunkirk cuts between some scenes that are shot in the taller Imax format and others shot in the longer 35mm anamorphic format.
From these kinds of more overt rationale for shooting in a specific aspect ratio, we can also choose a frame size in order to exploit its cinematic advantages.
Extremely wide aspect ratios like 2.40 or even 2.76 contain more lateral space. It makes them a better format to layer information within a shot. Multiple planes can be used when framing, to include characters and story elements in the foreground, middle ground and background.
“When you’re in Mini’s there are always two plays going on simultaneously. There’s the foreground play where the actors are closer to the lens and to the camera and they’re doing their things. But there’s always a background situation and the audience really has to keep track of the foreground play and the background play.” - Quentin Tarantino, Director
Because a wider screen ratio is able to see more background information it’s better at contextualising the geography of the space in a location. The extra width also lends itself to landscapes and expansive, epic sets to show off the grandeur of the location by expanding it.
For this reason it’s popularly used to capture big budget epics, with large set pieces with lots of moving parts that requires a certain photographic width to include them.
On the other end, narrower aspect ratios are better for films that deliberately want to withhold context, or frame single characters from a subjective point of view. Son of Saul did this by framing with a narrow 1.33 frame that was glued to the protagonist.
How wide a frame is can also influence the emotions that audiences ascribe to the image. Super wide frame shots of desserts can make them seem vast and unending, while a tight shot of a character in an almost square frame can make a space feel psychologically much more contained and cut off.
“Obviously it’s unusual to have something in this day and age to have something in this aspect ratio. I mean, a confined space obviously felt like 1.33 so that’s what we’re gonna do. I don’t know where I even first heard of 1.19 but I heard about it and was like, maybe this is one opportunity where we can do this…It’s somewhere between 1.33 and 8x10 photography.” - Jarin Blaschke, Cinematographer
CONCLUSION
Ultimately, choosing an aspect ratio is entirely dependent on the context of the film. Different ratios can be used to invoke historical ties, present a specific recording point of view, differentiate between timelines, be used to accentuate certain cinematic advantages or even create a kind of emotional impact.
Above all, whatever aspect ratio you choose, make sure that the choice is a considered one that leverages this element of filmmaking to further the telling of your story.