How To Shoot A Studio Interview

INTRODUCTION
Interviews are the bread and butter of documentaries. With the rise in popularity of this format across streaming services, commercial content and corporate videos - it’s a technique which should be in every filmmaker’s toolbox.
From framing, to camera settings and lighting, I’m going to show you how exactly you can film a professional, cinematic interview.
To do this I’ve rented a studio where I can set up a portrait style interview against a backdrop. Although I’ve opted for a controlled environment, the principles from this video can also be used as a template for filming interviews in any space.

CAMERA SETUP
Before I start setting up lights I first like to prep the camera so that I can find a frame of the interview subject sitting in a chair. Positioning the equipment after you’ve composed the shot means that you won’t have to adjust or move around gear that’s suddenly in the frame.
For this shoot I’ve used a very simple mirrorless camera and single zoom lens setup - with a Sony A7s III and a 24-70mm f/2.8. Let’s pop the lens on and dial in our camera settings.

I like shooting almost everything in log, even quick interviews which won’t be graded by a professional colourist, as it’s easy to pop a quick LUT on the footage in post, and if small exposure or colour adjustments need to be made then filming in log gives you more flexibility to do that.
So I'll record at a 4K resolution in Slog3. In post software I’ve added a Kodak LUT from Da Vinci Resolve and haven’t done any advanced colour grading beyond that.
Next I’ll dial in the basic exposure and motion settings which will remain consistent throughout the interview. Since I work in a PAL zone I’ll be filming with recorded sync sound at 25FPS, but those in NTSC areas may want to record at 24FPS.
We’ll set our shutter speed to double our frame rate, so 1/50, our white balance to 5,600K or daylight, and open our lens’ aperture to its widest stop of f/2.8.

I’ll then throw a variable ND filter on the front, which will allow us to quickly adjust our exposure without needing to change any of the settings we’ve already dialed in.
FRAMING
Now it’s time to find a frame. Our zoom lens will give us the ability to either punch in tighter or zoom wider depending on the emotional context of the questioning. For example, I can start with a medium shot for introductory questions, then later zoom in to a close up to build more of a connection with the interviewee as the conversation progresses.
These different shot sizes give the editor more options in post and can be achieved by the zoom lens without needing to move the camera or interrupt the flow of the interview.

Before I place the tripod I’ll set up a chair where the subject will be seated and place our paper roll backdrop on two c-stands and position it behind the chair.
I’ll start by zooming the lens out to 24mm and then slowly zooming in until the frame is filled with the backdrop - which gives me a medium interview shot with a focal length of around 40mm.
For this tutorial I’ve gone for quite a basic, traditional framing, shooting at a slight angle on the side opposite to where I’ll place the key light.However, you can use your creative license when framing to compose shots of different widths, heights and angles.
The eyeline of our subject will be on the opposite side to the camera placement. This will be where our interviewer will sit. If you’re filming interviews with a two camera setup then I’d recommend placing the interviewer outside the two cameras. Placing the eyeline in between the two cameras will result in strange spatial continuity.

With our medium frame set I’ll then zoom all the way into 70mm and find a tight frame. I could punch into this focal length if there’s a more emotionally elevated moment.
If I wanted to break the fourth wall a bit by including some of our lighting and film gear in shot, perhaps as an introductory moment when they sit down - I can do so by zooming out to a 24mm.
Now that I have my widest and tightest shot dialed in, I’ll zoom back out to the 40mm medium shot, lock off the frame and begin setting up lights, using this composition as an edge for where equipment can be placed.
POSITIONING LIGHTS
Before arriving at the studio, I put together a lighting diagram - which gives an overhead view of where I want to place the subject, background, camera and lights. Having a plan before you arrive on set will save you set up time and will make sure you don’t select or rent too little or too much gear.

For this studio style setup, I’ve gone with a basic three point lighting plan for the interview subject, then I’ve planned to also use an additional light to illuminate our paper backdrop which will be behind the subject set up on two c-stands.
I’ll start by setting up our key lamp: a Nanlite 240C, which is a 2x2 panel light. To this I’d added a softbox with a layer of diffusion and an eggcrate - to soften and angle the source.
I like to place the key on the side of the subject opposite to where the camera is positioned, this is so that there will be a bit more contrast and shadow on the side of the face nearest to the camera, which will make the footage a little less flat.
I’ve positioned the lamp outside of our widest 40mm frame, at roughly 45 degrees on the right side of the subject, lifted it higher than their seated position on the c-stand and angled the lamp down a bit.
Next, we’ll place our fill, a 2x1 120C, with the same diffusion and eggcrate setup. This will be placed out of frame at around 45 degrees to the subject on the same side as the camera - which is opposite our key light.
The last of our three point lights is a backlight - one of Nanlite’s new FC-120C COB sources. I’ll place this behind the subject, opposite the key side and set it up on a c-stand arm that I can boom outwards. This will allow me to hit the subject a bit more back on, while still placing the stand and lamp outside the edge of the frame. I’ve added a diffusion dome to the reflector to soften and spread the backlight.
Now that our three subject lights are set up, I’ll add our background light - another 120C, however this time with a projector attachment - which will give us some cool effects which we’ll get to later. I’ve set this up so that it’s off centre and aimed directly at the middle of our backdrop.
BALANCING LEVELS
I’d say there are two main reasons that studios are often favoured for interviews: firstly, studios are better for recording clean sound, and secondly, with their lack of windows and natural ambience, they make it easy to control the light and exposure for long periods of time using only artificial lamps.
We’ll do this now by balancing levels. This is another way of saying I’ll dim up or down on each of the lamps until I find an intensity which feels appropriate to the look we’re after, is not too bright and blowing out, nor too dim and underexposed.
I like to do this by linking all the lights to an app on my phone, in this case the Nanlink app. I can monitor the brightness of the exposure behind the camera by watching the screen, as I use the app to bring up and find the right level for each light. I find this much quicker and more accurate than manual dimming.
KEY LIGHT

In the same order I positioned the lamps, I’ll start by turning on the key light. This should be the brightest source which provides the strongest illumination across one side of our subject’s face.
I’ve dimmed up on our key to 56% which is nice and bright, without clipping the highlights or being overexposed. If I’m working with a cinema camera which has false colour I’d probably set our key intensity so that the skin is green or in the middle grey reading, but since I’m using a mirrorless camera without exposure tools I’m kind of eyeing the exposure and making sure it doesn’t clip nor blow out on the zebras.
To make sure the skin tone feels correct, I’ll also set the light to 5,600K so that it matches the colour balance on the camera.
FILL LIGHT

Now it’s time to set our fill. The intensity of our fill will determine how much contrast the face will have. If we’re after a brighter, high key look without any shadows we can dim this all the way up until it roughly matches the strength of our key.
Or, if we want a low key vibe with more shadow on one side of the face, we can dim this fill way down, or even turn it off.

I’ll go for a middle ground so that we have a little contrast without getting too moody, which landed us at 17%. I’ve also set it to 5,600K to match our key.
BACKLIGHT

Now let’s move to our backlight - an FC-120C with a diffusion dome. I’ll set this to a 4,000K white balance to provide a backlight that is subtly warmer than the key. If you turn it off and on you can see it subtly gives our subject a hair light, separates her from the background and lifts the overall ambience.
BACKGROUND LIGHT

Finally we’ll illuminate our backdrop. These lights come with a FM mount that allows you to use multiple different modifiers on them, whether those be softboxes, or, in this case, a projector mount.
I’ve decided to use this projector attachment to create a textured lighting effect on the background. I’ve chosen a circular gobo disk with a pattern which I think will work well, slotted it into the projector modifier, flagged the sides to give it a different shape and then adjusted the lens to defocus the effect. You can use this to either have these effects fully sharp, or blurry and less defined. Like our other sources I’ve cooled the light down to 5,600K.
Since I want the light effect to be a bit larger on the backdrop I’ve moved the light further away. Bringing it closer to a surface will make the effect smaller, while creating more distance will enlarge the source.
The light in the background of your interview is just as important as how your subject is lit and has a large effect on the mood of the shot.
I find this texture quite a bit more visually interesting, as it has a bit more contrast between light and dark shades.
However, if I wanted a clean background that was illuminated a bit brighter with a high key look, like you’d see in a beauty commercial, I could swap the projector attachment for a softbox and get a soft spread of light on the backdrop. This is also a great trick for creating even illumination if you’re lighting a green or blue screen background which will later be keyed and replaced in post.

Higher key look where the background is lit by a softbox.
Or, if I wanted to go for a lower key studio look, which you’d see in a show such as Drive To Survive, then I can turn the background light off altogether.

Lower key look where the background light is turned off.
SOUND
Now that we’re happy with our camera and lighting setup, it’s time to bring in our audio equipment. If I’m recording the sound, I like to position the boom mic just above the subject on a c-stand arm. That way it doesn’t have to be held for the whole interview.
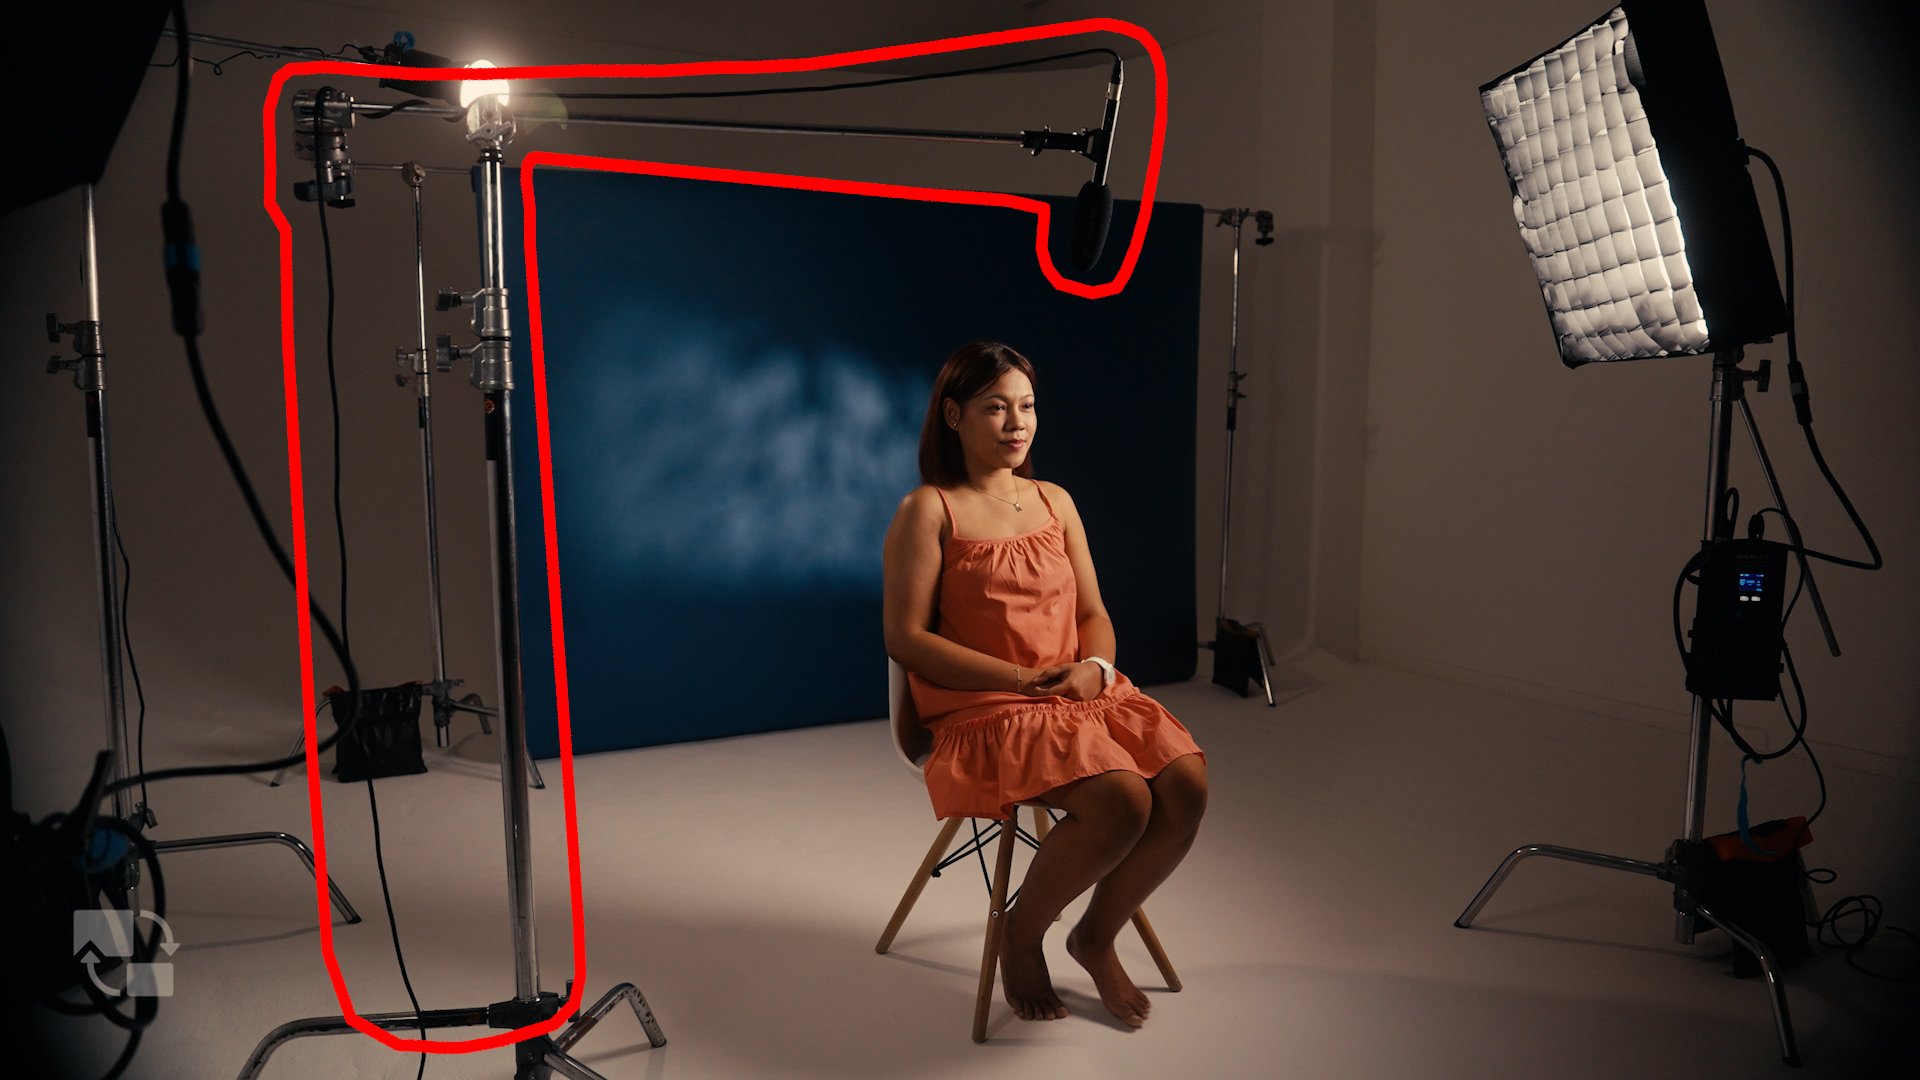
A lapel microphone will also be worn by the interviewee so that there are two audio tracks that can be used in the sound mix. In case there are any mic bumps or other unwanted sound recorded, there will always be a backup mic in place.
The reason I position the boom microphone last is because now that we know where all our lights are set we can avoid casting the shadow of the microphone in the shot.
Since I’m slightly hearing the sound of the fans that are used to keep the lights cool, I’m going to go into the menu and set the fan mode to low to record nice, clean audio.
Here I’ve plugged the sound into a zoom recorder where the levels can be mixed. It’s also possible to plug the sound into an audio jack or XLR input on the camera. If there’s a sound recordist then they should have their own mixer that they’ll record to.
CONCLUSION
There you have it - the essential tools and techniques for shooting studio style interviews - from camera, to lighting, to sound. This method, just scratches the surface of what is possible but hopefully acts as a great starting off point when you’re planning your next interview.